Viewing entries in
PowerShell

PowerShell: Calculating Standard Deviation

PowerShell: Calculating Standard Deviation

Calculating Standard Deviation

What a weekend! It's the tail end of a Sunday here, but it feels like several days have gone by. It all started with Friday night when my apartment building caught on fire. Apparently someone here didn't think it was a good idea to clear out lint from the dryer. Even though I live several stories under said person, I will have to vacate my apartment on Monday due to water damage from the sprinklers. 

With all this going on, I figured why not write some PowerShell! My girlfriend has been asking me to write a script/function to help her out with calculating standard deviation in a quick fashion (preferably 10 key input). So here we are.

In this post you'll find

Math

I'm not the best at math, I'll admit that up front. My girlfriend is good at it, so she helped me with the math and I filled in the PowerShell gaps. What you see is the outcome from both endeavors.

Script Explanation

I used a few different things in PowerShell to complete this task.

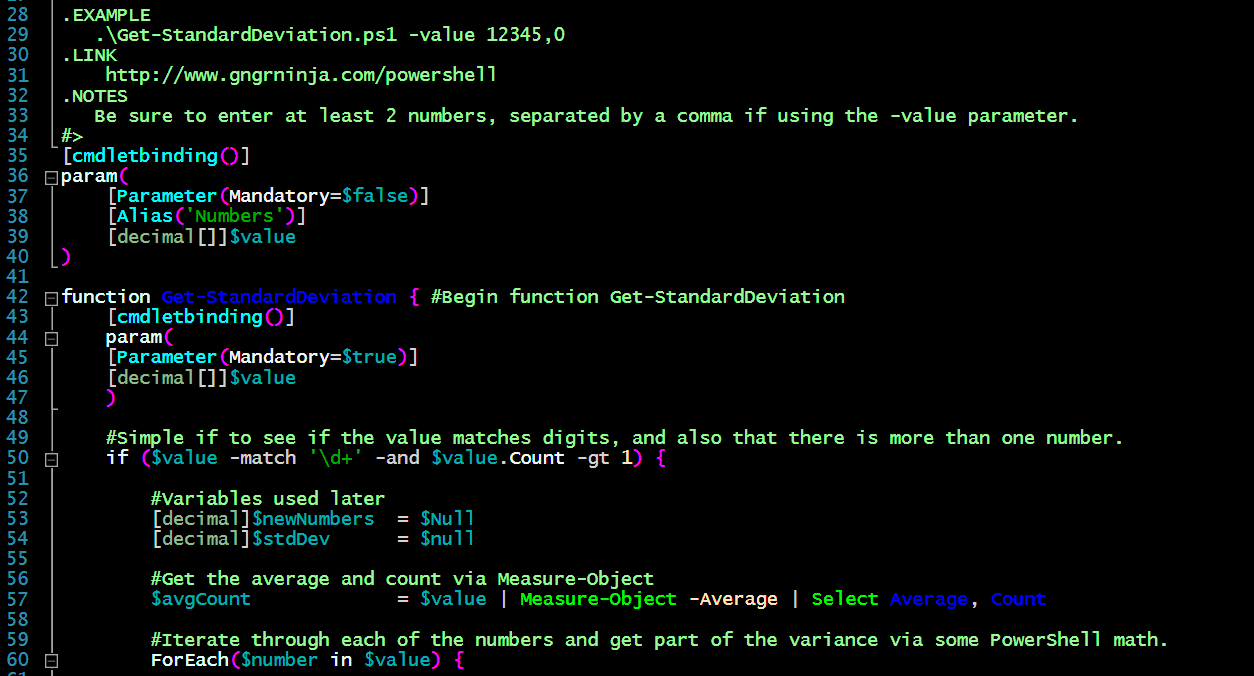
I declared a [decimal[]] array in order to get decimal values and ensure numbers are entered.

param(
[Parameter(Mandatory=$true)]
[decimal[]]$value
)

To get some simple error checking, I used an if statement to see if it indeed matches a digit (probably overkill since I used [decimal[]]), but also to ensure the count was greater than 1.

if ($value -match '\d+' -and $value.Count -gt 1) {

I then declare $avgCount, and use Measure-Object to get the average, and select the Average and Count properties. 

$avgCount = $value | Measure-Object -Average | Select Average, Count

After that I use a ForEach loop to iterate through all the number and do some math!

ForEach($number in $value) {

$newNumbers += [Math]::Pow(($number - $avgCount.Average), 2)

}

The above code takes each number in the array, get the number minus the average to the power of 2, and then adds it to the variable $newNumbers.

I then finish the calculation and store it in the variable $stdDev.

$stdDev = [math]::Sqrt($($newNumbers / ($avgCount.Count - 1)))

Once I had this information, I created an array and object. I added properties to it so I could show the original numbers used, the result, and the result rounded to different decimal places.

I then return that object array with sorting applied and formatted as a list.

[System.Collections.ArrayList]$formattedObjectArray = @()
$formattedProperty= @{'Standard Deviation' = $stdDev}
$formattedProperty += @{'Rounded Number (2 decimal)' = [Math]::Round($stdDev,2)}
$formattedProperty += @{'Rounded Number (3 decimal)' = [Math]::Round($stdDev,3)}
$formattedProperty += @{'Original Numbers' = $($value -join ",")}

#Create the object we'll add to the array, with the properties set above
$fpO = New-Object psobject -Property $formattedProperty

#Add that object to this array
$formattedObjectArray.Add($fpO) | Out-Null

#Return the array object with the selected objects defined, as well as formatting.
Return $formattedObjectArray | Select-Object 'Original Numbers','Standard Deviation','Rounded Number (2 decimal)','Rounded Number (3 decimal)' | Format-List

To be sure this can be used a standalone function, or as script, I declared the value parameter twice. Once was at the top of the script, and the second time in the function. So this could be used as a script, I added this if statement at the bottom:

if ($value) { Get-StandardDeviation -value $value } Else { Get-StandardDeviation }

This ensures that if there is a value from the script being run with the arguments given to the value parameter, it will pass that along to the function. If not, it will simply run the function which will ask for the values. Another way to write this would have been to ask for the value and have it mandatory at the script level as well. 

More math!

The [Math] static class is very handy.

You can see what the different methods are by using the following command:

[math].GetMethods() | Select-Object -ExpandProperty Name -Unique

To see more of what it can do, check out this blog post from The Scripting Guy! 

Examples of it running

Here are some examples of the script in action.

Numbers after the script name, separated by a comma.

.\Get-StandardDeviation.ps1 12345,0
Numbers declared after the -Value parameter called, separated by a comma.
.\Get-StandardDeviation.ps1 -Value 12345,0

Numbers declared for the -Value parameter, but using the alias of Numbers. (Advanced parameters are fun!)

.\Get-StandardDeviation.ps1 -Numbers 12345,0

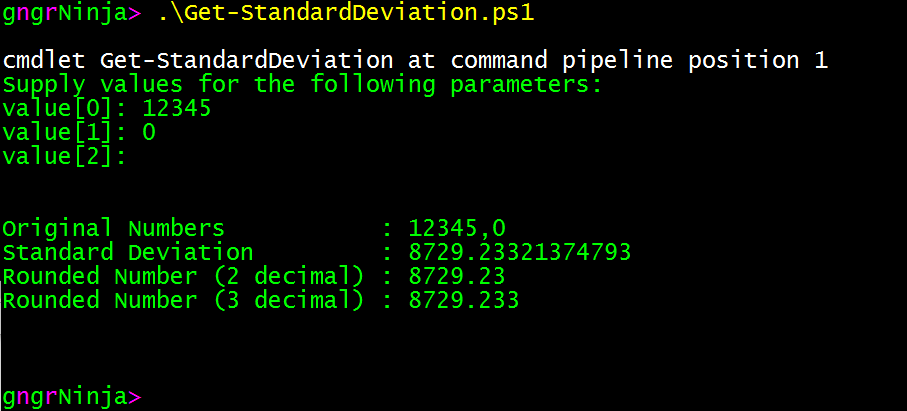
Finally, the way my girlfriend wanted it coded. She wanted to input numbers in succession and then hit enter.

.\Get-StandardDeviation.ps1

Help

You can see the help for this script by using:

Get-Help .\Get-StandardDeviation.ps1 -Detailed

The Code

<#
.Synopsis
   This script will find the standard deviation, given a set of numbers.
.DESCRIPTION
   This script will find the standard deviation, given a set of numbers. 

   Written by Mike Roberts (Ginger Ninja)
   Version: 0.5
.EXAMPLE
   .\Get-StandardDeviation.ps1

   Using this method you will need to input numbers one line at a time, and then hit enter twice when done.
   --------------------------------------------------------------------------------------------------------
   PS > .\Get-StandardDeviation.ps1
    
    cmdlet Get-StandardDeviation at command pipeline position 1
    Supply values for the following parameters:
    value[0]: 12345
    value[1]: 0
    value[2]: 


    Original Numbers           : 12345,0
    Standard Deviation         : 8729.23321374793
    Rounded Number (2 decimal) : 8729.23
    Rounded Number (3 decimal) : 8729.233
    --------------------------------------------------------------------------------------------------------
.EXAMPLE
   .\Get-StandardDeviation.ps1 -value 12345,0
.LINK  
    http://www.gngrninja.com/script-ninja/2016/5/1/powershell-calculating-standard-deviation   
.NOTES
   Be sure to enter at least 2 numbers, separated by a comma if using the -value parameter.
#>
[cmdletbinding()]
param(
    [Parameter(Mandatory=$false)]
    [Alias('Numbers')]
    [decimal[]]$value
)

function Get-StandardDeviation { #Begin function Get-StandardDeviation
    [cmdletbinding()]
    param(
    [Parameter(Mandatory=$true)]
    [decimal[]]$value
    )

    #Simple if to see if the value matches digits, and also that there is more than one number.
    if ($value -match '\d+' -and $value.Count -gt 1) {

        #Variables used later
        [decimal]$newNumbers  = $Null
        [decimal]$stdDev      = $null
        
        #Get the average and count via Measure-Object
        $avgCount             = $value | Measure-Object -Average | Select Average, Count
    
        #Iterate through each of the numbers and get part of the variance via some PowerShell math.
        ForEach($number in $value) {

            $newNumbers += [Math]::Pow(($number - $avgCount.Average), 2)

        }

        #Finish the variance calculation, and get the square root to finally get the standard deviation.
        $stdDev = [math]::Sqrt($($newNumbers / ($avgCount.Count - 1)))

        #Create an array so we can add the object we create to it. This is incase we want to perhaps add some more math functions later.
        [System.Collections.ArrayList]$formattedObjectArray = @()
        
        #Create a hashtable collection for the properties of the object
        $formattedProperty  = @{'Standard Deviation'           = $stdDev}
        $formattedProperty += @{'Rounded Number (2 decimal)'   = [Math]::Round($stdDev,2)}
        $formattedProperty += @{'Rounded Number (3 decimal)'   = [Math]::Round($stdDev,3)}
        $formattedProperty += @{'Original Numbers'             = $($value -join ",")}

        #Create the object we'll add to the array, with the properties set above
        $fpO = New-Object psobject -Property $formattedProperty

        #Add that object to this array
        $formattedObjectArray.Add($fpO) | Out-Null

        #Return the array object with the selected objects defined, as well as formatting.
        Return $formattedObjectArray | Select-Object 'Original Numbers','Standard Deviation','Rounded Number (2 decimal)','Rounded Number (3 decimal)' | Format-List

    } else {

        #Display an error if there are not enough numbers
        Write-Host "You did not enter enough numbers!" -ForegroundColor Red -BackgroundColor DarkBlue
 
    } 
      
} #End function Get-StandardDeviation

if ($value) { Get-StandardDeviation -value $value } Else { Get-StandardDeviation }

That's all there is to it. Let me know if this helped you in any way, if you have any questions or comments, or maybe perhaps a different way to calculate standard deviation via PowerShell in the comments section below!

-Ginger Ninja

[Back to Top]

PowerShell: Getting Started - Modules

PowerShell: Getting Started - Modules

Getting Started - Modules

Welcome to my Getting Started with Windows PowerShell series!

In case you missed the earlier posts, you can check them out here:

We will be exploring:

Note: I reccommend getting used to / switching to Visual Studio Code if you can. It is lightweight, has GREAT extensions/themes, and can be used for much, much more than just PowerShell. Check it out here: https://code.visualstudio.com/docs/languages/powershell

What are modules?

Modules in PowerShell are a way to aggregate functions into one file and then re-use them later. There are various different module types, but we'll be focusing on Script Modules. If you find yourself reusing functions here and there, it may be time to create a module in PowerShell. 

If you are here, already know all of this, and want a framework for creating a standard PowerShell module, check out this project on GitHub: https://github.com/devblackops/Stucco.

Script modules require these basic items:

  • A file with code in it (for script modules this will be a .psm1 file)

  • Any required modules / scripts that the module itself requires

  • A folder that has the module name stored where PowerShell can import the module

  • This isn't exactly required, but is is immensely helpful: a manifest file that contains metadata (version/author/file info).

List available modules

In PowerShell, you can see what modules are available to you by using the following command:

Get-Module -ListAvailable

This command will list the modules available to you, and show you which folder they are located in.

To  see what modules you are currently using in your session, type:

Get-Module

If you 'd like to see what commands a module has available, use:

Get-Command -Module DnsClient

The above command will show us the commands available in the DnsClient module.

Let's try to use one of the commands from the DnsClient module.

Clear-DnsClientCache

By all appearances it looks like that worked! Interesting. Let's have a look at seeing what modules are installed again.

Get-Module

It looks like the module was automatically imported into PowerShell when we used one of its commands. That is because starting in PowerShell version 3.0, modules that are available via Get-Module -ListAvailable will be automatically imported if one of their commands are used.

Creating modules

PowerShell modules available via Get-Module -ListAvailable are stored in folders listed in the environment variable PSModulePath. Use the following commands to see where the folders are:

(Get-ChildItem Env:\PSModulePath).Value.Split(';')

The folders:

  • C:\Program Files\WindowsPowerShell\Modules

  • C:\Windows\system32\WindowsPowerShell\v1.0\Modules

Contain modules that will be available to anybody using PowerShell on the local machine.

Let's keep the scope to not require administrative rights (which those folders require to change at all), and create the Documents\WindowsPowerShell\Modules folder.

The full path for my instance of PowerShell can be found by using:

(Get-ChildItem Env:\PSModulePath).Value.Split(';')[0]

Find out if that matches your Documents folder as well. If it does not, iterate through the array by using [1] or [2] at the end of the Get-ChildItem command.

When you find the one that matches, use the following command to create the folder:

New-Item -Path (Get-ChildItem Env:\PSModulePath).Value.Split(';')[0] -ItemType Directory

Navigate to that location via:

Set-Location (Get-ChildItem Env:\PSModulePath).Value.Split(';')[0]

Create a folder for our module named Part6. Note: This is what PowerShell will display the module name as.

New-Item 'Part6' -ItemType Directory

Now launch the ISE, and paste the following code in:

function Write-Pretty {
    [cmdletbinding()]
    param(
    [Parameter(
                Mandatory         = $True,
                ValueFromPipeline = $True
               )]
    [Alias('Text')]
    $prettyText,
    [Parameter(Mandatory=$false)]
    [Alias('Type')]
    $textType
    )

    Begin {
    
        Write-Host `n 

    }

    Process {

        ForEach ($textItem in $prettyText) {

            Switch ($textType) {

                {$_ -eq 'Random'} {

                    Write-Host -NoNewline "[" -ForegroundColor $(Get-Random -Minimum 1 -Maximum 15) 
                    Write-Host -NoNewline "R" -ForegroundColor $(Get-Random -Minimum 1 -Maximum 15)
                    Write-Host -NoNewline "andom" -ForegroundColor $(Get-Random -Minimum 1 -Maximum 15)
                    Write-Host -NoNewline "]" -ForegroundColor $(Get-Random -Minimum 1 -Maximum 15)

                    $writeText  = $textItem.ToString().Split(' ')

                    ForEach ($text in $writeText) {

                        Write-Host -NoNewLine " $text" -ForegroundColor $(Get-Random -Minimum 1 -Maximum 15)

                    }

                    Write-Host `n
            
                }

                {$_ -eq 'Error'} {

                    Write-Host -NoNewline "[" -ForegroundColor White 
                    Write-Host -NoNewline "Error" -ForegroundColor Red -BackgroundColor DarkBlue
                    Write-Host -NoNewline "]" -ForegroundColor White 
                    Write-Host " $textItem" -ForegroundColor Red 

                }


                {$_ -eq 'Warning'} {

                    Write-Host -NoNewline "[" -ForegroundColor White
                    Write-Host -NoNewline "Warning" -ForegroundColor Yellow -BackgroundColor Blue
                    Write-Host -NoNewline "]" -ForegroundColor White
                    Write-Host " $textItem" -ForegroundColor Yellow


                }

                {$_ -eq 'Info' -or $_ -eq $null} {

                    Write-Host -NoNewline "[" -ForegroundColor White
                    Write-Host -NoNewline "Info" -ForegroundColor Green -BackgroundColor Black
                    Write-Host -NoNewline "]" -ForegroundColor White
                    Write-Host " $textItem" -ForegroundColor White

                }

                Default { 
        
                    Write-Host $textItem
        
                }

            }

        }

    }

    End {
    
        Write-Host `n

    }

}

Write-Pretty -Text 'Part6 module loaded!' -textType Random

Once you have the content in the ISE, save the file in the Part6 folder we created as part6.psm1.

Congratulations! You just created your first module file.

Navigate to the folder containing Part6.psm1 in PowerShell.

cd .\Part6\

Use the following command to create the module manifest file:

New-ModuleManifest -Path .\part6.psd1 -NestedModules 'part6.psm1'

Use Get-ChildItem to list out the files. You should see part6.psm1 and part6.psd1.

The module manifest file contains the metadata for your module. Check out this link for more details on manifest files: https://msdn.microsoft.com/en-us/library/dd878337(v=vs.85).aspx

Import a module

Let's import the module we created!

Make sure you see it via:

Get-Module -ListAvailable

Now that we see it, let's manually import it via:

Import-Module Part6

If all goes well, you should see a confirmation that the module was installed.

With this module, we get a new command: Write-Pretty.

You can use:

Write-Pretty Test
Write-Pretty Test -textType Random
Write-Pretty Test -textType Error
Write-Pretty Test -textType Warning

You can also pipe a command to Write-Pretty. Let's try:

Get-Process | Write-Pretty

What about...

Get-Process | Write-Pretty -textType Random

Remove a module

To remove the module, simply run:

Remove-Module Part6

When developing your own modules, Import-Module and Remove-Module will be your friends. When you import a module, it is imported into memory in its current state at that moment. That means if you make any changes after importing, you will have to remove and then re-import the module.

Homework

  • Go over the code we used in the module!

    • How did we accept pipeline input?

    • What method did we use to iterate through each element received by the pipeline?

I hope you've enjoyed the series so far! As always, leave a comment if you have any feedback or questions!

-Ginger Ninja

[Back to top]


PowerShell: Getting Started - Loop-the-Loop

PowerShell: Getting Started - Loop-the-Loop

Getting Started - Loop-the-Loop

Loop used in Part 4

We actually ended up using a loop in Part 4 to iterate through each disk and display information regarding the disk.

Code for loop used in Part 4:

Foreach ($disk in $disks) {

                Write-Host `n"Device ID    : $($disk.DeviceID)"
                Write-Host ("Free Space   : {0:N2} GB" -f $($disk.FreeSpace / 1GB))
                Write-Host ("Total Size   : {0:N2} GB" -f $($disk.Size / 1GB))
                Write-Host ("% Free       : {0:P0}   " -f $($disk.FreeSpace / $disk.Size))
                Write-Host "Volume Name  : $($disk.VolumeName)"
                Write-Host "Drive Type   : $(Get-WMIInfo -lookup 'drivenumber' -typeNumber $disk.DriveType)"`n

            }

This is called a ForEach loop and what it does is iterates through and array of objects, allowing you to declare the item as well as the array or collection.

ForEach ($item in $collection) { $item.Property }

In this case the item we declare is $disk, from the array/collection $disks.

What this allowed us to do was go through each disk, and for each disk display that current item's information individually. 

Handling individual items

Since $disk represents the current item in the loop, we can use $disk.Property to display the properties we want. The last line in this example uses the Get-WMIInfo function to assign the drive type text to the number we supply. That happens once for each item in the loop, therefore different drives (CD-ROM, HDD, etc) will return as different types.

The many different loops in PowerShell

There are many different types of loops in PowerShell. You can actually use any of them to perform the same task. There is usually a "best loop" for any given task, however. 

To get started, let's create and save part5.ps1 in C:\PowerShell (or wherever you prefer).

Note

If you run code that performs an infinite loop in PowerShell, use CTRL+C to break out of the loop.

The ForEach loop

What's it do?

The ForEach loop in PowerShell iterates through an array/collection. It allows you to define the element or item you wish to use as the placeholder for the current object in the loop.

Loop setup

The ForEach loop is setup as follows:

ForEach (item/element in array/collection) {

Do-Stuff

}

Element can be anything you specify. It makes sense to make it reflect what is being handled as the current item, however. 
Array is the object/array/collection you want to iterate through.

Example

Copy and paste the following into part5.ps1 (or the PowerShell console):

$processes = Get-Process

$i = 1
ForEach ($process in $processes) {

    Write-Host "Process[$i]'s Name is $($process.Name)"

    $i++

}

Here's the output of the code above:

In this example we declared $processes to hold the results of Get-Process$i as 1, then our ForEach loop with $process as the placeholder, and finally $processes as the item to iterate through.

The action we take is to Write-Host the current value of $i, and the current element's ($process)'s Name via $($process.Name).

We then take the final action of iterating $i by 1 via $i++.  $i++ is simply a shortcut that tells PowerShell to add one to the current value of $i

ForEach-Object

There's a pipeline variation of the ForEach loop named ForEach-Object.

To use it you would simply run the command you want, and then pipe it to ForEach-Object. You would then use the special placeholder variable in PowerShell ($_) to take action on the current element in the array. 

Here is an example:

Copy and paste the following into part5.ps1 (or the PowerShell console):
Run the code (starting with $i = 1) as a selection, rather than the whole script.

$i = 1
Get-Process | ForEach-Object {

    Write-Host "Process[$i]'s Name is $($_.Name)"
    $i++

}

This will perform the same actions as the other loop, but in a different way.

I generally like to store commands I'm calling into variables, and because of that I use the ForEach loop more. ForEach-Object does have it's place though, especially when you're running advanced commands and you need to perform actions from piped in input.

When to use a ForEach loop

I use a ForEach loop when there is an action I want to take on an array of items. The action could be anything from deleting specific files, or merely displaying information.

The for loop

What's it do?

The for loop performs actions until a specific condition is met.

Loop setup

The for loop is setup as follows:

for (init;condition;repeat) {

Do-Stuff

}

Here's what the init, condition, and repeat represent:

init = The statement/action that runs first (once). Typically it is the variable to be initialized and used in the loop.
condition = Statement that must be true for the loop to continue running
repeat = Action to take after a loop cycle

Examples

Copy and paste the following into part5.ps1 (or the PowerShell console):
Run the code (starting with for ($i=1;$i -le 15;$i++) {) as a selection, rather than the whole script.

for ($i=1;$i -le 15;$i++) {

    Write-Host "This is the color for [$i]" -ForegroundColor $i

}

You should see the following output:

For this example we set the init as $i=1. This initializes $i with the value of 1.

We then set the condition as $i -le 15. What that states is the loop will run as long as $i is less than (or equal to) 15.

Finally, we set the repeat to $i++. 

Write-Host takes 1-15 as values for the ForeGround color, which this loop iterates through.

For loop flexibility

You can actually specify any or none of the conditions for initcondition, and/or repeat.

For example, this works:

for () {Write-Host "Wheeeeeeeeeeeeeeee!"}

Which results in:

I'll note again that CTRL+C is your friend when your loop is infinite and you want to break out of it in PowerShell.

You can also specify the various elements outside of the loop statement declaration.

Copy and paste the following into part5.ps1 (or the PowerShell console):
Run the code (starting with $i = 0) as a selection, rather than the whole script.

$i = 0

for (;$i -le 20;) {

    Write-Host "`$i is [$i] iterations old!"

    $i++

}

Note: In this example it is important to understand that there are semicolons around the condition. That is to tell PowerShell there is no init specified in the for loop statement, that there is a condition, and finally that there is no repeat defined.

Here's the output:

When to use a for loop

I generally use for loops when I want to run the same set of code multiple times for various reasons. 

Remember the ForEach loop with Get-Process earlier?

One of the awesome things about PowerShell is you can do one thing many different ways.

Here's a for loop iterating through $processes its own way:

$processes = Get-Process
for ($i = 0;$i -le $processes.count;$i++) {Write-Host "Process[$i]'s Name is $($processes[$i].Name)"}

We set the the condition to be when $i is less than (or equal to) $processes.count.

We then modify the Write-Host statement a bit to reflect the current element in the $processes array via $processes[$i]. All arrays in PowerShell start with 0, which is why we set the init as $i = 0.  

The While loop

What's it do?

The While loop in PowerShell performs actions while a condition is true.

Loop setup

While (condition) {

Do-Stuff

}

The setup is easy for this one! Condition reflects any statement / expression that is true.

Example

For this example we'll be using Notepad.exe. If you have any Notepad windows open, close them!

Copy and paste the following into part5.ps1 (or the PowerShell console):
Run the code (starting with $notepad = Get-Process Notepad) as a selection, rather than the whole script.

$notepad = Get-Process Notepad

While ($notepad.Count -le 5) {

    Write-Host "Starting Notepad, current count is: $($notepad.Count + 1)"

    Start-Process Notepad.exe

    $notepad = Get-Process Notepad
    
}

Here is the result:

In this example we declare $notepad as the result of Get-Process Notepad. We then start the loop with the condition that $notepad.Count is less than (or equal to) 5

When the condition is true we use Write-Host to display the current number of Notepad windows open, open another Notepad window via Start-Process, and then declare $notepad as the result of Get-Process Notepad. That last step is perhaps the most important. If we did not do that, we'd have an infinite loop, and not a fun one.

Note:

We will use Notepad as an example in another loop. To close all open Notepad windows at once, run:

Get-Process Notepad | Stop-Process

BE SURE TO INCLUDE NOTEPAD IN GET-PROCESS!

When to use a While loop

I generally use while loops to perform actions I need to perform, while a specific condition is true. This could be while a specific process exists that you would like to close, or while PowerShell jobs exist. We haven't covered jobs yet, but we will do that in a later post!

The Do While loop

What's it do?

The Do While loop in PowerShell performs actions while a condition is true. The difference between Do While and While is that even if the condition is not true, the Do actions still run at least once. Whereas with the While loop the actions do not ever run if the condition is not true.

Loop setup

Do {

Do-Stuff

} While (condition) 

For the Do While loop we declare Do { Do-Stuff } for our action, and then finally the While condition afterwards.

Examples

Here is an example demonstrating that the Do actions always run before the condition is evaluated.

Copy and paste the following into part5.ps1 (or the PowerShell console):
Run the code (starting with $i = 14) as a selection, rather than the whole script.

$i = 14

Do {

    Write-Host "This will still run once! `$i = $i"

} While ($i -gt 15)

$i is never greater than 15, yet the Do code still executes at least once.

Here's another example of a Do While loop in action:

Copy and paste the following into part5.ps1 (or the PowerShell console):
Run the code (starting with $i = 0) as a selection, rather than the whole script.

$i = 0

Do {

    Write-Host "Now we're cookin'! `$i = $i"
    $i++

} While ($i -le 15)

This will add one to $i while $i is less than (or equal to) 15.

When to use the Do While loop

I use the Do While loop when I want to have the While loop going, yet no matter what need to perform the actions of the Do statement at least once.

The Do Until loop

What's it do?

The Do Until loop performs actions UNTIL a condition is true. This is the opposite of what we're doing with the Do While loop. Like the Do While loop, however, the Do statements are run at least once.

Loop setup

Do {

Do-Stuff

} Until (condition)

The setup for this is very similar to the Do While loop. The only difference here is we're using Until, not While

Example

Copy and paste the following into part5.ps1 (or the PowerShell console):
Run the code (starting with Do {) as a selection, rather than the whole script.

Do {

    $notepad = Get-Process Notepad

    Start-Process Notepad.exe

    Write-Host "Starting Notepad, current count is: $($notepad.Count + 1)"

    $notepad = Get-Process Notepad


} Until ($notepad.Count -eq 5)

This should execute Notepad exactly 5 times, given that it was not open before running the code.

Notice how we changed the condition to be -eq and not -le. So Until $notepad.Count equals 5, we're performing the loop actions of Do.

When to use the Do Until loop

I seldom have used the Do Until loop, but it has its place. You generally would use it when you need to run commands that should execute until a specific condition is true. The condition could be that a specific process is running, or a number you're keeping track of reaches a specific value.

Comparison Operators

I've use a few comparison operators in these examples. Comparison operators evaluate values you place on either side. Here are some examples.

-eq
The -eq comparison operator evaluates whether one value equals another. For example:

1 -eq 1

The above example would return True 

-ne
The -ne comparison operator is the opposite of the -eq comparison operator. For example:

1 -ne 1

The above example would return False

-gt
The -gt comparison operator evaluates values to see if one is greater than the other. For example:

2 -gt 1

The above example would return True

-ge
The -ge comparison operator evaluates values to see if one is greater than or equal to the other. For example:

2 -ge 2

The above example would return True

-lt
The -lt comparison operator evaluates values to see if one is less than the other. For example:

1 -lt 2

The above example would return True

-le
The -le comparison operator evaluates values to see if one is less than or equal to the other. For example:

2 -le 2

The above example would return True

-like
The -like comparison operator evaluates values to see if one is like the other, allowing a wildcard comparison to take place. For example:

'onetwothree' -like '*one*'

The above example would return True

-notlike
The -notlike comparison operator evaluates values to see if one is not like the other, allowing a wildcard comparison to take place. For example:

'onetwothree' -notlike '*one*'

The above example would return False

There's more!

For a deeper dive into comparison operators, use this command:

Get-Help About_Comparison_Operators

You could also check out this link: http://ss64.com/ps/syntax-compare.html

Homework

  • Pick one of the loop examples and get it working with each of the different loop types. (It's possible!)

  • Learn more about comparison operators

I hope you've enjoyed the series so far! As always, leave a comment if you have any feedback or questions!

-Ginger Ninja

[Back to top]

PowerShell: Getting Started - A Deeper Dive Into Functions

PowerShell: Getting Started - A Deeper Dive Into Functions

Getting Started - A Deeper Dive Into Functions

Part 3 Review

At the end of Part 3, we created the following functions:

function Get-OSInfo {

    $osInfo = Get-WmiObject -Class Win32_OperatingSystem

    $versionText = Get-VersionText -version $osInfo.Version.Split('.')[0]

    Write-Host "You're running $versionText"

}


function Get-VersionText {
    param($version)

    Switch ($version) {

        10{$versionText = 'Windows 10'}

        6.3 {$versionText = 'Windows 8.1 or Server 2012 R2'}

        6.2 {$versionText = 'Windows 8 or Server 2012'}

        6.1 {$versionText = 'Windows 7 or Server 2008 R2'}

        6.0 {$versionText = 'Windows Vista or Server 2008'}

        5.2 {$versionText = 'Windows Server 2003/2003 R2'}

        5.1 {$versionText = 'Windows XP'}

        5.0 {$versionText = 'Windows 2000'}

    }

    Return $versionText

}

Get-OSInfo

Get-VersionText issue explored

Let's go ahead and run that script in the ISE (or copy and paste it into the console).

Here's the output I get:

Stay in the console pane if you're in the ISE, and let's run the following command:

Get-VersionText -version 6

Here's the output:

This presents a problem! The way we coded the version we send to Get-VersionText takes only the first part of the version number before the "." in the version returned from the Get-WMIObject command. To see this, run the following commands:

$osInfo = Get-WmiObject -Class Win32_OperatingSystem
$osInfo

The version we're sending the Get-VersionText function is gathered using the following code:

$osInfo.Version.Split('.')[0]

For me, running Windows 10, that is fine! But if you are running Windows 7, it would have just been 6! That would not have returned the correct version (as we saw above). The version we need to match correctly to display the text for Windows 7 is 6.1.

The fix

Let's look at a possible solution.  We need to get the numbers before the last decimal point in the Version property. There are two string manipulation methods that can help us out here. They are SubString and LastIndexOf.

SubString takes two arguments to display a specific part of the string based on the numerical values you specify. 

LastIndexOf takes one argument as the text to look for the last instance of. It then returns the numerical value of where it matches. 

Here is the solution to store the correct version number to look up:

$versionNumber = $osInfo.Version.SubString(0,$osInfo.Version.LastIndexOf('.'))

If you want to see what LastIndexOf does on its own (with value of '.') run:

$osInfo.Version.LastIndexOf('.')

So we're running $osInfo.Version.SubString(0,4) when we use  $osInfo.Version.SubString(0,$osInfo.Version.LastIndexOf('.')) **And the version is 10.x.xxx)**

That's why we use LastIndexOf and not a hard set numerical value. Let's look at setting up a test to see that in action with a different version number. 

$testVersion = '6.1.1337'
$testVersion.SubString(0,4)
$testVersion.SubString(0,$testVersion.LastIndexOf('.'))

You should see the following results:

Notice that if we used (0,4) we got an extra '.' at the end as a result. But if we use LastIndexOf, it returns the correct number for SubString to use every time for what we need.

Getting the functions to work

To get the code from Part 3 to work now, we'll have to modify the Get-OSInfo function to add the new line to get the version number, and then use that variable when calling the Get-VersionText function.

We'll also want to declare the parameter type in Get-VersionText for the version parameter to [double].

The reason we want to set the type for this parameter is so that it will take 10.0, and essentially make it 10. However, it will also take 10.1 or 6.1 and keep it at that value. To see that, use the following commands:

[double]10.0
[double]10.1

Perfect, that's just what we want to make sure our Switch statement works in the Get-VersionText function for Windows 10. Here's the code that will work:

function Get-OSInfo {

    $osInfo = Get-WmiObject -Class Win32_OperatingSystem

    $versionNumber = $osInfo.Version.SubString(0,$osInfo.Version.LastIndexOf('.'))
    $versionText = Get-VersionText -version $versionNumber

    Write-Host "You're running $versionText"

}


function Get-VersionText {
    param([double]$version)

    Switch ($version) {

        10{$versionText = 'Windows 10'}

        6.3 {$versionText = 'Windows 8.1 or Server 2012 R2'}

        6.2 {$versionText = 'Windows 8 or Server 2012'}

        6.1 {$versionText = 'Windows 7 or Server 2008 R2'}

        6.0 {$versionText = 'Windows Vista or Server 2008'}

        5.2 {$versionText = 'Windows Server 2003/2003 R2'}

        5.1 {$versionText = 'Windows XP'}

        5.0 {$versionText = 'Windows 2000'}

    }

    Return $versionText

}

Get-OSInfo

Go ahead and run that code! Looks like it worked for me.

Don't worry if you don't understand what exactly [double] means yet. I'll be going over types later in this post!

Adding CMDlet-like functionality to your functions

What if I told you there's this one weird trick to writing better functions? Yeah... I'd hate me too. There is one thing you can do, however, that will graduate a function from basic to advanced. That would be adding [cmdletbinding()] to the very top of of your scripts and/or functions. (It must be at the top, except for where there is comment based help).

When you use [cmdletbinding()] you need to also include the param() statement. This is true even if your function doesn't require parameters.

What does it do, exactly?

By simply adding [cmdletbinding()] you enable extra functionality for:

  • The ability to add -Verbose and -Debug when calling your functions/scripts.
  • Add the -whatif and -confirm options to your scripts (although, this requires a bit of extra work, but is doable).
  • Extra parameter options for using advanced parameters. These can really come in handy.

Simple advanced function example

function Invoke-SuperAdvancedFunctionality {
[cmdletbinding()]
param()

    Write-Verbose "This function has now graduated!"

}

Let's go ahead and enter that in PowerShell (run via ISE or paste into console), and then call it by using:

Invoke-SuperAdvancedFunctionality

Alright... nothing happened!

Well that's because the line we added is Write-Verbose, not Write-Output or Write-Host. This seems like a good time to go over...

Write-Verbose vs. Write-Debug vs. Write-Host vs. Write-Output

Write-Host

This command is generally frowned upon in the PowerShell community. Write-Host merely outputs text via the current running PowerShell host (be it the ISE or console). 

Pros

  • Easy way to work through scripts while outputting information to yourself.
  • Can use formatting features (`t for [TAB] and `n for new line to name a couple), and colors! 
  • Can present users of your scripts/functions with a nice way to have data presented to them

Cons

  • Some people in the PowerShell community may scoff at you.
  • Can be confused with Write-Output, which should be used differently

Example

Write-Host 'This is an example of Write-Host!' -ForegroundColor White -BackgroundColor DarkBlue

More information
Use the command: 

Get-Help Write-Host -Detailed

Write-Output

This command sends what you specify to the next command in the pipeline. What this means is that if it is the last command used, you'll see the value of Write-Output in the console. You can use Write-Output to return information from a function, or even to set a variable with a command.

Pros

  • Can be used to pass objects to the pipeline in PowerShell.

Cons

  • Can be used to pass objects to the pipeline in PowerShell! (yup can be a con too)
    • Be careful with this! If your intention is to merely display information, do not use Write-Output (especially in a function) as you may clutter the pipeline with random information that could cause some unintentional results.
  • Cannot format the text in any way (as it is an object and information passed to the pipeline).

Example

Write-Output "This is a test"
$test = Write-Output "This is a test"
$test

The first line will simply output the text to the console. The second line shows how it can be used to pass information to the pipeline. The third line will display the value of the $test variable.

Let's see what happens if we run the following commands with Write-Host...

$test = Write-Host "This is a test"
$test

Since Write-Host does not pass information to the pipeline, and merely outputs text to the host, it does not store the result in the variable. The command is simply executed and the output written to the console only.

More information

Use the command:

Get-Help Write-Output -Detailed

Write-Verbose

Write-Verbose is enabled when you use a function or script with [cmdletbinding()] specified at the top. You use it by calling the function or script with the -Verbose flag.

Let's go back to our function Invoke-SuperAdvancedFunctionality from earlier, and call it with the -Verbose flag.

Invoke-SuperAdvancedFunctionality -Verbose

There we go! Now you see the text from the Write-Verbose command we used in the function.

Write-Debug

Write-Debug allows you to step through your code with breakpoints. It is also enabled by adding [cmdletbinding()] to your script or function.

Let's add the following lines to our function:

$processes = Get-Process
Write-Debug "`$processes contains $($processes.Count) processes"

The function should now look like this:

function Invoke-SuperAdvancedFunctionality {
[cmdletbinding()]
param()

    Write-Verbose "This function has now graduated!"

    $processes = Get-Process

    Write-Debug "`$processes contains $($processes.Count) processes"

}

A quick note on strings and escape characters

In PowerShell, values surrounded by "double quotes" are called expanded strings. These allow variables to be resolved and displayed in the string. In this example I wanted to show what the actual variable name is (without resolving it), and also show the .Count property. To do this I first use the escape character of ` before $processes. The ` character tells PowerShell to not display the value of $processes, but to treat it like text.

I then wanted to show the .Count property. To get this to resolve you need to use $() to encapsulate the variable and property you're wanting to call. This is called a subexpression.

If you're just displaying text information in PowerShell, it's best to use single quotes.

Back to Write-Debug!

Now run:

Invoke-SuperAdvancedFunctionality -Verbose

The function will now show you the debugging information, and prompt you for options as to how to continue.

There are really no pros or cons to using Write-Verbose or Write-Debug. I wrote the above pros and cons for Write-Host and Write-Output slightly in jest.

The general use cases for Write-Verbose is when you want to display information. Typically it's to show someone else running your code that has added the -Verbose flag to derive more information.

As for Write-Debug, it's best used to troubleshoot and step through your scripts when you need to pause and check what a value is set to (or anything else you want to stop for). 

Advanced parameters and types

Let's start a new script in the ISE and save it as part4.ps1.

Add the following code:

function Get-WMIInfo {
    [cmdletbinding()]
    param(
    [parameter(Mandatory=$true)]
    [string]
    $lookup,
    [parameter(Mandatory=$false)]
    [double]
    $version,
    [parameter(Mandatory=$false)]
    [int]
    $typeNumber
    )

    Write-Debug "[$lookup] reference requested."

Now, with [cmdletbinding()], we can use some parameter options we couldn't before. One of those is (Mandatory=$true). What that does is requires that parameter to be set for the script or function to run. If it is not initially set, it will prompt you to set it when the code executes.

There are many other options available to you for advanced parameters. You can check those out here.

Types

You can specify type constraints in PowerShell. In the above code we set one for each parameter. 

[string]$lookup
[double]$version
[int]$typeNumber

What PowerShell does it looks for the values/arguments provided to match the datatypes. It they do not, you'll get a pretty error message. Here's an example error when you try to pass a string to the [int] type.

[int]$thisIsGoingToErrorOut = 'one is a number, right?'

Type list

[array]          -An array of values.
[bool]           - $true or $false values only.
[byte]           - An 8-bit unsigned integer.
[char]           - A unicode 16-bit character.
[decimal]     - A single-precision 32-bit floating point number.
[double]      - A double-precision 64-bit floating point number.
[hashtable] - This represents a hastable object in PowerShell. (keys paired with values)
[int]             - A 32-bit signed integer.
[single]       - A (lonely) single-precision 32-bit floating point number.
[string]       - A fixed-length string of Unicode characters.
[xml]           - This represents an XMLdocument object.
 

Using the Switch statement to handle parameter arguments

You can use a Switch statement to handle different arguments given to a parameter.

Let's finish the code for Get-WMIInfo. Paste the following after the Write-Debug command:

Switch ($lookup) {

        {$_ -eq 'osversion'} {

            Write-Debug "Looking up [$version]."

            Switch ($version) {

                10{$versionText = 'Windows 10'}

                6.3 {$versionText = 'Windows 8.1 or Server 2012 R2'}

                6.2 {$versionText = 'Windows 8 or Server 2012'}

                6.1 {$versionText = 'Windows 7 or Server 2008 R2'}

                6.0 {$versionText = 'Windows Vista or Server 2008'}

                5.2 {$versionText = 'Windows Server 2003/2003 R2'}

                5.1 {$versionText = 'Windows XP'}

                5.0 {$versionText = 'Windows 2000'}

                Default {$versionText = 'Unable to determine version!'}

            }

            Write-Debug "[$version] matched with text [$versionText]"

            Return $versionText

        }

        {$_ -eq 'drivenumber'} {


            Write-Debug "Looking up drive # [$typeNumber]"

            Switch ($typeNumber) {

                0 {$typeText = 'Unknown'}

                1 {$typeText = 'No Root Directory'}

                2 {$typeText = 'Removeable Disk'}

                3 {$typeText = 'Local Disk'}

                4 {$typeText = 'Network Drive'}

                5 {$typeText = 'Compact Disk'}

                6 {$typeText = 'RAM Disk'}

                Default {$typeText = "Invalid type number [$typeNumber]"}

            }

            Write-Debug "[$typeNumber] matched with text [$typeText]"

            Return $typeText

        }
    }
}

The first Switch statement evaluates $lookup. The value for $lookup is determined by what is set in the $lookup parameter. 

Let's look at the follow segment of code:

{$_ -eq 'osversion'} { 

What this does it is evaluates if $_ (in this case the value for lookup) matches 'osversion'.

If the condition is found to be true, it will run the code surrounded in {}'s.

In this case, the code would be the same code we used in Part 3 to lookup the OS version text. This would switch the value for $version,and attempt to match the version number.  

The default statement in the switch will execute if no values are matched. For the $version switch that would execute:

Default {$versionText = 'Unable to determine version!'}

The next evaluation point for $lookup is to see if it matches 'drivenumber'.

{$_ -eq 'drivenumber'} { 

If it matches drive number, then it proceeds to attempt to match the drive number received with the associated text.

Finishing the script for Part 4

Let's add the following code after the Get-WMIInfo function:

function Get-OSInfo {
    [cmdletbinding()]
    Param(
    [parameter(Mandatory=$false)]
    [boolean]
    $getDiskInfo = $false
    )

    Write-Verbose "Looking up OS Information..."

    $osInfo        = Get-WmiObject -Class Win32_OperatingSystem

    $versionNumber = $osInfo.Version.SubString(0,$osInfo.Version.LastIndexOf('.'))

    Write-Verbose "Looking up the matching windows edition for version #: [$versionNumber]"

    Write-Debug "Version number stored as [$versionNumber]"

    $versionText = Get-WMIInfo -lookup 'osversion' -version $versionNumber

    Write-Host `n"You're running $versionText"`n

    if ($getDiskInfo) {

        Write-Verbose "Gathing disk information via WMI..."

        $disks = Get-WmiObject -Class Win32_LogicalDisk

        if ($disks) {
            
            Write-Host `n"Disk information!"`n -ForegroundColor White -BackgroundColor Black
            
            Foreach ($disk in $disks) {

                Write-Host `n"Device ID    : $($disk.DeviceID)"
                Write-Host ("Free Space   : {0:N2} GB" -f $($disk.FreeSpace / 1GB))
                Write-Host ("Total Size   : {0:N2} GB" -f $($disk.Size / 1GB))
                Write-Host ("% Free       : {0:P0}   " -f $($disk.FreeSpace / $disk.Size))
                Write-Host "Volume Name  : $($disk.VolumeName)"
                Write-Host "Drive Type   : $(Get-WMIInfo -lookup 'drivenumber' -typeNumber $disk.DriveType)"`n

            }


        } else {

            Write-Host "Error getting disk info!"

        }

    }

}

Get-OSInfo -getDiskInfo $true

Execute the code, and you should see it both displays the OS information, as well as the information for any disks in your system.

Homework

  • After running the script we created, call the functions in different ways. Here's an example of one:

Get-OSInfo -getDiskInfo $true -Debug
Get-WMIInfo -lookup osversion -version 100
  • Review the code we used today.
    • What does the foreach statement do?
    • Take a look at the -f operator used to format a percentage (you can also see some PowerShell math in action)
Write-Host ("% Free : {0:P0} " -f $($disk.FreeSpace / $disk.Size))

I hope you've enjoyed the series so far! As always, leave a comment if you have any feedback or questions!

-Ginger Ninja

[Back to Top]

PowerShell: Getting Started - Using the ISE and Creating Functions

PowerShell: Getting Started - Using the ISE and Creating Functions

Getting Started - Using the ISE and Creating Functions

PowerShell ISE

NOTE

The ISE is basically in maintenance mode now, and will likely only be getting security patches. Using Visual Studio Code is now the way to go.
Check out my post here on getting started with VS Code + PowerShell:

The ISE provides a way to use PowerShell more... powerfully. I generally prefer sticking to the shell if I'm using solid scripts and running random commands. However, once I get an idea for a script or start stringing different commands together, I turn to the ISE (or Visual Studio Code depending on what I'm doing). 

For the purpose of this getting started series, I will stick to using the ISE. The ISE was introduced with PowerShell 2.0, and follows relatively the same version outline as described in part one.

Features

  • IntelliSense (commands auto finish as you type them, and it shows available options)

  • Script debugging

  • Recent file list

  • Syntax highlighting

For a full list of features, check out this TechNet article.

Using the ISE

  • Launch the ISE by clicking the Start icon and searching for/typing "ISE".

  • You should see the following screen.

  • Go File -> Save As, and save this script as C:\PowerShell\part3.ps1 (Create the folder if it does not exist).

We are now ready to start using the ISE!

Customizing the ISE

As a preference I like to close the command pane on the right. 

You can also adjust the theme by going to Tools -> Options.

The script pane can be toggled in various ways by using the icons highlighted here:

Running Commands

Let's type in Get-Date, and then click the green arrow.

Here's the result:

The result is shown below in the script pane.

Now, let's add another command: 

Get-WMIObject -Class Win32_LogicalDisk

Highlight this command by clicking and dragging, and then click the icon next to the green arrow (smaller green arrow with paper behind it).

The result of this should show that the highlighted command ran. (it will display under the output of Get-Date)

The green arrow will run every command in the script, while the green arrow with paper behind it will only run the current selection. You can also use the shortcut keys F5 (to run the entire script) and F8 (to run just the selected text).

IntelliSense

Let's see what happens if you just type in Get-.

The ISE will show you a list of available command. Go ahead and choose Get-Alias.

On the same line as Get-Alias add a "-". 

You'll see that the ISE will display a list of available parameters and the type of input you can use when specifying an argument.

In this case it is showing that the Name parameter accepts an argument type of string array.

That means that either of these commands will work:

Get-Alias -Name ls

Get-Alias -Name ls,dir

The results of running each command should look similar to this:

The first command returns just the ls alias, as expected.

The second command will return both the ls, and dir output of the command. This is because PowerShell interprets the comma separated values as an array.

Let's move on to creating some functions!

Functions

As described in part 2 of my series, functions are:

a series of commands that are grouped together to perform a specific task (or at least, that's the best practice). You can write functions and scripts that mimic the behavior of Cmdlets (via providing error checking and comment based help).

Go ahead and clear out any commands we've put in the ISE so we can start with a clean slate.

Creating a Function

Let's create a function that works by gathering information about the current OS of your machine.

When naming functions it is best practice to use approved verbs, and use PowerShell's Verb-Noun format.

Type the following in the ISE:

function Get-OSInfo {

 Write-Host "This function will display OS information"

}

Go ahead and run this in the ISE using F5 or the green arrow to run the entire script.

Let's see the result.

It looks like it ran, but nothing happened!

That's because the function is now stored in this PowerShell session. You have to call it to use it. To call it, add this line to the script:

Get-OSInfo

Go ahead and run the full script again.

In the above example you can see that the function was called via the script, and that you also can type the function name in the script pane manually.

You can see that Write-Host was executed and the text was displayed.

Replace the code inside of the function with the following code:

$osInfo = Get-WmiObject -Class Win32_OperatingSystem

Return $osInfo

Run the script again.

You can see that the function returns the variable we set within it (which contains the OS information). The following information is displayed:

SystemDirectory : C:\WINDOWS\system32
Organization: Microsoft
BuildNumber : 10586
RegisteredUser: Microsoft
SerialNumber: x
Version : 10.0.10586

Let's modify the Get-OSInfo function to reflect the following code:

function Get-OSInfo {

$osInfo = Get-WmiObject -Class Win32_OperatingSystem

$versionText = Get-VersionText -version $osInfo.Version.Split('.')[0]

Write-Host "You're running $versionText"

}

Finally, add this function below the first one (Get-VersionText):

function Get-VersionText {
param($version)

Switch ($version) {

10{$versionText = 'Windows 10'}

6.3 {$versionText = 'Windows 8.1 or Server 2012 R2'}

6.2 {$versionText = 'Windows 8 or Server 2012'}

6.1 {$versionText = 'Windows 7 or Server 2008 R2'}

6.0 {$versionText = 'Windows Vista or Server 2008'}

5.2 {$versionText = 'Windows Server 2003/2003 R2'}

5.1 {$versionText = 'Windows XP'}

5.0 {$versionText = 'Windows 2000'}

}

Return $versionText

}

The script should now look like this:

Functions should do one thing, and that one thing well. The second function adds a switch statement. The switch statement evaluates a variable's value and performs actions depending on what it receives. It also accepts one parameter, which is $version

In the first function we use the .split() method on the version, and the [0] to select the first element in the split array.

You can see the result of that method if you run the following lines individually:

$osInfo = Get-WmiObject -Class Win32_OperatingSystem

$osInfo.Version.Split('.')[0]

That should return '10'. (if you're running Windows 10) 

If you'd like to see what the whole array looks like type

$osInfo.Version.Split('.')

You should see the following results (may vary depending on your version).

Let's get back to our script! Go ahead and run it!

If all goes well, it will display the returned text of the version you're running. 

What it does

At the bottom of the script the first function is called via the Get-OSInfo command. 

The function (Get-OSInfo) stores the WMI information for the  Win32_OperatingSystem class in the $osInfo variable.

Then we declare $versionText, which calls the function Get-VersionText  with the parameter -version and argument $osInfo.Version.Split('.')[0]

The Get-VersionText function then runs, and uses the Switch statement to determine how to set $versionText depending on what the value of $version is. This value is then returned into the $versionText variable called in the first function.

Finally, it uses Write-Host to display the text version of the version you're running that's stored in the $versionText variable.

After it executes, it will output "You're running Windows 10". (Or whichever version of Windows you're running).


That covers the basics of using functions in PowerShell. I will go over more advanced functions in part 4!

Homework

  • Use the Get-VersionText function with different numbers as the argument for the -version parameter.

  • Write your own functions! Maybe get some ideas from this post on Get-WMIObject.

  • Get a deeper understanding of the switch statement. How would you make it return a value in $versionText if none of the numbers specified are a match?

I hope you've enjoyed the series so far! As always, leave a comment if you have any feedback or questions!

-Ginger Ninja

[Back to top]

PowerShell Quick Tip: Basic use of the -f format operator

PowerShell Quick Tip: Basic use of the -f format operator

What the -f?

There are many ways to manipulate/build strings in PowerShell. One of my favorite ways is to use the -f format operator. When you use the operator, it evaluates everything to the right of -f as an array that starts at index value 0 (as all PowerShell arrays do). The values are comma separated.

Setup

For this demonstration I setup the following variables:

[array]$formatArray = @('you','values','them.')
$user               = (Get-ChildItem Env:\USERNAME).Value
$date               = Get-Date

Using the -f operator

Example one

"Your user name is {0}, and the time is [{1:HH}:{1:mm}:{1:ss}]" -f $user,$date

Returns

Your user name is Mike, and the time is [12:54:44]

Example two

Since it is indexing values as an array (starting at zero), you can actually feed it an array. Let's look at the values of the $formatArray array.

0 = you
1  = values
2 = them

Knowing that now, let's run this command:

"These {1} go where {0} place {2}" -f $formatArray

Returns

These values go where you place them.

Pretty cool, huh? There are multiple uses for this! Here is one example from a logging module I wrote. The context here is the user used the -addDate $true argument, and I need to append the date to the log name.

    if ($addDate) {
        
        if ($logName.Contains('.')) {
            
            $logName = $logName.SubString(0,$logName.LastIndexOf('.')) + "_{0:MM-dd-yy_HHmm}" -f (Get-Date) + $logName.Substring($logName.LastIndexOf('.'))
            
            Write-Verbose "Adding date to log file with an extension! New file name: $logName"
            Write-Verbose ""
           
        } else {
            
            $logName = $logName + "_{0:MM-dd-yy_HHmm}" -f (Get-Date)
            
            Write-Verbose "Adding date to log file. New file name: $logName"
            Write-Verbose ""
            
        }
         
    }

But wait... there's more!

As you can see in the examples above you can use the value with a colon and then specify more options. For these examples I used the options for getting specific values returned by Get-Date such as:

{1:HH}:{1:mm}:{1:ss}

This allows us to enumerate the values specifically for the 24 hour hour, minutes, and seconds returned by $date (which is where Get-Date is stored from the setup above).

There are other options you can use to to further format your strings. There are ones for different placements, spaces, and even returning different number values.  To check out the full details of what the -f format operator can do, check out these links!

As always, let me know if you have any questions or ideas in the comments section below!

-Ginger Ninja

PowerShell: Getting Started - Command Discovery

PowerShell: Getting Started - Command Discovery

Getting Started - Command Discovery

Welcome to my Getting Started with Windows PowerShell series!

Terminology Overview

This part may not be as exciting as the hands on stuff, but it is important to understand. Don't worry if you don't grasp a lot of it right away. It will all come together the more you use PowerShell. When your knowledge of it deepens you'll see more and more use cases for it yourself! We'll actually be building scripts, functions, and modules in subsequent posts! If you would like to skip to the hands-on stuff (and I don't blame you!) click here.

Cmdlets

Cmdlets are essentially snippets of .NET code or classes that perform a single function in PowerShell. The core functionality of PowerShell revolves around Cmdlets. Keep in mind that when you are creating functions, modules, or scripts that you aren't actually creating Cmdlets. If you'd like to look further into actually creating Cmdlets, check out this page. Please note that it is not actually writing PowerShell at that point.  It's .NET code that will interact, and provide functionality TO PowerShell.

Scripts

A PowerShell script is simply a file with a .ps1 extension that contains a series of PowerShell commands. The profile we created is actually an example of a PowerShell script.

Functions

A function in PowerShell is a series of commands that are grouped together to perform a specific task (or at least, that's the best practice). You can write functions and scripts that mimic the behavior of Cmdlets (via providing error checking and comment based help). Here's an example of a function I wrote in my post about using the LIFX API.

function Set-LightState { #Begin function Set-LightState
    [cmdletbinding()]
    param(
        [Parameter()]
        [ValidateSet('on','off')]
        [string]
        $state,
        [Parameter()]  
        [string]
        $color,
        [Parameter()]
        [ValidateRange(0.0,1)]
        [double]
        $brightness,
        [string]
        $selector
    )

    if ($lifxLight.Connected) {          

        $fullURL  = "$baseurl/$($lifxLight.id)/state"             
        $payload  = [PSCustomObject]@{

            power      = $state
            color      = $color
            brightness = $brightness

        }

        $payloadJson = $payload | ConvertTo-Json

        Write-Host "Attempting to Change light to:" -ForegroundColor $foregroundcolor
        Write-Host `t"State     :" $state
        Write-Host `t"Color     :" $color
        Write-Host `t"Brightness:" ($brightness * 100)"%" `n

        $stateReturn = Invoke-RestMethod -headers $headers -uri $fullURL -Method Put -Body $payloadJson -ContentType $acceptheader
    
        Write-Host "API status:" -ForegroundColor $foregroundcolor
        Write-Host `t"Light :" $stateReturn.results.label
        Write-Host `t"Status:" $stateReturn.results.status `n
    
    } else {
        
        $lightName = $lifxLight.label
        Write-Host "$lightName is offline or unreachable :("
        
    }    

} #End function Set-LightState

Here are some examples of that function in action.

Below you can see it being referenced in some code further on in the script.

Let's create a simple function to see how they work interactively.

function Get-RandomNameChaos {
param([string]$Name,
      [int]$Times
     )
    
    if ($Name) {
        $i = 1
        
        Do {

            Write-Host (Get-Random "`t","`n") [$i] [$Name] -foregroundColor (Get-Random -Minimum 1 -Maximum 15) -backgroundColor (Get-Random -Minimum 1 -Maximum 15)
        
            $i++
    
        } While ($i -lt ($times + 1)) 

    } else {

    Write-Host 'No name specified!' 
    
    }
}

This functions takes two arguments, -Name and -Time

You can get the function to work in PowerShell by:

  • Copy and pasting it in from above
  • Putting it in a script file and calling it within the script
  • Putting it in a module file and importing the module

I decided to paste it in and show you what happens as an example. I ran:

Get-RandomNameChaos -Name Mike -Times 3

Functions can take different arguments which are assigned to the parameters defined. 

This function we created has [int] next to the $Times parameter. This means that if you put anything other than an integer as a value, you will get an error message. 

Try running the function by calling it with different arguments. Maybe 100 for times, or even putting a non-integer value in just to see what it does.

Modules

Modules are PowerShell scripts with a .psm1 extension that contain a group of functions. Once you write a lot of functions you use over and over, it's generally a good time to create a module. You can import modules in PowerShell by using the Import-Module command. Here's an example of a logging module I created:

Above I imported my module to add logging functionality via specific functions I created. I then ran Get-Command -Module ninjalogging to get a list of commands it provides. 

Command structure

PowerShell Cmdlets (and well written functions) utilize the following format: Verb-Noun.

You can use the Get-Verb command to see a list of verbs that PowerShell uses and are officially approved. This can be handy when you're creating your own functions so you can use an approved verb that fits.

You can also run the following command which utilizes Get-CommandGroup-Object, and Sort-Object to list out the most commonly used verbs for all the PowerShell CMDlets you have access to.

Get-Command -CommandType Cmdlet | Group-Object Verb | Sort-Object Count -Descending | Format-Table -Autosize

If you have any questions about the above string of piped commands let me know in the comments, or try using Get-Help <command>.

As you can see a lot of the Cmdlets use only a few of the approved verbs. I find myself trying to use a lot of those verbs myself. There's Get, Set, and New just to name a few.

Aliases

There are aliases in PowerShell that make writing out one-liners and troubleshooting during a fire easier to manage. To see a list of aliases type Get-Alias.

You can even create you own aliases and use them in PowerShell. The alias I personally use the most is ls. To see what that Alias is linked to you can use:

Get-Alias -Name ls

ls is simply an alias for Get-ChildItem

Simple, but it provides a quick way to execute different Cmdlets and shorthand format.

You can check if an alias exists, and create your own with the following commands:

Get-Alias -name log
New-Alias -Name log -Value Out-LogFile -Description 'Link to Out-LogFile'
Get-Process | Out-String | log

The above example will not work for you as you do not have a function named Out-LogFile. What it does in my case is creates a text file logging the output of Get-Process. If you want to try to create your own alias, use Get-Process for the value and psax for the Name. Give it any Description you'd like.

You can then use:

Get-Alias -Name 'your alias name' 

to check on it. Here is the result for my example:

Command Discovery

The most straightforward command to use to discover commands is... Get-Command.

This command will display the commands as well as the command type, version, and its source.

You can narrow the scope of this command in various ways. One way is to specify the source:

Get-Command -Module Microsoft.PowerShell.Management

Let's say you wanted to discover all the commands available that had to do with processes. Let's try:

Get-Command -Name "*process*"

You could also run:

Get-Command | Where-Object {$_.Name -like "*process*"}

The $_. placeholder variable stands for the current element in the pipeline. In this case it would run through each line that is returned from Get-Command and look at the property Name ($_.Name). It then uses the comparison operator -like which allows us to specify wildcards. 

Either way the results are the same, and let's focus in on...

Get-Process

Here is the result of running Get-Process.

Formatting the results

You can also pipe the command to Format-List

Get-Process | Format-List

Here's an example of how to use Select-Object and Sort-Object. You can add more properties the the list if you want! Mess around with it to see what you can come up with that's useful to you. Here's what I ran:

Get-Process | Select-Object Name,CPU | Sort-Object CPU -Descending | Format-Table -AutoSize

Another way to output this information is to use Out-GridView. This can be a great way to get a visual of the returned items.

Get-Process | Out-GridView

In this instance I know that Get-Process is actually capable of displaying much more information. Let's try this command:

Get-Process | Select-Object * | Out-GridView

Well, that's a lot more information!

You can even add criteria to narrow it down.

I added one here (Use the [+ Add Criteria] button in the upper left) for VirtualMemorySize that islessthanorequalto 100000000.

Here's another one for Name contains chrome.

Exporting the Results

We can also use Get-Process with > and >>. These are very simple ways to output the results to a file.

Creates a new file every time (and will overwrite the file if it exists)
>> Appends the results to a file if it exists, or creates one if it doesn't

Let's look at:

Get-Process > processes.txt

Let's run the following command to see the contents of the file:

Start-Process .\processes.txt.

You can also use [TAB] completion. Try typing Start-Pro[TAB] .\pr[TAB]

Start-Process will take the input you give it and then run that with the associated application handler that's set. For example:

Start-Process www.google.com

The above command would open your default browser, and then navigate to www.google.com

Back to Get-Process!

If you were to use:

Get-Process >> processes.txt

It would append the results to the file that already exists.

Out-File

You can also use Out-File. I prefer this option as you have more control over what happens. You can specify the encoding, path, and other various options such as NoClobber.

Let's give it a try:

Get-Process | Out-File -FilePath C:\ninja\process.txt 

To append to this file using Out-File you would use:

Get-Process | Out-File -FilePath C:\ninja\process.txt -Append

Using Stop-Process with Get-Process

One of the handy things you can do with Get-Process is pipe it to Stop-Process. Just don't do this without specifying a process name, or you will very likely end up causing your computer to reboot!

This can, however, be a handy way to kill a hung process. Let's say you wanted to close any open notepad.exe instances. 

Get-Process notepad | Stop-Process

You wont see any information returned, and that usually means it found the process and stopped it as well. 

Profile Review

Below I have commented out the profile we created in part one with information on what each line is doing. 

#Set the variable $foregroundColor to be white. Global means it will be set in all scopes. 
$global:foregroundColor = 'white'

#Store the results of Get-Date in the $time variable
$time = Get-Date

#Store the current version in the $psVersion variable
$psVersion= $host.Version.Major

#Store the current user and computer in each variable 
$curUser= (Get-ChildItem Env:\USERNAME).Value
$curComp= (Get-ChildItem Env:\COMPUTERNAME).Value

#Write-Host writes to the host that's running the script. In this case, very likley your console!
#The following lines takes the variables above and uses them in the output in various ways.
Write-Host "Greetings, $curUser!" -foregroundColor $foregroundColor
Write-Host "It is: $($time.ToLongDateString())"
Write-Host "You're running PowerShell version: $psVersion" -foregroundColor Green
Write-Host "Your computer name is: $curComp" -foregroundColor Green
Write-Host "Happy scripting!" `n

#This replaces the default prompt function with our own!
function Prompt {

#We get the time again as this function runs every single time you hit enter.
$curtime = Get-Date

#Writing to the host, this time with -noNewLine.
#-NoNewLine means it will keep writing to the same line. 
#This allows us to use multiple colors on the same line.
Write-Host -NoNewLine "p" -foregroundColor $foregroundColor
Write-Host -NoNewLine "$" -foregroundColor Green
Write-Host -NoNewLine "[" -foregroundColor Yellow

#This line uses a string format operator (-f) and takes the results from Get-Date and formats them on the left.
#I'll be detailing more about how that works in a later post!

Write-Host -NoNewLine ("{0:HH}:{0:mm}:{0:ss}" -f (Get-Date)) -foregroundColor $foregroundColor

#Closing off the prompt 
Write-Host -NoNewLine "]" -foregroundColor Yellow
Write-Host -NoNewLine ">" -foregroundColor Red

#This variable controls the PowerShell window title. We set it to the current path everytime this function runs.
$host.UI.RawUI.WindowTitle = "PS >> User: $curUser >> Current DIR: $((Get-Location).Path)"

#This next line is needed so we can override the default prompt with our Write-Host above!
Return " "

}

Homework

  • Write your own profile using the one I gave you as a template for ideas.
  • Customize the Get-RandomNameChaos function some more!
  • Figure out just what the heck "{0}" -f (Get-Date) does and how it works. (Hint: String format operators)
  • Get Get-Process | Out-GridView to show you only properties you care about.
  • Learn what a calculated property is.

In part 3, we go over the ISE and creating functions!

-Ginger Ninja

[Back to top]

PowerShell: Getting Started - Customizing Your Environment!

PowerShell: Getting Started - Customizing Your Environment!

Getting Started - Basics and Environment Customization

Welcome to my Getting Started with Windows PowerShell series!

We will be exploring:

Update 4/24/19: Look for some of these series pages to get revamped. PowerShell Core is making waves! If you haven’t checked it out, you should.

Looking to get started with Visual Studio Code + PowerShell? Check out this post:

Just What is PowerShell?

PowerShell is a framework provided by Microsoft that provides a platform for automation, general scripting, and well just about anything you can imagine doing with it. It's based on .NET, and has hooks into pretty much anything Windows can do. There are a lot of new things introduced with PowerShell, and it is ever evolving. You can also still use old commands you're familiar with like ping, but you have much more powerful options at your finger tips (like Test-Connection).  If you'd like a deeper dive into what PowerShell is, check out Microsoft's Scripting Guy's post, here.

PowerShell is an object-oriented programming language with a ton of features. Everything we work with PowerShell is an object one way or another. What this means is we can get information from it via properties, and take actions with it via methods.

You can use PowerShell in two distinct ways.

PowerShell also makes it easy to create your own custom objects, more on that in another post!

PowerShell Versions

Here's the breakdown: 

  • Windows 7 comes with Windows PowerShell version 2.0 installed by default. If you're still running Windows 7, and want to try out the latest version of PowerShell (currently 5.0), you'll need to install the Windows Management Framework update

  • Windows 8 versioning is a bit strange

  • You can run PowerShell 2.0-3.0

    • You cannot run PowerShell 4.0+

  • Windows 8.1 let's you run version 5.0

  • Windows 10 comes with PowerShell version 5.0 installed by default, and if you're all updated (which it is hard not to be with how Windows 10 updates work...) version 5.1+ will be available

If for some reason you're using a machine running Windows XP, PowerShell 2.0 will work with this download.

PowerShell Core

PowerShell core heralds the open sourcing of PowerShell, check it out on Github! You can even run it on your Raspberry Pi.

How can I check what version I have?

Well, first you'll have to open PowerShell

  1. Hit the Windows key or click the Start icon/button.

  2. Type in 'PowerShell', and select 'Windows PowerShell'

I recommend pinning PowerShell to your taskbar as well. This makes it really easy to launch.

PowerShell stores the version in a special variable dedicated to host information. This variable is aptly named $host. To see the value of this variable, type $host into your console and press enter. You should see a similar result to this:

If you simply wanted to return the latest version, try typing $host.Version to display the Version property only.

Finally, if you want to just return the Major Version, use $host.Version.Major.

For a more detailed write up on versions and supported OSs, see this post at 4sysops.

How PowerShell Works

PowerShell works by executing commands, and then provides you a way to interpreting the results. Everything in PowerShell either is or becomes an object in one way or another. Think of an object in this instance as something you can take action on via methods, and get information from via properties.

Let's learn some more basics before we go about customizing our environment. Don't worry too much about grasping terminology! With PowerShell especially, learning by doing is where it's at.

'Hello World'

Even the simplest thing in PowerShell, such as 'Hello World',  becomes an object you can take action on. Go ahead and type the following command in PowerShell:

'hello world'.Length

The above example should return 11, as seen below.

Since 'Hello World' is an object, we can pipe it via "|" to Get-Member to see what we can do with it. Piping in PowerShell is the act of adding the "|" character to take the results of the input before it, and pass that over to the next command. Let's go ahead and run this:

'Hello World' | Get-Member

You should see the following:

You can see that the object Type is of System.String, and below that the various methods and properties. To use them, simply add a dot after 'Hello World' and specify the one you'd like to use. For instance, I wonder what ToUpper does. Let's see!

'Hello World'.ToUpper

Hmm... that looks a little weird. That's because to execute the method, you need to put a pair of parentheses after it. Sometimes you can include different values in the parentheses to include overload options. What we're seeing here is the definition of those options for .ToUpper(). For this example we can just use:

'Hello World'.ToUpper()

Get-Member will likely be one of the handiest cmdlets you will use. It lets you know what properties and methods the object contains.

Now that we've covered some basics, let's get back to checking out...

Ping vs Test-Connection

Let's ping google.com via PowerShell.

Ping Google.com

Alright, pretty standard! Let's see what Test-Connection Google.com does.

Test-Connection Google.com

Now that looks a little bit different. So what's so special about Test-Connection? To see what else Test-Connection can do and the options it provides, use:

Get-Help Test-Connection

Notice under REMARKS it states that I don't have the help files stored on my computer. To remedy this, right click your PowerShell icon on the taskbar, and go to Run as Administrator. Then use this command:

Update-Help

Now let's see the help for Test-Connection again!

Get-Help Test-Connection

Under the SYNTAX portion you can see that Test-Connection accepts the -ComputerName parameter. This is the one that Google.com was placed into by default. It then specifies what the input is expected to be. This parameter accepts a string, and string array. That is what the [] next to string means. Think of an array as a collection of values.

To see examples of how to run Test-Connection, type:

Get-Help Test-Connection -Examples

Variables

Let's take advantage of the fact that Test-Connection's -ComputerName parameter can accept a string array. To do this, we'll need to create a variable and add some values to it. The best way to create a string array is to use this command:

[System.Collections.ArrayList]$testArray = @()

This above code will create an empty array in the variable $testArray. Think of a variable as a container of objects.

Let's add some hosts to this array that we'll want to use with Test-Connection

$testArray.Add('192.168.1.1')
$testArray.Add('google.com')
$testArray.Add('qwertyuiop.asdf')
 

Arrays in PowerShell always start with 0, and when we use the .Add method on this array you can see it outputs the index of the element(value) we are adding. To add an element without seeing that, simply pipe $testArray.Add('yahoo.com') to Out-Null.

$testArray.Add('yahoo.com') | Out-Null

You can see it did not return the index number this time. To display the values in the array, type:

$testArray

OK! Now that we have our array setup, let's use:

Test-Connection -ComputerName $testArray

You can even use Test-Connection with conditional logic. 

if (Test-Connection Google.com) {Write-Host "Success!"} 

Since Test-Connection Google.com returned $true, it proceeds to perform the command in the script block {}.

I wonder what happens if you replace Google.com with 'qwertyuiop.asdf'...

Alright! Now that we've gone through some more of the basic concepts, it's time to...

Customize Your Environment

Open up your PowerShell console and Right Click the title bar. 

  1. Select Properties.

  2. Select the Font tab to adjust the font.

  3. Select the Colors tab to set the colors you want.

Customizing your profile

PowerShell uses profile files to automatically load a script when you start the PowerShell console.

Let's take a look at the file PowerShell uses for your current user profile on all hosts (meaning the ISE and console). We'll get into the different host types in a different post. The special variable we'll want to look at is $profile, and we'll want to see the CurrentUserAllHosts property.

$profile.CurrentUserAllHosts

It looks like the generic Dell account (my way to have a fresh instance of PowerShell) I'm using would have the profile stored in:

C:\Users\Dell\Documents\WindowsPowerShell\profile.ps1

Since the folder and file do not exist, let's use the New-Item cmdlet to create each. Be sure to change the values to match what your result was from the $profile.CurrentUserAllHosts value. Note: the file will still be profile.ps1, and only the user name should change.

New-Item -Path C:\Users\Dell\Documents\ -ItemType Directory -Name WindowsPowerShell
New-Item -Path C:\Users\Dell\Documents\WindowsPowerShell\ -ItemType File -Name profile.ps1

To auto-magically do this, you can use the following commands:

New-Item -Path "$((Get-ChildItem ENV:\UserProfile).Value)\Documents\" -ItemType Directory -Name WindowsPowerShell
New-Item -Path "$((Get-ChildItem ENV:\UserProfile).Value)\Documents\WindowsPowerShell" -ItemType File -Name profile.ps1

Now you should be able to use the Start-Process cmdlet(which opens a file with the associated handler in Windows automatically) to open and edit the profile file.

Start-Process $profile.CurrentUserAllHosts

You should now have a blank text file open with profile.ps1 as the name in the upper left.

Let's add the following code to the profile.ps1 file:
I will detail what this code does in the next post!

$foregroundColor = 'white'
$time = Get-Date
$psVersion= $host.Version.Major
$curUser= (Get-ChildItem Env:\USERNAME).Value
$curComp= (Get-ChildItem Env:\COMPUTERNAME).Value

Write-Host "Greetings, $curUser!" -foregroundColor $foregroundColor
Write-Host "It is: $($time.ToLongDateString())"
Write-Host "You're running PowerShell version: $psVersion" -foregroundColor Green
Write-Host "Your computer name is: $curComp" -foregroundColor Green
Write-Host "Happy scripting!" `n

function Prompt {

$curtime = Get-Date

Write-Host -NoNewLine "p" -foregroundColor $foregroundColor
Write-Host -NoNewLine "$" -foregroundColor Green
Write-Host -NoNewLine "[" -foregroundColor Yellow
Write-Host -NoNewLine ("{0}" -f (Get-Date)) -foregroundColor $foregroundColor
Write-Host -NoNewLine "]" -foregroundColor Yellow
Write-Host -NoNewLine ">" -foregroundColor Red

$host.UI.RawUI.WindowTitle = "PS >> User: $curUser >> Current DIR: $((Get-Location).Path)"

Return " "

}

Once you've added the content, save profile.ps1.
Now close and re-open your PowerShell console.

It should now look similar to this:

Each time you type a command the function named prompt executes and changes both the prompt (to include the current time), and the Window Title (to include the current user and directory).

In the next post I will be going over command discovery and formatting results. 

Homework

  • Try to figure out exactly how the string format operator works in the prompt function to format the time.

  • Use Get-Command to discover more PowerShell commands.

  • Find some commands to run (maybe Get-Date)? and Pipe them to Get-Member to see what properties and methods they contain.

  • Declare a variable and use that variable to use the methods and display the properties available. Hint: $time = Get-Date.

  • Further customize your profile to change up your prompt and title!

Let me know if you have any questions! Feedback is always appreciated.

-Ginger Ninja

[Back to top]

PowerShell: List out your PuTTY sessions

PowerShell: List out your PuTTY sessions

I wanted a way to export my PuTTY sessions as I was about to reformat my machine. You could export the registry keys and keep them, but I wanted something more visual as well. So I turned to my dear old trusty friend, PowerShell.

What you'll need

  • PowerShell
  • PuTTY installed with at least one session
  • The ability to overlook Write-Host as an always bad thing
    • It's only mostly always bad, ok? But I wanted some formatting and colors
      • I'm only judging myself a little bit.

Let's jump into it! (The code)

$sessions          = Get-ChildItem 'HKCU:\Software\SimonTatham\PuTTY\Sessions'
[array]$properties = @('HostName','TerminalType','TerminalSpeed')

Write-Host 'Listing PuTTy sessions' -ForegroundColor Green `n
foreach ($session in $sessions) {
    
    $name       = ($session.Name.Substring($session.Name.LastIndexOf("\") + 1)).Replace("%20"," ")
    Write-Host $name -ForegroundColor White
    
    Foreach ($property in $properties) {
                
        Write-Host -NoNewLine `t $property":" -ForegroundColor Green
        Write-Host $session.GetValue($property)
        
        }

    Write-Host `n
    
}

There isn't too much to this one, but it's also the tip of the iceberg. I chose to make it more human readable as if you simply did this:

Get-ChildItem HKCU:\Software\SimonTatham\PuTTY\Sessions

The output is all of the key's properties:

So what I did is cherry picked some of the values I wanted to display.

[array]$properties = @('HostName','TerminalType','TerminalSpeed')

I then used a foreach loop to go through each property listed and display it for that session.

Foreach ($property in $properties) {

Write-Host -NoNewLine `t $property":" -ForegroundColor Green
Write-Host $session.GetValue($property)

}

The execution

My PuTTY session is pretty lonely, but just one will work!

PowerShell code execution:

I named my script Backup-Putty.ps1 as I initially made it as a way to get a quick human readable copy and paste of the sessions I cared about. With more effort you could easily make this script output the list into a CSV and store it that way.

PowerShell Quick Tip: Use a text file to omit values in an array

PowerShell Quick Tip: Use a text file to omit values in an array

After making the Lun Check Script I had an issue come up when somebody decommissioned a server. The LUNs that were mapped needed to be set offline for a week, then deleted. Since the script would see if ANY LUNs (sans ones with test in the name) were offline, this triggered an alert. 

To mitigate this problem, I added a text file that the script imports and uses to exclude any LUNs with the names included in the file in their path.

To demonstrate this, here is an example text file contents:

Exclude.txt File contents:
test
al*
delta
th*

$processThis would be the full list of LUNs, for example.

$exclude = Get-Content C:\exclude.txt
$processThis = @('test','delta','alpha','this','that','and','the','other','thing')

We can try to use -notin to see how that works when excluding the contents of Exclude.txt...

$processThis | Where-Object {$_ -notin $exclude}
alpha
this
that
and
the
other
thing

Well, that worked for 'test' and 'delta', but not the wildcard entries! I need to accommodate wildcards per my team's request.  To do this I used a ForEach-Object with Where-Object nested inside of it.

$omit = $exclude | ForEach-Object{$no = $_;$processthis | Where-Object{$_ -like $no}}

Now $omit will contain the full list of items to omit.

$omit
test
alpha
delta
this
that
the
thing

And we can finally use Where-Object with -notin to finish it up.

$processThis | Where-Object {$_ -notin $omit}
and
other

I hope you found this helpful! If you know of a better way, or have any questions, let me know!

-Ginger Ninja

PowerShell: NetApp LUN monitoring with a PRTG custom sensor

PowerShell: NetApp LUN monitoring with a PRTG custom sensor

When a LUN goes offline, bad things tend to happen on the host using it. It is good to know sooner rather than later if that happens. I was looking for a way to do this and what made the most sense was using PowerShell and PRTG.

Requirements

  • PRTG installation (you can get it free for up to 100 sensors!)
    • While you don't NEED PRTG that is how this script reports back. You'll need to change what the actions are for offline LUNs if you want to do other things.
  • ONTap PowerShell toolkit
    • This will need to be installed where you are using the script.
  • A user account on the NetApp(s) that the script can leverage.

Setup

You'll need to setup:

  • The module full path for the ONTap toolkit (if different).
  • The password setup section that is commented out.
  • The username ($user) you are going to use to connect to the NetApp(s).
  • The array ($netAppControllers) of your controllers. For 7-mode simply include the controller name, for CDOT add -c after the name so the script knows which is which.
  • The $exclude variable file path. (It is best to set this up even if it is a blank text file).
[cmdletbinding()]
param(
    [string]
    $Controller,
    [string]
    $action
)
#Import the OnTap module manually using the following path.
Import-Module 'C:\Program Files (x86)\NetApp\NetApp PowerShell Toolkit\Modules\DataONTAP\dataontap.psd1'

#Encrypted password hash used to get the password securely.
$File = "D:\PRTG Network Monitor\Custom Sensors\EXEXML\lunpass.txt"

#Setup password (Do this one time or whenever you change the password!:
#[Byte[]] $key = (1..16)
#$Password = "P@ssword1" | ConvertTo-SecureString -AsPlainText -Force
#$Password | ConvertFrom-SecureString -key $key | Out-File $File

#User account used to get NetApp information.
$user                     = 'your NetApp PowerShell user account'

#Key used to decrypt password
[Byte[]] $key = (1..16)

#Import the password from the file using the key.
$pass = Get-Content $File | ConvertTo-SecureString -Key $key

#Create the credential used to connect to each NetApp controller
$netAppCredential         = New-Object System.Management.Automation.PSCredential($user,$Pass)

#Set the variable which contains all of your controllers (add -c for CDOT)
$global:NetAppControllers = @('netapp1','netapp2','netapp3-c')

#LUNs to exclude
$exclude = Get-Content 'D:\PRTG Network Monitor\Custom Sensors\EXEXML\exclude.txt'

#This sets the variable of $stopTxt to null (which is set later if there is a failed LUN)
$stopTxt = $null

The functions and switch

#This function connects to the 7-Mode controllers the way they need to be connected to, as well as C-DOT.
function Connect-NetAppController {

    
    if (($foundController).Split("-")[1] -like "*c*") { 

        $nController = $foundController.Split("-")[0]


        if (Test-Connection $nController -Count 1 -Quiet) {

       
        Connect-NcController $nController -Credential $netAppCredential | Out-Null

    
        } Else {
            
           #Write-Host `n"Unable to ping: " $nController
            
        }

    } else {

        $7Controller = $foundController

        if (Test-Connection $foundController -Count 1 -Quiet) {
        
        $7Controller = $foundController

        Connect-NaController $foundController -Credential $netAppCredential | Out-Null

       
         } Else {
            
            #Write-Host `n"Unable to ping: " $7Controller
            
        }
    } 
}

#This functions takes the object created in the switch and output the information properly for PRTG to interpret
Function Display-PRTGText {
[cmdletbinding()]
param([array]
      $PRTGObject
)   
    
    $header = '<prtg>'
    $footer = '</prtg>'

    Write-Output $header
    
    foreach ($lun in $PRTGObject) {

    if ($lun.NameOff) {
        
        $stopTxt    = $true
        $offlineLun += $lun.NameOff 
        
    }    

    if ($lun.Exclusions) {
        
        $exclude    = $true
        $excludeTxt = $lun.Exclusions
        
    }
    
    Write-Output "
    
    <result>
    <channel>Total LUNs ($($lun.Name))</channel>
    <value>$($lun.TotalLuns)</value>
    </result>
    
    <result>
    <channel>Offline LUNs ($($lun.Name))</channel>
    <value>$($lun.OfflineLuns)</value>
    </result>
    
    "   
    }

    if ($stopTxt) {
        
        Write-Output "
        
        <text>Offline LUNs: $offlineLun</text>
        
        "
    } elseif (!$stopTxt -and $exclude) {
        
        Write-Output "
        
        <text>Exclusions: $excludeTxt</text>
        
        "
    }

    Write-Output $footer    
    
}


#This switch takes action based on what you specify in the parameter. Right now there is only one: luncheck
Switch ($action) {
    
    'luncheck' {
          
        if ($controller -eq 'all') { 
    
            [array]$cModeControllers = $NetAppControllers
     
        } else {
            
            [array]$cmodecontrollers = $controller

        }
        
        #Set/Clear this array to be used at the NetApp Object
        [array]$netAppObject = $null
        
        foreach ($array in $cModeControllers) {
            $foundcontroller = $array
            $controller      = $array   
            $numLuns         = 0
            $numOn           = 0
            $numOff          = 0
            $offline         = $null
            $online          = $null
            $luns            = $null
            $omit            = $null
            $newLuns         = $null
            $text            = $null
            
            #if it is a CDOT controllers (I add -c in the name to segement them out)
            if (($foundController).Split("-")[1] -like "*c*") {

                Connect-NetAppController 
                
                $luns    = Get-NCLun | Where-Object{$_.Path -notlike "*test*"}

                if ($exclude.count -gt 0) {

                    $omit = $exclude | ForEach-Object{$no = $_;$luns | Where-Object{$_.path -like $no}}
                    $luns = $luns | Where-Object{$_.Path -notin $omit.Path}
                
                }
                
                $numLuns = $luns.count
                $offline = $luns | Where-Object{$_.Online -ne $true}
                $online  = $luns | Where-Object{$_.Online -eq $true}
                $numOff  = $offline.count
                $numOn   = $online.count       
                
                $netAppProp     = @{Name=$controller}
                $netAppProp     += @{TotalLuns=$numLuns}
                $netAppProp     += @{OfflineLuns=$numOff}
                $netAppProp     += @{OnlineLuns=$numOn}
                $netAppProp     += @{Exclusions=$exclude}
                
                if ($numOff -gt 0) {
                    
                    foreach ($off in $offline) {[array]$text += 'Lun: ' + $off.path + ' VServer: ' + $off.vserver}                
                    $netAppProp += @{NameOff=$text}
                    
                }

                $naO             = New-Object PSObject -Property $netAppProp
                $netAppObject   += $naO       
                                      
            #Else they are 7-mode so use 7-mode commands            
            } else {

                Connect-NetAppController 
                
                $luns    = Get-NALun | Where-Object{$_.Path -notlike "*test*"}  
                
                if ($exclude.count -gt 0) {
                    
                    $omit = $exclude | ForEach-Object{$no = $_;$luns | Where-Object{$_.path -like $no}}
                    $luns = $luns | Where-Object{$_.Path -notin $omit.Path}
                
                }
                
                $numLuns = $luns.count
                $offline = $luns | Where-Object{$_.Online -ne $true}
                $online  = $luns | Where-Object{$_.Online -eq $true}
                $numOff  = $offline.count
                $numOn   = $online.count
                
                $netAppProp     = @{Name=$controller}
                $netAppProp     += @{TotalLuns=$numLuns}
                $netAppProp     += @{OfflineLuns=$numOff}
                $netAppProp     += @{OnlineLuns=$numOn} 
                $netAppProp     += @{Exclusions=$exclude}
                              
                if ($numOff -gt 0) {
                    
                    foreach ($off in $offline) {[array]$text += 'Lun: ' + $off.path}           
                    $netAppProp += @{NameOff=$text}
                    
                }
                
                $naO             = New-Object PSObject -Property $netAppProp
                $netAppObject   += $naO    

            }      
        
        }
   
        Display-PRTGText $netAppObject
    
    }
}

The code lets you run the script specifying "all" controllers (which will use the array defined at the beginning of the script), or a controller of your choice.

The function Display-PRTGText takes the $netAppObject object that is built below in the switch option luncheck. It first displays the PRTG header, the LUN information, and finally the PRTG footer. 

The switch looks for the action you'd like to take. Right now there is only one, "luncheck". You can add more for different sensor types to check different things based on what you pass to -action.

Examples

To test the script, run it as follows:

.\Lun-Check.ps1 -Controller yourcontroller-c -action luncheck

The above code will execute and if all goes well it will return results with opening and closing <prtg> tags.

If there are any offline, they will be returned into the PRTG sensor via the <text> tag. 

Exclusions

You can exclude certain LUNs from being checked. If you have decommissioned a server or are testing anything that involves setting a LUN's state to be offline this can be handy. Add entries to exclude.txt line by line. You can include either the full LUN path, or anything in the path name with wildcards around it.  Please note that there is also a line that omits any LUN with "test" in the name. To change this, remove that if line.

Examples:

  • /vol/finance1/lun1
  • *finance*

The first example will omit just that one LUN, whereas the second example will omit any LUN with finance in the path. Any exclusions you do add will be noted in the sensor's message as text if no LUNs are currently offline.

Once you have verified you received the results from the script as needed, we can now perform the sensor setup in PRTG.

PRTG Setup

You'll want to perform the following steps in PRTG:

  1. Ensure you have the script in your EXEXML custom sensor folder. Example: "D:\PRTG Network Monitor\Custom Sensors\EXEXML\lun-check.ps1"
  2. Create an "EXE/Script Advanced" sensor on a device of your choice.
  3. Select the lun-check.ps1 script in the drop down.
  4. Set the following parameters: -controller all -action luncheck
  5. Modify the timeout of the script to 180 seconds.

If you do not want to use the array with all the NetApp(s) change 'all' to the name of a controller. If it is a CDOT controller, be sure to add -c to the name.

You should now see channels for total and offline LUNs.

I have it setup to show the sensor as down if there are any LUNs offline. To do this, be sure to change the channel limits accordingly. It will return the path of the LUN and the VServer it is on (CDOT) or just the path for 7-Mode. This is displayed in the sensor's message as text.


And finally, you'll want to tweak the notification settings of the sensor if for some reason you want it different than the parent's settings.

Full Code

[cmdletbinding()]
param(
    [string]
    $Controller,
    [string]
    $action
)
#Import the OnTap module manually using the following path.
Import-Module 'C:\Program Files (x86)\NetApp\NetApp PowerShell Toolkit\Modules\DataONTAP\dataontap.psd1'

#Encrypted password hash used to get the password securely.
$File = "D:\PRTG Network Monitor\Custom Sensors\EXEXML\lunpass.txt"

#Setup password (Do this one time or whenever you change the password!:
#[Byte[]] $key = (1..16)
#$Password = "P@ssword1" | ConvertTo-SecureString -AsPlainText -Force
#$Password | ConvertFrom-SecureString -key $key | Out-File $File

#User account used to get NetApp information.
$user                     = 'your NetApp PowerShell user account'

#Key used to decrypt password
[Byte[]] $key = (1..16)

#Import the password from the file using the key.
$pass = Get-Content $File | ConvertTo-SecureString -Key $key

#Create the credential used to connect to each NetApp controller
$netAppCredential         = New-Object System.Management.Automation.PSCredential($user,$Pass)

#Set the variable which contains all of your controllers (add -c for CDOT)
$global:NetAppControllers = @('netapp1','netapp2','netapp3-c')

#LUNs to exclude
$exclude = Get-Content 'D:\PRTG Network Monitor\Custom Sensors\EXEXML\exclude.txt'

#This sets the variable of $stopTxt to null (which is set later if there is a failed LUN)
$stopTxt = $null

#This function connects to the 7-Mode controllers the way they need to be connected to, as well as C-DOT.
function Connect-NetAppController {

    
    if (($foundController).Split("-")[1] -like "*c*") { 

        $nController = $foundController.Split("-")[0]


        if (Test-Connection $nController -Count 1 -Quiet) {

       
        Connect-NcController $nController -Credential $netAppCredential | Out-Null

    
        } Else {
            
           #Write-Host `n"Unable to ping: " $nController
            
        }

    } else {

        $7Controller = $foundController

        if (Test-Connection $foundController -Count 1 -Quiet) {
        
        $7Controller = $foundController

        Connect-NaController $foundController -Credential $netAppCredential | Out-Null

       
         } Else {
            
            #Write-Host `n"Unable to ping: " $7Controller
            
        }
    } 
}

#This functions takes the object created in the switch and output the information properly for PRTG to interpret
Function Display-PRTGText {
[cmdletbinding()]
param([array]
      $PRTGObject
)   
    
    $header = '<prtg>'
    $footer = '</prtg>'

    Write-Output $header
    
    foreach ($lun in $PRTGObject) {

    if ($lun.NameOff) {
        
        $stopTxt    = $true
        $offlineLun += $lun.NameOff 
        
    }    

    if ($lun.Exclusions) {
        
        $exclude    = $true
        $excludeTxt = $lun.Exclusions
        
    }
    
    Write-Output "
    
    <result>
    <channel>Total LUNs ($($lun.Name))</channel>
    <value>$($lun.TotalLuns)</value>
    </result>
    
    <result>
    <channel>Offline LUNs ($($lun.Name))</channel>
    <value>$($lun.OfflineLuns)</value>
    </result>
    
    "   
    }

    if ($stopTxt) {
        
        Write-Output "
        
        <text>Offline LUNs: $offlineLun</text>
        
        "
    } elseif (!$stopTxt -and $exclude) {
        
        Write-Output "
        
        <text>Exclusions: $excludeTxt</text>
        
        "
    }

    Write-Output $footer    
    
}


#This switch takes action based on what you specify in the parameter. Right now there is only one: luncheck
Switch ($action) {
    
    'luncheck' {
          
        if ($controller -eq 'all') { 
    
            [array]$cModeControllers = $NetAppControllers
     
        } else {
            
            [array]$cmodecontrollers = $controller

        }
        
        #Set/Clear this array to be used at the NetApp Object
        [array]$netAppObject = $null
        
        foreach ($array in $cModeControllers) {
            $foundcontroller = $array
            $controller      = $array   
            $numLuns         = 0
            $numOn           = 0
            $numOff          = 0
            $offline         = $null
            $online          = $null
            $luns            = $null
            $omit            = $null
            $newLuns         = $null
            $text            = $null
            
            #if it is a CDOT controllers (I add -c in the name to segement them out)
            if (($foundController).Split("-")[1] -like "*c*") {

                Connect-NetAppController 
                
                $luns    = Get-NCLun | Where-Object{$_.Path -notlike "*test*"}

                if ($exclude.count -gt 0) {

                    $omit = $exclude | ForEach-Object{$no = $_;$luns | Where-Object{$_.path -like $no}}
                    $luns = $luns | Where-Object{$_.Path -notin $omit.Path}
                
                }
                
                $numLuns = $luns.count
                $offline = $luns | Where-Object{$_.Online -ne $true}
                $online  = $luns | Where-Object{$_.Online -eq $true}
                $numOff  = $offline.count
                $numOn   = $online.count       
                
                $netAppProp     = @{Name=$controller}
                $netAppProp     += @{TotalLuns=$numLuns}
                $netAppProp     += @{OfflineLuns=$numOff}
                $netAppProp     += @{OnlineLuns=$numOn}
                $netAppProp     += @{Exclusions=$exclude}
                
                if ($numOff -gt 0) {
                    
                    foreach ($off in $offline) {[array]$text += 'Lun: ' + $off.path + ' VServer: ' + $off.vserver}                
                    $netAppProp += @{NameOff=$text}
                    
                }

                $naO             = New-Object PSObject -Property $netAppProp
                $netAppObject   += $naO       
                                      
            #Else they are 7-mode so use 7-mode commands            
            } else {

                Connect-NetAppController 
                
                $luns    = Get-NALun | Where-Object{$_.Path -notlike "*test*"}  
                
                if ($exclude.count -gt 0) {
                    
                    $omit = $exclude | ForEach-Object{$no = $_;$luns | Where-Object{$_.path -like $no}}
                    $luns = $luns | Where-Object{$_.Path -notin $omit.Path}
                
                }
                
                $numLuns = $luns.count
                $offline = $luns | Where-Object{$_.Online -ne $true}
                $online  = $luns | Where-Object{$_.Online -eq $true}
                $numOff  = $offline.count
                $numOn   = $online.count
                
                $netAppProp     = @{Name=$controller}
                $netAppProp     += @{TotalLuns=$numLuns}
                $netAppProp     += @{OfflineLuns=$numOff}
                $netAppProp     += @{OnlineLuns=$numOn} 
                $netAppProp     += @{Exclusions=$exclude}
                              
                if ($numOff -gt 0) {
                    
                    foreach ($off in $offline) {[array]$text += 'Lun: ' + $off.path}           
                    $netAppProp += @{NameOff=$text}
                    
                }
                
                $naO             = New-Object PSObject -Property $netAppProp
                $netAppObject   += $naO    

            }      
        
        }
   
        Display-PRTGText $netAppObject
    
    }
}

I wrote this to fill a need rather quickly. For error handling, the PRTG sensor itself does a good job at telling you why and where the script broke. As for variable renaming and cleanup, that is something I am always striving to do.

I hope you found this helpful, and as always feedback is appreciated!

-Ginger Ninja


PowerShell: Easy function for connecting to sessions on remote domain controllers

PowerShell: Easy function for connecting to sessions on remote domain controllers

One of the things I love doing with PowerShell is enabling my team to learn how to use it while providing tools that make specific or repetitive commands easy to use. 

Enter-PSSession is easy and straightforward to use, however it can be made even easier and used in a way to let users select from a list of servers, pick one, and then establish that connection.

Requirements

The Code

function Enter-DCSession {
    [cmdletbinding()]
    param(
        )
    $i = 0
    Write-Host "Enter PowerShell session on: ('q' exits to terminal)"`n -foregroundcolor $foregroundcolor
    foreach ($d in $ourDCs){
        if ($i -lt 10) {Write-Host "" $i -> $d.Name} else {Write-Host $i -> $d.Name}
        $i++
    
    }
   
    $enterSession = Read-Host "DC #?"
    While (!$adminCredential) { $adminCredential = Get-Credential -UserName 'domain\' -Message "Please input your admin account" }
if (($enterSession -ne "q") -and ($ourDCs.Name -contains $ourDCs[$enterSession].Name)) { 
        
        Write-Host "Connecting to remote session... type 'exit' to drop back to the local session."`n
        Enter-PSSession -ComputerName $ourDCs[$enterSession].Name -Credential $adminCredential
        
    } else {
        
        Write-Host `n'q or invalid option specified.' -ForegroundColor Red
        
    }
}

You can use this function in a module, and then call it via Enter-DCSession. It will then display a list of DCs stored in $ourDCs, and allow you to connect to one of them.

The logic in the script will only accept valid name selections as it compares the returned result to the names in the array $ourDCs.

if (($enterSession -ne "q") -and ($ourDCs.Name -contains $ourDCs[$enterSession].Name))

Come to think of it, I could actually just have the latter half of that if statement an it would work the same way. There's some cleanup I'll have to do :)

This script's logic can apply to a variety of things. You have a list of objects you want to take an action on in an array as a start, and then you use a foreach to do it. Using $i = 0 before the foreach, and then $i++ within the foreach, allows you to provide users a number to interact with that matches the number in the array. 

That is how this script takes numbers as an input that matches the name in the array.

I hope you found this helpful, and I'm always open to feedback!

-Ginger Ninja


PowerShell Quick Tip: Simple logging with time stamps

PowerShell Quick Tip: Simple logging with time stamps

Today I was writing a script at work to check sysvol replication. We have a DC that will sometimes not share the love outbound, yet inbound works just fine. That means to test it I needed to create a file on that DC, and ensure it replicates outward. Normally, I would check event log or use WMI queries, however everything looks good even when it isn't working.

After writing the script, I wanted to add some very simple logging so I could save the results a file (which is then emailed out). 

KISS 

I kept this simple, as I needed something that I could write while not taking up too much time to do it. In the script, I created a function to format a time stamp.

Timestamp function

function Get-TimeStamp {
    
    return "[{0:MM/dd/yy} {0:HH:mm:ss}]" -f (Get-Date)
    
}

Told you it was simple! You can use it with Write-Output and use Out-File to add content into a log file.

Write-Output "$(Get-TimeStamp) I can connect to $dc" | Out-file C:\dclog.txt -append

Here are the results in the text file from the script after it runs:

[2/15/2016 9:27 AM] File test927AM created dc1
[2/15/2016 9:27 AM] File test927AM exists on dc1
[2/15/2016 9:30 AM] File test927AM removed from dc1
[2/15/2016 9:32 AM] I can connect to dc1

I added some Start-Sleep statements in there as you can see with the time stamp differences. Once I tidy up the sysvol replication checker script I'll share that here.

I hope you found this helpful, let me know if you have a better way or any questions/comments!

-Ginger Ninja

PowerShell: Fun with Weather Underground's API (part 2)

PowerShell: Fun with Weather Underground's API (part 2)

In the last post we learned how to use Weather Underground's API to resolve a city name and get data back from it. Once we get those two URLs we can use them to get data back from the API.  I also tied this into my LIFX light, which I posted about here.

Requirements

Setup

[cmdletbinding()]
param(
    [string]
    $city = (Read-Host "City?"),
    [string]
    $forecast = 'forecast',
    [boolean]
    $sendEmail,
    [boolean]
    $lifx,
    [boolean]
    $sendAlertEmail
)

if (!$foregroundColor) {$foregroundColor = 'green'}
$baseURL      = 'http://api.wunderground.com/api/'
$apiKey       = 'yourAPIKey'
$acceptHeader = 'application/json'

#"password" | ConvertTo-SecureString -AsPlainText -Force | ConvertFrom-SecureString | Out-File .\emlpassword.txt

$emailPass    = Get-Content .\emlpassword.txt | ConvertTo-SecureString  
$weatherList  = Get-Content .\emails.txt
$alertList    = Get-Content .\alertEmails.txt
$emailUser    = 'yourEmailUsername'
$emailFrom    = 'youremail@service.com'
$smtpServer   = 'smtp.gmail.com'
$smtpPort     = '587'

The Setup

  • Name: Get-Weather.ps1
  • Variables:
    • $baseURL = (Weather Underground's base URL for the API, should be fine with default).
    • $apiKey = Your API key that you get from signing up.
    • $acceptHeader = Header/formatting settings (default is good).
    • $emailPass = Set your password by running the commented line above it. This will be user/machine encrypted.
    • $weatherList = Create a text file (named emails.txt) in the script directory that contains a list of people to email the forecasts to. 
    • $alertList  = Create a text file (named alertEmails.txt) in the script directory that contains a list of people to email/text alerts to. I made this different so I could setup text message alerts.
    • $emailUser = Your user name for the email address we're sending from.
    • $emailFrom  = Your from email address.
    • $smtpServer  = Your SMTP server. Default is Google's.
    • $smtpPort = Your SMTP server's port. This is Google's default.
  • Parameters
    • city (will prompt for one if left blank)
    • forecast (Will default to 4 day which is the value 'forecast')
      Values:
      • forecast  (4 day)
      • hourly (next 36 hours)
      • camera (emails an email address a random webcam from the city specified)
    • sendEmail (accepts $true, defaults to $false) This is for sending the email forecast.
    • lifx (accepts $true, defaults to $false) This is for LIFX light integration. Currently it will flash your LIFX light red when there is an alert. More coming soon with this!
    • sendAlertEmail (accepts $true, defaults to $false) This is to send an email (which I use the carrier's email to text address to text myself) if an alert is found.

The first function: Get-Weather

This function will first use the auto-complete API and then from there create the URLs and use them to get the weather data. It will also return the API results at the end. That way you can run the script like this:

$weatherChicago = .\Get-Weather.ps1 -city Chicago

And it will return what the API returns, as well as display some information:

The variable $weatherChicago will contain what the API returned. 

With this information you can really drill down and see what is available. It was by doing this that I got the initial ideas for parts of this script. Here's an example of the information returned via:

$weatherChicago.current_observation

After the function finds the city and displays the basic info, it then moves forward to check which forecast was specified and if that forecast is to be emailed. 

Get-Weather function code

function Get-Weather {
    param()
   
    $findMe = $city
    $find   = Invoke-RestMethod -Uri "http://autocomplete.wunderground.com/aq?query=$findMe"

    if ($find) {
        
        $cityAPI  = $find.Results[0].l
        $city     = $find.Results[0].name
        
        $fullURL  = $baseURL + $apiKey + "/features/conditions/hourly/forecast/webcams/alerts" + "$cityAPI.json"
        $radarURL = "http://api.wunderground.com/api/$apiKey/animatedradar/animatedsatellite" + "$cityAPI.gif?num=6&delay=50&interval=30"
        
        Write-Host `n"API URLS for $city" -foregroundcolor $foregroundColor
        Write-Host `t$fullURL
        Write-Host `t$radarURL
        
        $weatherForecast = Invoke-RestMethod -Uri $fullURL -ContentType $acceptHeader
        
        $currentCond     = $weatherForecast.current_observation
        
        Write-Host `n"Current Conditions for: $city" -foregroundColor $foregroundColor
        Write-Host $currentCond.Weather 
        Write-Host "Temperature:" $currentCond.temp_f"F"
        Write-Host "Winds:" $currentCond.wind_string
        
        $curAlerts = $weatherForecast.alerts 
        
        if ($curAlerts) {
            
            if ($lifx) { Get-LIFXAPI -action flashcolor -brightness 1 -color Red -state on }
            
            $typeName = Get-WeatherFunction -Weather 'alert' -value $weatherForecast.alerts
            
            $alertDate  = $curAlerts.date
            $alertExp   = $curAlerts.expires 
            $alertMsg   = $curAlerts.message
            
            Write-Host `n"Weather Alert! ($typeName)" -foregroundcolor Red
            Write-Host "Date: $alertDate Expires: $alertExp"
            Write-Host "$alertMsg"    
            
            if ($sendAlertEmail) {

                Foreach ($email in $alertList) {
                    
                    Send-WeatherEmail -to $email -Subject "Weather Alert!" -Body "Alert Type: $typeName City: $city Message: $alertMsg"
                
                }
            }                  

        } 
        
    }

    Switch ($forecast) {
    
        {$_ -eq 'hourly'} {
 
            if ($sendEmail) {

                $hourlyForecast = $weatherForecast.hourly_forecast
                
                $body = "<p></p>"
                $body += "<p>Here is your hourly forecast!</p>"
                
                $selCam   = Get-Random $weatherForecast.webcams.count
                
                $camImg   = $weatherforecast.webcams[$selCam].CURRENTIMAGEURL
                $camName  = $weatherForecast.webcams[$selCam].linktext
                $camLink  = $weatherForecast.webcams[$selCam].link
                
                $body += "<p>Random webcam shot from: <a href=`"$camLink`">$camName</a></p>"
                $body += "<p><img src=`"$camImg`"></p>"                 
                                
                $body += "<p>$city Radar:</p>"
                $body += "<p><img src=`"$radarURL`"></p>"  
                
                if ($curAlerts) {
                    
                    $body += "<p><b><font color=`"red`">Weather Alert! ($typeName)</font></b></p>"
                    $body += "<p>Date: $alertDate Expires: $alertExp</p>"
                    $body += "<p>$alertMsg</p>"    
    
                }           
                
                foreach ($hour in $hourlyForecast) {
                    
                    $body += "<p></p>"
                    $body += "<p></p>"
                    
                    $prettyTime       = $hour.fcttime.pretty
                    $hourTemp         = $hour.temp.english  
                    $hourImg          = $hour.icon_url
                    
                    [int]$hourChill   = $hour.windchill.english
                    
                    if ($hourChill -eq -9999) {
                    
                        $hourChilltxt = 'N/A'
                        
                    } else {
                        
                        $hourChilltxt = $hourChill.ToString() + 'F'
                   
                    }
                                        
                    $hourWind         = $hour.wspd.english
                    $windDir          = $hour.wdir.dir
                    $hourUV           = $hour.uvi
                    $dewPoint         = $hour.dewpoint.english
                    $hourFeels        = $hour.feelslike.english
                    $hourHum          = $hour.humidity
                    $conditions       = $hour.condition
                    [int]$hourPrecip  = $hour.pop
                    
                    $popText = Get-WeatherFunction -Weather 'preciptext' -value $hourPrecip
                    
                    $body += "<p><b>$prettyTime</b></p>"
                    $body += "<p><img src=`"$hourImg`">$conditions</p>"
                    $body += "<p>Chance of precipitation: $hourPrecip% / $popText</p>"
                    $body += "<p>Current Temp: $hourTemp`F Wind Chill: $hourChilltxt Feels Like: $hourFeels`F</p>"
                    $body += "<p>Dew Point: $dewPoint</p>"
                    $body += "<p>Wind Speed: $hourWind`mph Direction: $windDir</p>"
                    $body += "<p>Humidity: $hourHum%</p>"
                    $body += "<p>UV Index: $hourUV"     
                    
                }
                
                foreach ($email in $weatherList) {Send-WeatherEmail -To $email -Subject "Your hourly forecast for $city" -body $body}
            
            }            
        
        }
        
        {$_ -eq 'forecast'} {                
              
            if ($sendEmail) {

                $todayForecast = $weatherForecast.forecast.simpleforecast.forecastday
                
                $body = "<p></p>"
                $body += "<p>Here is your 4 day forecast!</p>"
                
                $selCam   = Get-Random $weatherForecast.webcams.count
                
                $camImg   = $weatherforecast.webcams[$selCam].CURRENTIMAGEURL
                $camName  = $weatherForecast.webcams[$selCam].linktext
                $camLink  = $weatherForecast.webcams[$selCam].link
                
                $body += "<p>Random webcam shot from: <a href=`"$camLink`">$camName</a></p>"
                $body += "<p><img src=`"$camImg`"></p>"                 
                
                $body += "<p>$city Radar:</p>"
                $body += "<p><img src=`"$radarURL`"></p>"      
                
                $curAlerts = $weatherForecast.alerts 
                
                if ($curAlerts) {
                    
                    $body += "<p><b><font color=`"red`">Weather Alert! ($typeName)</font></b></p>"
                    $body += "<p>Date: $alertDate Expires: $alertExp</p>"
                    $body += "<p>$alertMsg</p>"    

                }                   
               
                foreach ($day in $todayForecast) {
                    
                    $body += "<p></p>"
                    $body += "<p></p>"
                    
                    $dayImg          = $day.icon_url
                    $dayMonth        = $day.date.monthname
                    $dayDay          = $day.date.day
                    $dayName         = $day.date.weekday
                    $dayHigh         = $day.high.fahrenheit  
                    $dayLow          = $day.low.fahrenheit
                    $maxWind         = $day.maxwind.mph
                    $aveWind         = $day.avewind.mph
                    $aveHum          = $day.avehumidity
                    $conditions      = $day.conditions
                    [int]$dayPrecip  = $day.pop
                    
                    $popText = Get-WeatherFunction -Weather 'preciptext' -value $dayPrecip
                    
                    $body += "<p><b>$dayName, $dayMonth $dayDay</b></p>"
                    $body += "<p><img src=`"$dayImg`">$conditions</p>"
                    $body += "<p>Chance of precipitation: $dayPrecip% / $popText</p>"
                    $body += "<p>High: $dayHigh`F Low: $dayLow`F</p>"
                    $body += "<p>Ave Winds: $aveWind`mph Max Winds: $maxWind`mph</p>"
                    $body += "<p>Humidity: $aveHum%</p>"
         
                }

                foreach ($email in $weatherList) {Send-WeatherEmail -To $email -Subject "Your 4 day forecast for $city" -body $body}
            
            }  
            
        }

        {$_ -eq 'camera'} {
            
            $selCam    = Get-Random $weatherForecast.webcams.count
            
            $camImg    = $weatherforecast.webcams[$selCam].CURRENTIMAGEURL
            $camName   = $weatherForecast.webcams[$selCam].linktext
            $camLink   = $weatherForecast.webcams[$selCam].link
            
            $fileExt   = $camImg.SubString($camImg.LastIndexOf("."),4)
            
            $cityShort = $city.substring(0,$city.lastindexof(","))
            
            $fileName  = $cityShort + $fileExt
            
            $location  = (Get-Location).Path
            
            $camFile   = Invoke-WebRequest -Uri $camImg -OutFile "$location\$fileName"   
            
            $file = $location + "\" + $fileName
            
            $gallery = 'YourSquareSpaceGalleryOrEmailToSendAttachmentTo' 
            
            $SMTPClient             = New-Object Net.Mail.SmtpClient($SmtpServer, 587)
            $SMTPMessage            = New-Object System.Net.Mail.MailMessage($emailFrom,$gallery,"$city cam","$city cam")
            $SMTPClient.Credentials = New-Object System.Net.NetworkCredential($emailUser,$emailPass)
            
            $att                    = New-Object Net.Mail.Attachment($file)
            $SMTPClient.EnableSsl   = $true
           
            Switch (($fileName.substring($fileName.LastIndexOf(".")+1)).tolower()) {
                
                {$_ -like "*png*"} {
                
                    $typeExt = 'png'    
                    
                }
                
                {$_ -like "*jpg*"} {
                
                    $typeExt = 'jpg'     
                    
                }
                
                {$_ -like "*gif*"} {
                    
                    $typeExt = 'gif' 
                    
                }                                
                
            }
            
            $SMTPMessage.Attachments.Add($att)
            ($smtpmessage.Attachments).contenttype.mediatype = "image/$typeExt"
            
            $SMTPClient.Send($SMTPMessage)
            
            $att.Dispose()
            $SMTPMessage.Dispose()
            
            Remove-Item $file
            
        }
    
    } 
    
    Return $weatherForecast

}

Let's take a look at some of the code

The 'camera' option uses its own email sending commands since I had to change the MIME type of the attachment. There is also a variable used to specify where to send the email to. This variable is within the switch for now (until I clean it up!) as $gallery. You'll want to change that to an email address you want to receive the attached webcam shot.

 For some reason when sending an image file PowerShell sends it with type information stating it is an application. The following code is what I used to fix that. I noticed this issue when it wouldn't post to SquareSpace unless I first sent it to my Gmail, and then forwarded it to SquareSpace. Once I forwarded it I noticed it would post. It was then I decided to take a look at the full email details and saw the difference in attachment types.

That led me to write the following section of code so I could send the random webcam shot to the gallery and have it post.

{$_ -eq 'camera'} {
            
            $selCam    = Get-Random $weatherForecast.webcams.count
            
            $camImg    = $weatherforecast.webcams[$selCam].CURRENTIMAGEURL
            $camName   = $weatherForecast.webcams[$selCam].linktext
            $camLink   = $weatherForecast.webcams[$selCam].link
            
            $fileExt   = $camImg.SubString($camImg.LastIndexOf("."),4)
            
            $cityShort = $city.substring(0,$city.lastindexof(","))
            
            $fileName  = $cityShort + $fileExt
            
            $location  = (Get-Location).Path
            
            $camFile   = Invoke-WebRequest -Uri $camImg -OutFile "$location\$fileName"   
            
            $file = $location + "\" + $fileName
            
            $gallery = 'your SquareSpace gallery URL or Email address to send pictures to' 
            
            $SMTPClient             = New-Object Net.Mail.SmtpClient($SmtpServer, 587)
            $SMTPMessage            = New-Object System.Net.Mail.MailMessage($emailFrom,$gallery,"$city cam","$city cam")
            $SMTPClient.Credentials = New-Object System.Net.NetworkCredential($emailUser,$emailPass)
            
            $att                    = New-Object Net.Mail.Attachment($file)
            $SMTPClient.EnableSsl   = $true
           
            Switch (($fileName.substring($fileName.LastIndexOf(".")+1)).tolower()) {
                
                {$_ -like "*png*"} {
                
                    $typeExt = 'png'    
                    
                }
                
                {$_ -like "*jpg*"} {
                
                    $typeExt = 'jpg'     
                    
                }
                
                {$_ -like "*gif*"} {
                    
                    $typeExt = 'gif' 
                    
                }                                
                
            }
            
            $SMTPMessage.Attachments.Add($att)
            ($smtpmessage.Attachments).contenttype.mediatype = "image/$typeExt"
            
            $SMTPClient.Send($SMTPMessage)
            
            $att.Dispose()
            $SMTPMessage.Dispose()
            
            Remove-Item $file
            
        }

The above code downloads the file, looks at what type of image it is, and then changes the type accordingly. After that it constructs an email object, attaches the file, send the email, and finally removes the file.

The next function is Send-WeatherEmail

function Send-WeatherEmail {
    [cmdletbinding()]
    param(
    [Parameter(Mandatory=$true,ValueFromPipeline=$true)]
    [string]
    $To,
    
    [string]
    [Parameter(Mandatory=$true,ValueFromPipeline=$true)]
    $Subject,
    
    [Parameter(Mandatory=$true,ValueFromPipeline=$true)]
    $Body,
    
    [string]
    $attachment
    )

    if (!$to)      {Write-Error "No recipient specified";break}
    if (!$subject) {Write-Error "No subject specified";break}
    if (!$body)    {Write-Error "No body specified";break}
   
    $gmailCredential = New-Object System.Management.Automation.PSCredential($emailUser,$emailPass)
       
    Send-MailMessage -To $to -From $emailFrom -Body $body -BodyAsHtml:$true -Subject $Subject -SmtpServer $smtpServer -Port $smtpPort -UseSsl -Credential $gmailCredential
 
}

This function is a short and sweet function that wraps up Send-MailMessage so you can use it throughout the script easily.

Now onto the function Get-WeatherFunction

function Get-WeatherFunction {
    [cmdletbinding()]
    param(
        [string]
        $weather,
        $value       
    )
    
    Switch ($weather) {
        
        {$_ -eq 'preciptext'} {
        
            Switch ($value) {
                
                {$_ -lt 20} {
                    
                    $popText = 'No mention'
                    
                }
                
                {$_ -eq 20} {
                    
                    $popText = 'Slight Chance'
                    
                }
                
                {($_ -lt 50 -and $_ -gt 20)} {
                    
                    $popText = 'Chance'
                    
                }
                
                {$_ -eq 50} {
                    
                    $popText = 'Good chance'
                    
                }
                
                {($_ -lt 70 -and $_ -gt 50)} {
                    
                    $popText = 'Likely'
                    
                }
                
                {$_ -ge 70} {
                    
                    $popText = 'Extremely likely'
                    
                }
                
            }
            
            Return $popText
            
        }   
        
        {$_ -eq 'alert'}    {
            
            Switch ($curAlerts.type) {
                
                'HEA' {$typeName = 'Heat Advisory'}
                'TOR' {$typeName = 'Tornado Warning'}
                'TOW' {$typeName = 'Tornado Watch'}
                'WRN' {$typeName = 'Severe Thunderstorm Warning'}
                'SEW' {$typeName = 'Severe Thunderstorm Watch'}
                'WIN' {$typeName = 'Winter Weather Advisory'}
                'FLO' {$typeName = 'Flood Warning'}
                'WAT' {$typeName = 'Flood Watch / Statement'}
                'WND' {$typeName = 'High Wind Advisory'}
                'SVR' {$typeName = 'Severe Weather Statement'}
                'HEA' {$typeName = 'Heat Advisory'}
                'FOG' {$typeName = 'Dense Fog Advisory'}
                'SPE' {$typeName = 'Special Weather Statement'}
                'FIR' {$typeName = 'Fire Weather Advisory'}
                'VOL' {$typeName = 'Volcanic Activity Statement'}
                'HWW' {$typeName = 'High Wind Warning'}
                'REC' {$typeName = 'Record Set'}
                'REP' {$typeName = 'Public Reports'}
                'PUB' {$typeName = 'Public Information Statement'}
                    
            }
                
            Return $typeName
    
        }    
    }
    
}

This is perhaps one of the gnarliest functions I've ever named. I'll have to rethink the name, perhaps. For now, let's look at what it does. 

Currently it will take the parameter $weather and take different actions based on the input. If you specify 'preciptext' it will return the precipitation chance in text format based on the number it is given. For example if you run: 

Get-WeatherFunction -Weather 'preciptext' -value 71

It will return 'Extremely Likely'.

If you specify 'alert' then you'll be able to provide the 3 letter alert code Weather Underground returns via the API and return the full alert text. For example: 

Get-WeatherFunction -Weather 'alert' -value 'HEA'

This would return 'Heat Advisory'.

The final function: Get-LIFXApi

function Get-LIFXApi {
[cmdletbinding()]
param(
    [string]
    $action = 'setstate',
    [string]
    $state = 'on',
    [string]
    $color = 'white',
    [double]
    $brightness = '0.4'
)

$apiKey          = 'YourLifxApiKey'
$base64Key       =  [Convert]::ToBase64String([Text.Encoding]::ASCII.GetBytes(($apiKey)))
$headers         =  @{Authorization=("Basic {0}" -f $base64Key)}
$allURL          = 'https://api.lifx.com/v1/lights/all' 
$acceptheader    = 'application/json'
$baseURL         = 'https://api.lifx.com/v1/lights/'
$foregroundColor = 'white'
[array]$colors   = @('white','red','orange','yellow','cyan','green','blue','purple','pink')

$ninjaLights     = Invoke-RestMethod -headers $headers -Uri $allURL

function Change-LightState {
    [cmdletbinding()]
    param(
        [string]
        $state,
        [string]
        $color,
        [double]
        $brightness,
        [string]
        $selector
    )
    
    $ninjaID  = $ninjaLights.id
    $selector = 'id:' + $ninjaID
    $fullURL  = $baseurl + $selector + '/state'

    $payloadBuilder = "{
                    `"power`": `"$state`",
                    `"color`": `"$color`",
                    `"brightness`" : $brightness 
                    }"

    Write-Host "Changing light to:" -ForegroundColor $foregroundcolor
    Write-Host `t"State     :" $state
    Write-Host `t"Color     :" $color
    Write-Host `t"Brightness:" ($brightness * 100)"%" `n

    $stateReturn = Invoke-RestMethod -headers $headers -uri $fullURL -Method Put -Body $payloadBuilder
    
    Write-Host "API status:" -ForegroundColor $foregroundcolor
    Write-Host `t"Light :" $stateReturn.results.label
    Write-Host `t"Status:" $stateReturn.results.status `n
    
    
}

Switch ($action) {
    
    'setstate' { Change-LightState -state $state -color $color -brightness $brightness -selector $selector }
    
    'fluxtest' { 
        
        $originalBrightness = $ninjaLights.Brightness
        $originalColor      = $ninjalights.Color
        $originalState      = $ninjalights.Power
        $colorString        = "hue:" + $originalcolor.hue + " saturation:" + $originalcolor.saturation + " kelvin:" + $originalColor.Kelvin       
          
        $i = 0
        
        While ($i -le 20) {
            
            $color              = Get-Random $colors
            [double]$brightness = "{0:n2}" -f (Get-Random 0.99)
 
            Change-LightState -color $color -brightness $brightness -selector $selector -state $state
            Start-Sleep -seconds 1
            $i++
            
        }
        
        Change-LightState -state $originalState -color $colorString -brightness $originalBrightness -selector $selector  
        
    } 
    
    'flashcolor' {
        
        $originalBrightness = $ninjaLights.Brightness
        $originalColor      = $ninjalights.Color
        $originalState      = $ninjalights.Power
        $colorString        = "hue:" + $originalcolor.hue + " saturation:" + $originalcolor.saturation + " kelvin:" + $originalColor.Kelvin
        
        Change-LightState -state $state -color $color -brightness $brightness -selector $selector
        Start-Sleep -Seconds 1
        
        Change-LightState -state $originalState -color $colorString -brightness $originalBrightness -selector $selector
        Start-Sleep -Seconds 1
                
        Change-LightState -state $state -color $color -brightness $brightness -selector $selector
        Start-Sleep -Seconds 1
        
        Change-LightState -state $originalState -color $colorString -brightness $originalBrightness -selector $selector
        Start-Sleep -Seconds 1        
        
        Change-LightState -state $state -color $color -brightness $brightness -selector $selector
        Start-Sleep -Seconds 1
        
        Change-LightState -state $originalState -color $colorString -brightness $originalBrightness -selector $selector
                        
    }
}    
    
    
}

I wrote the above function as a script initially when I learned that LIFX provides and API you can use to control your light! It is currently called if the parameter lifx is $true, and if there is a current alert.

if ($lifx) { Get-LIFXAPI -action flashcolor -brightness 1 -color Red -state on }

It then performs the switch option 'flashcolor' which flashes the light red at 100%. It then returns the light to whatever setting it was set to before it started flashing. To get this function to work you'll need to change $apiKey to your LIFX Cloud API key. For more details on working with the LIFX API, check out my post here.

Full code

[cmdletbinding()]
param(
    [string]
    $city = (Read-Host "City?"),
    [string]
    $forecast = 'forecast',
    [boolean]
    $sendEmail,
    [boolean]
    $lifx,
    [boolean]
    $sendAlertEmail
)

if (!$foregroundColor) {$foregroundColor = 'green'}
$baseURL      = 'http://api.wunderground.com/api/'
$apiKey       = 'yourAPIKey'
$acceptHeader = 'application/json'

#"password" | ConvertTo-SecureString -AsPlainText -Force | ConvertFrom-SecureString | Out-File .\emlpassword.txt

$emailPass    = Get-Content .\emlpassword.txt | ConvertTo-SecureString  
$weatherList  = Get-Content .\emails.txt
$alertList    = Get-Content .\alertEmails.txt
$emailUser    = 'yourEmailUsername'
$emailFrom    = 'youremail@service.com'
$smtpServer   = 'smtp.gmail.com'
$smtpPort     = '587'

function Get-Weather {
    param()
   
    $findMe = $city
    $find   = Invoke-RestMethod -Uri "http://autocomplete.wunderground.com/aq?query=$findMe"

    if ($find) {
        
        $cityAPI  = $find.Results[0].l
        $city     = $find.Results[0].name
        
        $fullURL  = $baseURL + $apiKey + "/features/conditions/hourly/forecast/webcams/alerts" + "$cityAPI.json"
        $radarURL = "http://api.wunderground.com/api/$apiKey/animatedradar/animatedsatellite" + "$cityAPI.gif?num=6&delay=50&interval=30"
        
        Write-Host `n"API URLS for $city" -foregroundcolor $foregroundColor
        Write-Host `t$fullURL
        Write-Host `t$radarURL
        
        $weatherForecast = Invoke-RestMethod -Uri $fullURL -ContentType $acceptHeader
        
        $currentCond     = $weatherForecast.current_observation
        
        Write-Host `n"Current Conditions for: $city" -foregroundColor $foregroundColor
        Write-Host $currentCond.Weather 
        Write-Host "Temperature:" $currentCond.temp_f"F"
        Write-Host "Winds:" $currentCond.wind_string
        
        $curAlerts = $weatherForecast.alerts 
        
        if ($curAlerts) {
            
            if ($lifx) { Get-LIFXAPI -action flashcolor -brightness 1 -color Red -state on }
            
            $typeName = Get-WeatherFunction -Weather 'alert' -value $weatherForecast.alerts
            
            $alertDate  = $curAlerts.date
            $alertExp   = $curAlerts.expires 
            $alertMsg   = $curAlerts.message
            
            Write-Host `n"Weather Alert! ($typeName)" -foregroundcolor Red
            Write-Host "Date: $alertDate Expires: $alertExp"
            Write-Host "$alertMsg"    
            
            if ($sendAlertEmail) {

                Foreach ($email in $alertList) {
                    
                    Send-WeatherEmail -to $email -Subject "Weather Alert!" -Body "Alert Type: $typeName City: $city Message: $alertMsg"
                
                }
            }                  

        } 
        
    }

    Switch ($forecast) {
    
        {$_ -eq 'hourly'} {
 
            if ($sendEmail) {

                $hourlyForecast = $weatherForecast.hourly_forecast
                
                $body = "<p></p>"
                $body += "<p>Here is your hourly forecast!</p>"
                
                $selCam   = Get-Random $weatherForecast.webcams.count
                
                $camImg   = $weatherforecast.webcams[$selCam].CURRENTIMAGEURL
                $camName  = $weatherForecast.webcams[$selCam].linktext
                $camLink  = $weatherForecast.webcams[$selCam].link
                
                $body += "<p>Random webcam shot from: <a href=`"$camLink`">$camName</a></p>"
                $body += "<p><img src=`"$camImg`"></p>"                 
                                
                $body += "<p>$city Radar:</p>"
                $body += "<p><img src=`"$radarURL`"></p>"  
                
                if ($curAlerts) {
                    
                    $body += "<p><b><font color=`"red`">Weather Alert! ($typeName)</font></b></p>"
                    $body += "<p>Date: $alertDate Expires: $alertExp</p>"
                    $body += "<p>$alertMsg</p>"    
    
                }           
                
                foreach ($hour in $hourlyForecast) {
                    
                    $body += "<p></p>"
                    $body += "<p></p>"
                    
                    $prettyTime       = $hour.fcttime.pretty
                    $hourTemp         = $hour.temp.english  
                    $hourImg          = $hour.icon_url
                    
                    [int]$hourChill   = $hour.windchill.english
                    
                    if ($hourChill -eq -9999) {
                    
                        $hourChilltxt = 'N/A'
                        
                    } else {
                        
                        $hourChilltxt = $hourChill.ToString() + 'F'
                   
                    }
                                        
                    $hourWind         = $hour.wspd.english
                    $windDir          = $hour.wdir.dir
                    $hourUV           = $hour.uvi
                    $dewPoint         = $hour.dewpoint.english
                    $hourFeels        = $hour.feelslike.english
                    $hourHum          = $hour.humidity
                    $conditions       = $hour.condition
                    [int]$hourPrecip  = $hour.pop
                    
                    $popText = Get-WeatherFunction -Weather 'preciptext' -value $hourPrecip
                    
                    $body += "<p><b>$prettyTime</b></p>"
                    $body += "<p><img src=`"$hourImg`">$conditions</p>"
                    $body += "<p>Chance of precipitation: $hourPrecip% / $popText</p>"
                    $body += "<p>Current Temp: $hourTemp`F Wind Chill: $hourChilltxt Feels Like: $hourFeels`F</p>"
                    $body += "<p>Dew Point: $dewPoint</p>"
                    $body += "<p>Wind Speed: $hourWind`mph Direction: $windDir</p>"
                    $body += "<p>Humidity: $hourHum%</p>"
                    $body += "<p>UV Index: $hourUV"     
                    
                }
                
                foreach ($email in $weatherList) {Send-WeatherEmail -To $email -Subject "Your hourly forecast for $city" -body $body}
            
            }            
        
        }
        
        {$_ -eq 'forecast'} {                
              
            if ($sendEmail) {

                $todayForecast = $weatherForecast.forecast.simpleforecast.forecastday
                
                $body = "<p></p>"
                $body += "<p>Here is your 4 day forecast!</p>"
                
                $selCam   = Get-Random $weatherForecast.webcams.count
                
                $camImg   = $weatherforecast.webcams[$selCam].CURRENTIMAGEURL
                $camName  = $weatherForecast.webcams[$selCam].linktext
                $camLink  = $weatherForecast.webcams[$selCam].link
                
                $body += "<p>Random webcam shot from: <a href=`"$camLink`">$camName</a></p>"
                $body += "<p><img src=`"$camImg`"></p>"                 
                
                $body += "<p>$city Radar:</p>"
                $body += "<p><img src=`"$radarURL`"></p>"      
                
                $curAlerts = $weatherForecast.alerts 
                
                if ($curAlerts) {
                    
                    $body += "<p><b><font color=`"red`">Weather Alert! ($typeName)</font></b></p>"
                    $body += "<p>Date: $alertDate Expires: $alertExp</p>"
                    $body += "<p>$alertMsg</p>"    

                }                   
               
                foreach ($day in $todayForecast) {
                    
                    $body += "<p></p>"
                    $body += "<p></p>"
                    
                    $dayImg          = $day.icon_url
                    $dayMonth        = $day.date.monthname
                    $dayDay          = $day.date.day
                    $dayName         = $day.date.weekday
                    $dayHigh         = $day.high.fahrenheit  
                    $dayLow          = $day.low.fahrenheit
                    $maxWind         = $day.maxwind.mph
                    $aveWind         = $day.avewind.mph
                    $aveHum          = $day.avehumidity
                    $conditions      = $day.conditions
                    [int]$dayPrecip  = $day.pop
                    
                    $popText = Get-WeatherFunction -Weather 'preciptext' -value $dayPrecip
                    
                    $body += "<p><b>$dayName, $dayMonth $dayDay</b></p>"
                    $body += "<p><img src=`"$dayImg`">$conditions</p>"
                    $body += "<p>Chance of precipitation: $dayPrecip% / $popText</p>"
                    $body += "<p>High: $dayHigh`F Low: $dayLow`F</p>"
                    $body += "<p>Ave Winds: $aveWind`mph Max Winds: $maxWind`mph</p>"
                    $body += "<p>Humidity: $aveHum%</p>"
         
                }

                foreach ($email in $weatherList) {Send-WeatherEmail -To $email -Subject "Your 4 day forecast for $city" -body $body}
            
            }  
            
        }

        {$_ -eq 'camera'} {
            
            $selCam    = Get-Random $weatherForecast.webcams.count
            
            $camImg    = $weatherforecast.webcams[$selCam].CURRENTIMAGEURL
            $camName   = $weatherForecast.webcams[$selCam].linktext
            $camLink   = $weatherForecast.webcams[$selCam].link
            
            $fileExt   = $camImg.SubString($camImg.LastIndexOf("."),4)
            
            $cityShort = $city.substring(0,$city.lastindexof(","))
            
            $fileName  = $cityShort + $fileExt
            
            $location  = (Get-Location).Path
            
            $camFile   = Invoke-WebRequest -Uri $camImg -OutFile "$location\$fileName"   
            
            $file = $location + "\" + $fileName
            
            $gallery = 'YourSquareSpaceGalleryOrEmailToSendAttachmentTo' 
            
            $SMTPClient             = New-Object Net.Mail.SmtpClient($SmtpServer, 587)
            $SMTPMessage            = New-Object System.Net.Mail.MailMessage($emailFrom,$gallery,"$city cam","$city cam")
            $SMTPClient.Credentials = New-Object System.Net.NetworkCredential($emailUser,$emailPass)
            
            $att                    = New-Object Net.Mail.Attachment($file)
            $SMTPClient.EnableSsl   = $true
           
            Switch (($fileName.substring($fileName.LastIndexOf(".")+1)).tolower()) {
                
                {$_ -like "*png*"} {
                
                    $typeExt = 'png'    
                    
                }
                
                {$_ -like "*jpg*"} {
                
                    $typeExt = 'jpg'     
                    
                }
                
                {$_ -like "*gif*"} {
                    
                    $typeExt = 'gif' 
                    
                }                                
                
            }
            
            $SMTPMessage.Attachments.Add($att)
            ($smtpmessage.Attachments).contenttype.mediatype = "image/$typeExt"
            
            $SMTPClient.Send($SMTPMessage)
            
            $att.Dispose()
            $SMTPMessage.Dispose()
            
            Remove-Item $file
            
        }
    
    } 
    
    Return $weatherForecast

}

function Send-WeatherEmail {
    [cmdletbinding()]
    param(
    [Parameter(Mandatory=$true,ValueFromPipeline=$true)]
    [string]
    $To,
    
    [string]
    [Parameter(Mandatory=$true,ValueFromPipeline=$true)]
    $Subject,
    
    [Parameter(Mandatory=$true,ValueFromPipeline=$true)]
    $Body,
    
    [string]
    $attachment
    )

    if (!$to)      {Write-Error "No recipient specified";break}
    if (!$subject) {Write-Error "No subject specified";break}
    if (!$body)    {Write-Error "No body specified";break}
   
    $gmailCredential = New-Object System.Management.Automation.PSCredential($emailUser,$emailPass)
       
    Send-MailMessage -To $to -From $emailFrom -Body $body -BodyAsHtml:$true -Subject $Subject -SmtpServer $smtpServer -Port $smtpPort -UseSsl -Credential $gmailCredential
 
}

function Get-WeatherFunction {
    [cmdletbinding()]
    param(
        [string]
        $weather,
        $value       
    )
    
    Switch ($weather) {
        
        {$_ -eq 'preciptext'} {
        
            Switch ($value) {
                
                {$_ -lt 20} {
                    
                    $popText = 'No mention'
                    
                }
                
                {$_ -eq 20} {
                    
                    $popText = 'Slight Chance'
                    
                }
                
                {($_ -lt 50 -and $_ -gt 20)} {
                    
                    $popText = 'Chance'
                    
                }
                
                {$_ -eq 50} {
                    
                    $popText = 'Good chance'
                    
                }
                
                {($_ -lt 70 -and $_ -gt 50)} {
                    
                    $popText = 'Likely'
                    
                }
                
                {$_ -ge 70} {
                    
                    $popText = 'Extremely likely'
                    
                }
                
            }
            
            Return $popText
            
        }   
        
        {$_ -eq 'alert'}    {
            
            Switch ($curAlerts.type) {
                
                'HEA' {$typeName = 'Heat Advisory'}
                'TOR' {$typeName = 'Tornado Warning'}
                'TOW' {$typeName = 'Tornado Watch'}
                'WRN' {$typeName = 'Severe Thunderstorm Warning'}
                'SEW' {$typeName = 'Severe Thunderstorm Watch'}
                'WIN' {$typeName = 'Winter Weather Advisory'}
                'FLO' {$typeName = 'Flood Warning'}
                'WAT' {$typeName = 'Flood Watch / Statement'}
                'WND' {$typeName = 'High Wind Advisory'}
                'SVR' {$typeName = 'Severe Weather Statement'}
                'HEA' {$typeName = 'Heat Advisory'}
                'FOG' {$typeName = 'Dense Fog Advisory'}
                'SPE' {$typeName = 'Special Weather Statement'}
                'FIR' {$typeName = 'Fire Weather Advisory'}
                'VOL' {$typeName = 'Volcanic Activity Statement'}
                'HWW' {$typeName = 'High Wind Warning'}
                'REC' {$typeName = 'Record Set'}
                'REP' {$typeName = 'Public Reports'}
                'PUB' {$typeName = 'Public Information Statement'}
                    
            }
                
            Return $typeName
    
        }    
    }
    
}

function Get-LIFXApi {
[cmdletbinding()]
param(
    [string]
    $action = 'setstate',
    [string]
    $state = 'on',
    [string]
    $color = 'white',
    [double]
    $brightness = '0.4'
)

$apiKey          = 'YourLifxApiKey'
$base64Key       =  [Convert]::ToBase64String([Text.Encoding]::ASCII.GetBytes(($apiKey)))
$headers         =  @{Authorization=("Basic {0}" -f $base64Key)}
$allURL          = 'https://api.lifx.com/v1/lights/all' 
$acceptheader    = 'application/json'
$baseURL         = 'https://api.lifx.com/v1/lights/'
$foregroundColor = 'white'
[array]$colors   = @('white','red','orange','yellow','cyan','green','blue','purple','pink')

$ninjaLights     = Invoke-RestMethod -headers $headers -Uri $allURL

function Change-LightState {
    [cmdletbinding()]
    param(
        [string]
        $state,
        [string]
        $color,
        [double]
        $brightness,
        [string]
        $selector
    )
    
    $ninjaID  = $ninjaLights.id
    $selector = 'id:' + $ninjaID
    $fullURL  = $baseurl + $selector + '/state'

    $payloadBuilder = "{
                    `"power`": `"$state`",
                    `"color`": `"$color`",
                    `"brightness`" : $brightness 
                    }"

    Write-Host "Changing light to:" -ForegroundColor $foregroundcolor
    Write-Host `t"State     :" $state
    Write-Host `t"Color     :" $color
    Write-Host `t"Brightness:" ($brightness * 100)"%" `n

    $stateReturn = Invoke-RestMethod -headers $headers -uri $fullURL -Method Put -Body $payloadBuilder
    
    Write-Host "API status:" -ForegroundColor $foregroundcolor
    Write-Host `t"Light :" $stateReturn.results.label
    Write-Host `t"Status:" $stateReturn.results.status `n
    
    
}

Switch ($action) {
    
    'setstate' { Change-LightState -state $state -color $color -brightness $brightness -selector $selector }
    
    'fluxtest' { 
        
        $originalBrightness = $ninjaLights.Brightness
        $originalColor      = $ninjalights.Color
        $originalState      = $ninjalights.Power
        $colorString        = "hue:" + $originalcolor.hue + " saturation:" + $originalcolor.saturation + " kelvin:" + $originalColor.Kelvin       
          
        $i = 0
        
        While ($i -le 20) {
            
            $color              = Get-Random $colors
            [double]$brightness = "{0:n2}" -f (Get-Random 0.99)
 
            Change-LightState -color $color -brightness $brightness -selector $selector -state $state
            Start-Sleep -seconds 1
            $i++
            
        }
        
        Change-LightState -state $originalState -color $colorString -brightness $originalBrightness -selector $selector  
        
    } 
    
    'flashcolor' {
        
        $originalBrightness = $ninjaLights.Brightness
        $originalColor      = $ninjalights.Color
        $originalState      = $ninjalights.Power
        $colorString        = "hue:" + $originalcolor.hue + " saturation:" + $originalcolor.saturation + " kelvin:" + $originalColor.Kelvin
        
        Change-LightState -state $state -color $color -brightness $brightness -selector $selector
        Start-Sleep -Seconds 1
        
        Change-LightState -state $originalState -color $colorString -brightness $originalBrightness -selector $selector
        Start-Sleep -Seconds 1
                
        Change-LightState -state $state -color $color -brightness $brightness -selector $selector
        Start-Sleep -Seconds 1
        
        Change-LightState -state $originalState -color $colorString -brightness $originalBrightness -selector $selector
        Start-Sleep -Seconds 1        
        
        Change-LightState -state $state -color $color -brightness $brightness -selector $selector
        Start-Sleep -Seconds 1
        
        Change-LightState -state $originalState -color $colorString -brightness $originalBrightness -selector $selector
                        
    }
}    
    
    
}

Get-Weather

Examples:

.\Get-Weather.ps1 -city houston -forecast hourly -sendEmail $true

And here is the email:

$weather = .\Get-Weather.ps1 -city Chicago -lifx $true

As you can see in the above example, the light will flash red. Then it begins  alternating with the state it was in beforehand, and finally it returns the light to the original state it was in.

More to come!

I've been writing this Get-Weather script for a little while now, and there's more I want to do with it. For now that list is:

  • Clean up the code a bit.
  • Add help nodes.
  • Add more error checking.
  • Find out more ways to utilize both the Weather Underground API and the LIFX API.

In the next post I will detail how I use this script in a scheduled task to send out daily weather emails.

As always, let me know if you have any questions, feedback, or ideas!

-Ginger Ninja

PowerShell: Control your LIFX light!

PowerShell: Control your LIFX light!

LET THERE BE LIGHT!

This post has been updated on 5/18/17 to reflect changes made to the Lifx API!

I stumbled upon the fact that LIFX has an API you can use today. Having found that out I wanted to do it in PowerShell and see what I can do. As it turns out there's a decent amount of things you can do and their API is "limited" to around 1 call per second.

If you would like to get into even more detail, step-by-step, and behind the scenes of how this works, check out this post!

Requirements

To get started with this you'll need...

Getting started

Here's what I did to get started. 

  1. Created a PowerShell script named Get-LifxApi.ps1.
  2. Opened the script up with basic parameters and variables to get started.
  3. Somewhat annoying my girlfriend with the light changing so much  ❤️

Starting code

[cmdletbinding(DefaultParameterSetName='SetState')]
param(
    [Parameter(
        ParameterSetName = "StateSetting"
    )]        
    [ValidateSet('SetState','FlashColor','RandomColors','ListLights')]    
    [string]
    $Action = 'SetState',
    [Parameter(
        ParameterSetName = "StateSetting"
    )]    
    [ValidateSet('on','off')]
    [string]
    $State = 'on',
    [Parameter(
        ParameterSetName = "StateSetting"
    )]    
    [ValidateSet('white','red','orange','yellow','cyan','green','blue','purple','pink')]
    [string]
    $Color = 'white',
    [Parameter(
        ParameterSetName = "StateSetting"
    )]    
    [ValidateRange(0.0,1)]
    [double]
    $Brightness = '0.4',
    [Parameter(
        ParameterSetName = "Toggle"    
    )]    
    [Switch]
    $Toggle
)

$apiKey          = 'YourKeyGoesHere'
$headers         =  @{Authorization=("Bearer {0}" -f $apiKey)}
$allURL          = 'https://api.lifx.com/v1/lights/all' 
$acceptHeader    = 'application/json'
$baseURL         = 'https://api.lifx.com/v1/lights'
$foregroundColor = 'white'
[array]$colors   = @('white','red','orange','yellow','cyan','green','blue','purple','pink')

Notes

You'll want to change the $apiKey to match your API key from the LIFX cloud.
The $allURL variable will return all your lights, and then the $baseURL variable is used later when formatting calls to change colors or do other things. $foregroundColor let's you specify a color for some of the Write-Host returns, and $colors is an array of colors currently accepted by the API (and you'll see why it is there later in this post). 

Let's make our first call!

I store the results of my light(s) in the $lifxLights variable.

$lifxLights = Invoke-RestMethod -headers $headers -Uri $allURL -ContentType $acceptheader

And now to write our first function in this script.

This function will allow us to utilize the API's state setting option. I named this function Set-LightState

function Set-LightState { #Begin function Set-LightState
    [cmdletbinding()]
    param(
        [Parameter()]
        [ValidateSet('on','off')]
        [string]
        $state,
        [Parameter()]  
        [string]
        $color,
        [Parameter()]
        [ValidateRange(0.0,1)]
        [double]
        $brightness,
        [string]
        $selector
    )

    if ($lifxLight.Connected) {          

        $fullURL  = "$baseurl/$($lifxLight.id)/state"        
        $payload  = [PSCustomObject]@{

            power      = $state
            color      = $color
            brightness = $brightness

        }

        $payloadJson = $payload | ConvertTo-Json

        Write-Host "Attempting to Change light to:" -ForegroundColor $foregroundcolor
        Write-Host `t"State     :" $state
        Write-Host `t"Color     :" $color
        Write-Host `t"Brightness:" ($brightness * 100)"%" `n

        $stateReturn = Invoke-RestMethod -headers $headers -uri $fullURL -Method Put -Body $payloadJson -ContentType $acceptheader
    
        Write-Host "API status:" -ForegroundColor $foregroundcolor
        Write-Host `t"Light :" $stateReturn.results.label
        Write-Host `t"Status:" $stateReturn.results.status `n
    
    } else {
        
        $lightName = $lifxLight.label
        Write-Host "$lightName is offline or unreachable :("
        
    }    

} #End function Set-LightState

I only have one LIFX light. In the start of this function I set my 'selector' (a required field for API calls to LIFX when setting states) as the light's ID.  I then use the value of light's ID to setup the URL structure for the call. $fullURL becomes the URL used when accessing the API to set the state of the light.

Let's take some action!

At the start of the script I have a parameter for action. 
Below is how it is used, in conjunction with toggle.

if ($toggle) { #If we're just toggling
             
    $fullURL  = "$baseurl/$($lifxLight.id)/toggle"  
    $toggleResult = Invoke-RestMethod -Uri $fullURL -Method Post -ContentType $acceptHeader -Headers $headers

    if ($toggleResult.results.status -eq 'ok') {

        Write-Host "Light [$($toggleResult.results.label)] was toggled!"

    } else {

        Write-Host "Something went wrong: [$($toggleResult.results.status)]"
    }

} else { #Else we perform the actions!

    Switch ($action) { #Begin switch for script actions
        
        'SetState' {         
            
            Set-LightState -state $state -color $color -brightness $brightness

        }    
        
        'ListLights' {
            
            return $lifxLight
            
        }       

        'RandomColors' { 
            
            $originalBrightness = $lifxLight.Brightness
            $originalColor      = $lifxLight.Color
            $originalState      = $lifxLight.Power
            $colorString        = "hue:" + $originalcolor.hue + " saturation:" + $originalcolor.saturation + " kelvin:" + $originalColor.Kelvin       
            
            $i = 0
            
            While ($i -le 10) {
                
                $color              = Get-Random $colors
                [double]$brightness = "{0:n2}" -f (Get-Random -Maximum 1 -Minimum 0.00)
    
                Set-LightState -color $color -brightness $brightness -selector $selector -state $state
                Start-Sleep -seconds 1
                $i++
                
            }
            
            Set-LightState -state $originalState -color $colorString -brightness $originalBrightness

        }
        
        'FlashColor' {
            
            $originalBrightness = $lifxLights.Brightness
            $originalColor      = $lifxLights.Color
            $originalState      = $lifxLights.Power
            $colorString        = "hue:" + $originalcolor.hue + " saturation:" + $originalcolor.saturation + " kelvin:" + $originalColor.Kelvin
            
            Set-LightState -state $state -color $color -brightness $brightness
            Start-Sleep -Seconds 1
            
            Set-LightState -state $originalState -color $colorString -brightness $originalBrightness
            Start-Sleep -Seconds 1
                    
            Set-LightState -state $state -color $color -brightness $brightness
            Start-Sleep -Seconds 1
            
            Set-LightState -state $originalState -color $colorString -brightness $originalBrightness 
            Start-Sleep -Seconds 1        
            
            Set-LightState -state $state -color $color -brightness $brightness
            Start-Sleep -Seconds 1
            
            Set-LightState -state $originalState -color $colorString -brightness $originalBrightness
                            
        }    
    
    } #End switch for light actions
}

My favorite action is the RandomColors. I have that set to use Get-Random to set the color and brightness randomly.  The other action is setstate. What that will do is set the light to a state you specify. If you do not give it options it will default to turning the light on to a brightness of 40% (0.4) and the color value of white (this is defined as per the default options for the parameters at the start of this script). You can change them by supplying the arguments when you run the script.

$fullURL example contents:

https://api.lifx.com/v1/lights/az0321123abc/state

Examples

.\Get-LifxAPI.ps1 -Action setstate -State on -Color blue -Brightness 0.5
lifx.PNG

Did it work?! 
(Yup)

.\Get-LifxAPI.ps1 -Action setstate

The above example is the simplest way to run it as it utilizes the default parameters. (actually, you could just run Get-LifxAPI.ps1)

Now for some fun!

.\Get-LifxAPI.ps1 -Action RandomColors

More to come!

I will be adding to this as I work on it more and clean it up. I will get adding:

  • Help nodes for Get-Help (done!).
  • More options to leverage different parts of the LIFX API (coming).
  • And more as I think of cool things to do with this!

Use:

Get-Help .\Get-LifxAPI.ps1 -Detailed

To see the help that is included. Be sure to change Get-LifxAPI.ps1 to what you named your script to!

The Code

<#
.SYNOPSIS   
    Use this script to control your Lifx light via PowerShell!
.DESCRIPTION 
    You can use this script to turn your light on and off, as well as change the brightness and colors.
.PARAMETER Action

    Argument: The action you'd like to take:
    SetState, FlashColor, RandomColors, and ListLights are valid actions.

.PARAMETER State
    This parameter accepts the state you'd like to set: on or off.
.PARAMETER Color
    Argument: The color you'd like to set the light to. 
    Valid colors can be tab completed.
.PARAMETER Brightness
    Argument: The brightness you want to set.
    Valid range: between 0-1 (0.5 being 50%)  
.PARAMETER Toggle
    Toggles the light      
.NOTES   
    Name: Get-LifxAPI.ps1
    Author: Mike Roberts aka Ginger Ninja
    DateCreated: 2/6/2016
    Last Modified: 5/18/2017

.EXAMPLE   
    $response = .\Get-LifxAPI.ps1 -Action ListLights
    ---------------------------------------------------------------

    1. Get an object returned that contains the result of the API call
    
    p$[18:52:20]> $response
    id                 : nun-ya
    uuid               : more nun-ya
    label              : Ninja room
    connected          : True
    power              : on
    color              : @{hue=249.9977111467155; saturation=0; kelvin=3400}
    brightness         : 0.48508430609597925
    group              : @{id=nun-ya; name=My Room}
    location           : @{id=nun-ya; name=My Home}
    product            : @{name=Original 1000; identifier=lifx_original_a21; company=LIFX; capabilities=}
    last_seen          : 2017-05-19T01:51:49Z
    seconds_since_seen : 32

.EXAMPLE   
    .\Get-LifxAPI.ps1 -Action RandomColors
    ---------------------------------------------------------------

    1. Light toggles between random colors 10 times

.EXAMPLE   
    .\Get-LifxAPI.ps1 -Toggle
    ---------------------------------------------------------------

    1. Toggles light state (on or off respectively)

.EXAMPLE   
    .\Get-LifxAPI.ps1 -Action SetState -State on -Color blue -Brightness 0.5
    ---------------------------------------------------------------

    1. Turns light on
    2. Changes color to blue
    3. Changes brightness to 0.5
.OUTPUTS
    If you use ListLights as the action, the output will be an
    object containing the results of the api call.

.LINK  
    http://www.gngrninja.com/script-ninja/2016/2/6/powershell-control-your-lifx-light
#>
[cmdletbinding(DefaultParameterSetName='SetState')]
param(
    [Parameter(
        ParameterSetName = "StateSetting"
    )]        
    [ValidateSet('SetState','FlashColor','RandomColors','ListLights')]    
    [string]
    $Action = 'SetState',
    [Parameter(
        ParameterSetName = "StateSetting"
    )]    
    [ValidateSet('on','off')]
    [string]
    $State = 'on',
    [Parameter(
        ParameterSetName = "StateSetting"
    )]    
    [ValidateSet('white','red','orange','yellow','cyan','green','blue','purple','pink')]
    [string]
    $Color = 'white',
    [Parameter(
        ParameterSetName = "StateSetting"
    )]    
    [ValidateRange(0.0,1)]
    [double]
    $Brightness = '0.4',
    [Parameter(
        ParameterSetName = "Toggle"    
    )]    
    [Switch]
    $Toggle
)

$apiKey          = 'YourKeyGoesHere'
$headers         =  @{Authorization=("Bearer {0}" -f $apiKey)}
$allURL          = 'https://api.lifx.com/v1/lights/all' 
$acceptHeader    = 'application/json'
$baseURL         = 'https://api.lifx.com/v1/lights'
$foregroundColor = 'white'
[array]$colors   = @('white','red','orange','yellow','cyan','green','blue','purple','pink')

function Set-LightState { #Begin function Set-LightState
    [cmdletbinding()]
    param(
        [Parameter()]
        [ValidateSet('on','off')]
        [string]
        $state,
        [Parameter()]  
        [string]
        $color,
        [Parameter()]
        [ValidateRange(0.0,1)]
        [double]
        $brightness,
        [string]
        $selector
    )

    if ($lifxLight.Connected) {          

        $fullURL  = "$baseurl/$($lifxLight.id)/state"             
        $payload  = [PSCustomObject]@{

            power      = $state
            color      = $color
            brightness = $brightness

        }

        $payloadJson = $payload | ConvertTo-Json

        Write-Host "Attempting to Change light to:" -ForegroundColor $foregroundcolor
        Write-Host `t"State     :" $state
        Write-Host `t"Color     :" $color
        Write-Host `t"Brightness:" ($brightness * 100)"%" `n

        $stateReturn = Invoke-RestMethod -headers $headers -uri $fullURL -Method Put -Body $payloadJson -ContentType $acceptheader
    
        Write-Host "API status:" -ForegroundColor $foregroundcolor
        Write-Host `t"Light :" $stateReturn.results.label
        Write-Host `t"Status:" $stateReturn.results.status `n
    
    } else {
        
        $lightName = $lifxLight.label
        Write-Host "$lightName is offline or unreachable :("
        
    }    

} #End function Set-LightState

#Get Lifx Lights
$lifxLights = Invoke-RestMethod -headers $headers -Uri $allURL -ContentType $acceptheader
if ($lifxLights.Count -gt 1) {

    Write-Host "Pick a light:"`n
    for ($i = 0;$i -le $lifxLights.Count - 1;$i++) {

        Write-Host "[$i] -> $($lifxLights[$i].label)"

    }

    $picked = $false

    Do {
        [int]$number = Read-Host "Which [#]?"
        Write-Host "$number"
        if (![String]::IsNullOrEmpty($number) -and ($number -le ($lifxLights.Count - 1) -and $number -gt -1)) {

            $picked    = $true
            $lifxLight = $number  
            write-Host "sup"

        }
    } 
    While ($picked -eq $false)

} else {

    $lifxLight = $lifxLights[0]

}

if ($toggle) { #If we're just toggling
             
    $fullURL  = "$baseurl/$($lifxLight.id)/toggle"  
    $toggleResult = Invoke-RestMethod -Uri $fullURL -Method Post -ContentType $acceptHeader -Headers $headers

    if ($toggleResult.results.status -eq 'ok') {

        Write-Host "Light [$($toggleResult.results.label)] was toggled!"

    } else {

        Write-Host "Something went wrong: [$($toggleResult.results.status)]"
    }

} else { #Else we perform the actions!

    Switch ($action) { #Begin switch for script actions
        
        'SetState' {         
            
            Set-LightState -state $state -color $color -brightness $brightness

        }    
        
        'ListLights' {
            
            return $lifxLight
            
        }       

        'RandomColors' { 
            
            $originalBrightness = $lifxLight.Brightness
            $originalColor      = $lifxLight.Color
            $originalState      = $lifxLight.Power
            $colorString        = "hue:" + $originalcolor.hue + " saturation:" + $originalcolor.saturation + " kelvin:" + $originalColor.Kelvin       
            
            $i = 0
            
            While ($i -le 10) {
                
                $color              = Get-Random $colors
                [double]$brightness = "{0:n2}" -f (Get-Random -Maximum 1 -Minimum 0.00)
    
                Set-LightState -color $color -brightness $brightness -selector $selector -state $state
                Start-Sleep -seconds 1
                $i++
                
            }
            
            Set-LightState -state $originalState -color $colorString -brightness $originalBrightness

        }
        
        'FlashColor' {
            
            $originalBrightness = $lifxLights.Brightness
            $originalColor      = $lifxLights.Color
            $originalState      = $lifxLights.Power
            $colorString        = "hue:" + $originalcolor.hue + " saturation:" + $originalcolor.saturation + " kelvin:" + $originalColor.Kelvin
            
            Set-LightState -state $state -color $color -brightness $brightness
            Start-Sleep -Seconds 1
            
            Set-LightState -state $originalState -color $colorString -brightness $originalBrightness
            Start-Sleep -Seconds 1
                    
            Set-LightState -state $state -color $color -brightness $brightness
            Start-Sleep -Seconds 1
            
            Set-LightState -state $originalState -color $colorString -brightness $originalBrightness 
            Start-Sleep -Seconds 1        
            
            Set-LightState -state $state -color $color -brightness $brightness
            Start-Sleep -Seconds 1
            
            Set-LightState -state $originalState -color $colorString -brightness $originalBrightness
                            
        }    
    
    } #End switch for light actions
}

Leave comment if you have any ideas or feedback!

-Ginger Ninja

PowerShell: Fun with Weather Underground's API (part 1)

PowerShell: Fun with Weather Underground's API (part 1)

Free APIs can be fun!

After doing some work with the Victor OPs API, I personally wanted to see what else was out there. I haven't messed with APIs too much in the past, but now I'm all about it. I'm a bit of a weather geek so I was excited when I found out that Weather Underground has one available for free!

What I've done so far

So far I've created a script that can:

  • Email you an HTML email with the following:
    • Hourly/4 day weather forecast
    • Current (randomly selected) webcam shot from the city you specified
    • Radar animated gif
  • Email a Squarespace gallery with a random camera shot from the city you specify.
  • Return (in PowerShell) the forecast for the city you specify

I'm thinking of things to add to it all the time now... like perhaps an alert check on an interval that sends you a text if there is a weather alert.

I'm doing all this to learn the ins and outs of handling APIs with PowerShell, as well as to feed my inner weather and script geek.

Getting started

This post will be a multi part post. For this portion I will stick to the part that you don't even need and API key for!  (Although, you may want to grab one, here)

Requirements

You'll need to setup the following variables:

  • $apiKey (Can be blank now or just 'yourAPIKeyHere') as it is not actually needed yet.
  • $city (Specify a city you'd like to look up using their free autocomplete API)
  • $baseURL  = 'http://api.wunderground.com/api/'

The Code

$city    = Read-Host "City?"
$apiKey  = 'yourAPIKeyHere' 
$baseURL = 'http://api.wunderground.com/api/'

   $findMe = $city
    $find   = Invoke-RestMethod -Uri "http://autocomplete.wunderground.com/aq?query=$findMe"
    
    if ($find) {
        
        $cityAPI  = $find.Results[0].l
        $city     = $find.Results[0].name
        
        $fullURL  = $baseURL + $apiKey + "/features/conditions/hourly/forecast/webcams/alerts" + "$cityAPI.json"
        $radarURL = "http://api.wunderground.com/api/$apiKey/animatedradar/animatedsatellite" + "$cityAPI.gif?num=6&delay=50&interval=30"
        
        Write-Host `n"API URLS for $city" -foregroundcolor $foregroundColor
        Write-Host `t$fullURL
        Write-Host `t$radarURL

}

Results / Going forward

If you put the above code in a script and run it, the results will be the API URLs it found for the first city it returns. If you want to narrow down it for a different $city, you'll need to specify 'City, State'.

Here are the results for $city = 'Portland'

If you want to get a jump start on this and you have your API key, check out the API documentation from Weather Underground!

Here is a teaser of what can be done (all via PowerShell!):


Let me know if you have any ideas or comments!

-Ginger Ninja

PowerShell: Reset a user's AD password

PowerShell: Reset a user's AD password

I cant login

"My password isn't working!" ...  Can you reset it?" These words are typically heard at least once or twice a day by front line support at most places. No matter how much we try to inform and remind users about their expiring passwords, there will be those that forget to change it before it expires or end up locking themselves out one way or another (iPhone/Exchange anyone?)

AD functions in PowerShell

I have written a few AD functions in PowerShell. One of them gets information about a user and then passes that along to possible actions to take. The function I'm writing about is one of those actions. 

Requirements

  • Quest AD tools
  • Resolve-UserName function (will give the code for that below)
  • Set $foregroundColor to something you like so it looks pretty.

Actions!

What this function will do is take an account name (or ask you for one), and then give you 3 options.

  • Reset and flag for change
  • Reset and don't flag for a change
  • Just flag for reset on next logon (or unflag if already flagged)

Parameters

-actName (Account name to reset)

The Code

This is the code for the Resolve-Username function:

function Resolve-UserName {

    param ($Username, [switch]$Verbose=$false)

    if (!$Username) {
        $Username = Read-Host "Enter username" 
    }

    if($Verbose){ Write-Host "Attempting to resolve `"$Username`"..." }
    $ResolvedName = Get-QADUser $Username -IncludeAllProperties
    do{
        If ($ResolvedName.Length -gt 1) {
    
            Write-Host `n"Multiple users found for `"$Username`", please select the intended user."`n -ForegroundColor $foregroundColor
            
            $i = 0
    
            Foreach ($u in $ResolvedName) {
                Write-Host "$i -> " $u.Name
                $i++
            }
            $selUsr = Read-Host "Which #?"
            $ResolvedName = Get-QADUser $ResolvedName[$selUsr] -IncludeAllProperties
        }
        elseif($ResolvedName.Length -eq 0){
            Write-Host "User does not exist. Try again." -ForegroundColor Red
            $ResolvedName = Get-QADUser (Read-Host "Enter username") -IncludeAllProperties
        }
    }until($ResolvedName.length -eq 1)
    if($Verbose){ Write-Host "Resolved `"$Username`" to" $ResolvedName.SamAccountName }
    Return $ResolvedName
}

This is the code for the Reset-ADPassword function:

function Reset-ADPassword {

    param($actName)
    
    if(!$actName){$actName = Read-Host "Enter username"}
    $usrObj = Resolve-UserName $actName

    If ($usrObj) {    
        
        Write-Host `n"Password reset:" $usrObj.Name -ForegroundColor $foregroundColor
        
        Write-Host "1. Reset and flag"
        Write-Host "2. Reset and do not flag"
        Write-Host "3. Just flag (or unflag if flagged)"`n
        
    
        $psdOp = Read-Host "Please specify an option #" 
        Write-Host "Note: You will be prompted to confirm any option you select." -ForegroundColor $foregroundColor
    
        Switch ($psdOp)  {
    
            1 { 
                
                $resetTo = Read-Host "Reset password to" -AsSecureString
                $resetTo = $resetTo | ConvertFrom-SecureString
                $PlainTextPassword = [Runtime.InteropServices.Marshal]::PtrToStringAuto([Runtime.InteropServices.Marshal]::SecureStringToBSTR( (ConvertTo-SecureString $resetTo) ))
                Set-QADUser $usrObj -UserPassword $PlainTextPassword -UserMustchangePassword $true -Credential $adminCredential -confirm }
    
            2 { 
                
                $resetTo = Read-Host "Reset password to" -AsSecureString
                $resetTo = $resetTo | ConvertFrom-SecureString
                $PlainTextPassword = [Runtime.InteropServices.Marshal]::PtrToStringAuto([Runtime.InteropServices.Marshal]::SecureStringToBSTR( (ConvertTo-SecureString $resetTo) ))
                Set-QADUser $usrObj -UserPassword $PlainTextPassword -UserMustchangePassword $false -Credential $adminCredential -confirm }
    
            3 { 
                
                if ($usrObj.UserMustChangePassword -eq $true) {
                    Set-QADUser $usrObj -UserMustChangePassword  $false  -Credential $adminCredential -confirm }
                else { Set-QADUser $usrObj -UserMustchangePassword $true -Credential $adminCredential -confirm } }  
        }
    } 
}

Let me know if you have any questions or comments!


PowerShell Quick Tip: Basic use of the Switch statement

PowerShell Quick Tip: Basic use of the Switch statement

Why use Switch?

In PowerShell you can use an if statement to compare things and determine actions based upon the result. You also can use elseif to keep comparing values until you reach a desired (or not so desired) result.

Switch allows you to take a variable you define, and then based upon its value perform different actions.

Example

In this example I will show you a switch statement I used in a script that uses the Weather Underground API to send HTML emails detailing your requested weather forecast. Consider this a teaser until I post that script itself.

What I wanted to do

In this example I wanted to take a returned percentage, and then change a variable to display the appropriate text result. It compares the returned value of the hour's chance of precipitation set in $hourPrecip, and then based on that number changes the variable $popText accordingly.

The Code

Switch ($hourPrecip) {
                        
                        {$_ -lt 20} {
                            
                            $popText = 'No mention'
                            
                        }
                        
                        {$_ -eq 20} {
                            
                            $popText = 'Slight Chance'
                            
                        }
                        
                        {($_ -lt 50 -and $_ -gt 20)} {
                            
                            $popText = 'Chance'
                            
                        }
                        
                        {$_ -eq 50} {
                            
                            $popText = 'Good chance'
                            
                        }
                        
                        {($_ -lt 70 -and $_ -gt 50)} {
                            
                            $popText = 'Likely'
                            
                        }
                        
                        {$_ -ge 70} {
                            
                            $popText = 'Extremely likely'
                            
                        }
                        
                    }

So now you display the percentage, as well as its correlating text value which describes what the percentage means.

If the value was 51 for $hourPrecip, then $popText will be set to Likely

The Weather Underground post will be coming soon!

Do you use switches in your scripts, and if so, how do you like to use them?

PowerShell: Building a basic text menu system (part 1)

PowerShell: Building a basic text menu system (part 1)

Menus?! But...why?

As I dove deeper into PowerShell years ago I started to think about ways to help those utilizing my scripts. I wrote a script that became a module that the whole team would use.

In this module there were a ton of functions. Some functions were for creating new hires, others for terminations, and even more for general AD user account and Exchange management. Once there were more than 6 different functions I created a basic menu system for the Helpdesk to use when using PowerShell with my module.

Where to start

The first thing you'll need to do is present the user with options. Write-Host is my favorite way to do this. You'll want to define the variable $foregroundColor to see the full effect of the following code. I like to keep that set as a global variable so it can be changed later if desired. This is of course, very important, as who doesn't want to sometimes tweak the color output of your scripts? 

I also keep a version number in the variable $ncVer.

Building the menu:

Write-Host `n"Ninja Center v" $ncVer -ForeGroundColor $foregroundcolor
Write-Host `n"Type 'q' or hit enter to drop to shell"`n
Write-Host -NoNewLine "<" -foregroundcolor $foregroundColor
Write-Host -NoNewLine "Active Directory"
Write-Host -NoNewLine ">" -foregroundcolor $foregroundColor
Write-Host -NoNewLine "["
Write-Host -NoNewLine "A" -foregroundcolor $foregroundColor
Write-Host -NoNewLine "]"

Write-Host -NoNewLine `t`n "A1 - " -foregroundcolor $foregroundcolor
Write-host -NoNewLine "Look up a user"
Write-Host -NoNewLine `t`n "A2 - " -foregroundcolor $foregroundcolor
Write-host -NoNewLine "Enter PowerShell session on DC"
Write-Host -NoNewLine `t`n "A3 - " -foregroundcolor $foregroundcolor
Write-host -NoNewLine "Run DCDiag on a DC (or all DCs)"`n`n

Write-Host -NoNewLine "<" -foregroundcolor $foregroundColor
Write-Host -NoNewLine "Exchange"
Write-Host -NoNewLine ">" -foregroundcolor $foregroundColor
Write-Host -NoNewLine "["
Write-Host -NoNewLine "E" -foregroundcolor $foregroundColor
Write-Host -NoNewLine "]"

Write-Host -NoNewLine `t`n "E1 - " -foregroundcolor $foregroundcolor
Write-host -NoNewLine "Forward a mailbox"
Write-Host -NoNewLine `t`n "E2 - " -foregroundcolor $foregroundcolor
Write-host -NoNewLine "Clear a mailbox forward"
Write-Host -NoNewLine `t`n "E3 - " -foregroundcolor $foregroundcolor
Write-host -NoNewLine "See if an IP address is being relayed"`n`n

Write-Host -NoNewLine "<" -foregroundcolor $foregroundColor
Write-Host -NoNewLine "Storage"
Write-Host -NoNewLine ">" -foregroundcolor $foregroundColor
Write-Host -NoNewLine "["
Write-Host -NoNewLine "S" -foregroundcolor $foregroundColor
Write-Host -NoNewLine "]"

Write-Host -NoNewLine `t`n "S1 - " -foregroundcolor $foregroundcolor
Write-host -NoNewLine "Connect to a NetApp controller"`n`n

When starting out I would use Write-Host to display information as I wrote scripts. This was nice, and was useful for troubleshooting. Then as my knowledge expanded I began to realize how else it worked. My new favorite, especially when building menus, is -NoNewLine. 

What -NoNewLine allows you to do is alternate different colors on the same line. Again, extremely uhhh... important. The output does look nice, though!

There are also some escaped string options I like to use. They are `t (horizontal tab), and -n(new line). These are used to keep the menu looking nice and not too cluttered.

OK so I built something that shows a bunch of stuff... what now?

Now we'll need to get some input from the user and take action! To do this we'll use Read-Host combined with a Switch to deal with the input.

$sel = Read-Host "Which option?"

Switch ($sel) {
    "A1" {Get-ADinfo;Load-NinjaCenter}
    "A2" {Enter-DCSession}
    "A3" {
        $DCs      = Read-Host "DC (specify name or put 'all' for all)?"
        $test     = Read-Host "Enter 'error' or 'full' for test feedback"         
       
        
        $global:dcDiagResults = Get-DCDiagInfo -DC $DCs -Type $test -Verbose
        
        Write-Host `n"Results stored in the variable: dcDiagResults"`n
        Write-Host -NoNewLine "Type "
        Write-Host -NoNewLine "Load-NinjaCenter " -foregroundcolor $foregroundcolor
        Write-Host -NoNewLine "to load the menu again."`n
    }
    
    "E1" {Forward-Email}
    "E2" {Clear-Forward}
    "E3" {Check-EXRelayIP}
    
    "S1" {
        Connect-NetAppController
    
        Write-Host -NoNewLine "Type "
        Write-Host -NoNewLine "Load-NinjaCenter " -foregroundcolor $foregroundcolor
        Write-Host -NoNewLine "to load the menu again."`n
}

    {($_ -like "*q*") -or ($_ -eq "")} {
        
        Write-Host `n"No input or 'q' seen... dropping to shell" -foregroundColor $foregroundColor
        Write-Host "Type Load-NinjaCenter to load them menu again"`n
        
        
    }          
        
}

Alright, now let's take some action!

As you can see above, the switch handles the user input. There are some more advanced ways to parse the input, which I will go over in a later post. For now, you can see a few things.

One is that you can stage other functions based on the input. For example, with the switch option "A3", (which is the menu option for running DC Diag against DCs), you can see that we provide the user with some more prompts to prep some variables to pass to the Get-DCDiagInfo function.

I actually wrote about my Get-DCDiagInfo (function, but also works as a standalone script), and you can read about it here.

This allows you to wrap your existing functions in different ways and present them to folks that will use them however you'd like to. For a Helpdesk environment, or those not super deep into PowerShell, this is a nifty way for them to encapsulate and utilize what you've written. 

Let's put it all together.

Here is the full code for the menu function:

function Load-NinjaCenter {  
[cmdletbinding()]
param()

    ##########################################
    #            Ninja Center Menu           #
    ##########################################
    Write-Host `n"Ninja Center v" $ncVer -ForeGroundColor $foregroundcolor
    Write-Host `n"Type 'q' or hit enter to drop to shell"`n
    Write-Host -NoNewLine "<" -foregroundcolor $foregroundColor
    Write-Host -NoNewLine "Active Directory"
    Write-Host -NoNewLine ">" -foregroundcolor $foregroundColor
    Write-Host -NoNewLine "["
    Write-Host -NoNewLine "A" -foregroundcolor $foregroundColor
    Write-Host -NoNewLine "]"

    Write-Host -NoNewLine `t`n "A1 - " -foregroundcolor $foregroundcolor
    Write-host -NoNewLine "Look up a user"
    Write-Host -NoNewLine `t`n "A2 - " -foregroundcolor $foregroundcolor
    Write-host -NoNewLine "Enter PowerShell session on DC"
    Write-Host -NoNewLine `t`n "A3 - " -foregroundcolor $foregroundcolor
    Write-host -NoNewLine "Run DCDiag on a DC (or all DCs)"`n`n

    Write-Host -NoNewLine "<" -foregroundcolor $foregroundColor
    Write-Host -NoNewLine "Exchange"
    Write-Host -NoNewLine ">" -foregroundcolor $foregroundColor
    Write-Host -NoNewLine "["
    Write-Host -NoNewLine "E" -foregroundcolor $foregroundColor
    Write-Host -NoNewLine "]"

    Write-Host -NoNewLine `t`n "E1 - " -foregroundcolor $foregroundcolor
    Write-host -NoNewLine "Forward a mailbox"
    Write-Host -NoNewLine `t`n "E2 - " -foregroundcolor $foregroundcolor
    Write-host -NoNewLine "Clear a mailbox forward"
    Write-Host -NoNewLine `t`n "E3 - " -foregroundcolor $foregroundcolor
    Write-host -NoNewLine "See if an IP address is being relayed"`n`n

    Write-Host -NoNewLine "<" -foregroundcolor $foregroundColor
    Write-Host -NoNewLine "Storage"
    Write-Host -NoNewLine ">" -foregroundcolor $foregroundColor
    Write-Host -NoNewLine "["
    Write-Host -NoNewLine "S" -foregroundcolor $foregroundColor
    Write-Host -NoNewLine "]"

    Write-Host -NoNewLine `t`n "S1 - " -foregroundcolor $foregroundcolor
    Write-host -NoNewLine "Connect to a NetApp controller"`n`n

    $sel = Read-Host "Which option?"

    Switch ($sel) {
        "A1" {Get-ADinfo;Load-NinjaCenter}
        "A2" {Enter-DCSession}
        "A3" {
            $DCs      = Read-Host "DC (specify name or put 'all' for all)?"
            $test     = Read-Host "Enter 'error' or 'full' for test feedback"         
        
            
            $global:dcDiagResults = Get-DCDiagInfo -DC $DCs -Type $test -Verbose
            
            Write-Host `n"Results stored in the variable: dcDiagResults"`n
            Write-Host -NoNewLine "Type "
            Write-Host -NoNewLine "Load-NinjaCenter " -foregroundcolor $foregroundcolor
            Write-Host -NoNewLine "to load the menu again."`n
        }
        
        "E1" {Forward-Email}
        "E2" {Clear-Forward}
        "E3" {Check-EXRelayIP}
        
        "S1" {
            Connect-NetAppController
        
            Write-Host -NoNewLine "Type "
            Write-Host -NoNewLine "Load-NinjaCenter " -foregroundcolor $foregroundcolor
            Write-Host -NoNewLine "to load the menu again."`n
    }

        {($_ -like "*q*") -or ($_ -eq "")} {
            
            Write-Host `n"No input or 'q' seen... dropping to shell" -foregroundColor $foregroundColor
            Write-Host "Type Load-NinjaCenter to load them menu again"`n
            
            
        }          
            
    }
    ##########################################
    #        End Ninja Center Menu           #
    ##########################################

}

What you'd do to run it is put it in a module you created and then call the function when the module is imported at the end of your script. Once exited, it could be called by its function name at any time to bring the menu back up.

Some things I've noticed

When I started sharing my scripts this way I noticed that people will find ways to break your code. This is a great way to learn the weak points of your scripts and become even better at writing them. I hope you've found this useful, and as always I appreciate any feedback!

PowerShell: Using the VictorOps REST API and PRTG Sensor Output

PowerShell: Using the VictorOps REST API and PRTG Sensor Output

What's it do?

I utilized the VictorOps REST API with PowerShell to return data in a user readable format, or to use with PRTG sensors.

I wanted a way to display who was currently on call via a PRTG map that other users can publicly access.

Note: This is something I wrote in a day, and it will be evolving into a cleaner, error checked format!

What you'll need

Parameters

-getInfo

  • ack               = List/ack any outstanding alerts. Will prompt for message and confirm before acknowledging.
  • OnCall         = List who is currently on call (must specify team with -team parameter) (compatible with -format parameter and PRTG sensors)
  • UserSched  = Get a user's oncall schedule. Currently best to return this into your own variable for now. (Must specify -user parameter)
  • Upcoming   = See who is on call for a team in the future. (must specify team with -team parameter)
  • Incident       = List all incidents (compatible with -format parameter and PRTG sensors)

-team

  • Specify the name of the team. If you have not setup the switch information later in this script, do so to ensure it lines up.
     

-user

  • Specify the username you're getting info for.

-format

  • Specify 'prtg' for certain -getInfo parameters and it will dump it as PRTG sensor information. Leave blank or specify 'user' to return a human readable response. Use 'raw' to return the raw API data. It would be best to call this script into a variable when doing this. $rawAPI = .\Script-Name.ps1 -getInfo 'oncall' -team 'teamname' -format 'raw' 

Examples

Here is some example output.

 .\Get-VictorOpsInfo.ps1 -getInfo incidents
.\Get-VictorOpsInfo.ps1 -getInfo incidents -format prtg

Setting it up

You'll need your API Key and ID from VictorOps. Once you have that, be sure to set them in the script.

$apiKey = ''
$apiID= ''

You can generate a key in VictorOps by going to "Settings -> API."

Be sure to change this switch to match your team setup in VictorOps.

Switch ($team) {

{$team -like "*team1*"}{

$teamName ='team1name'

}

{$team -like "*team2*"} {

$teamName = 'team2name'

}

}

Your username will be set to the username you're logged into the machine with. This is important to note as it sends username when you use the script to ack alerts. To change this, edit the following (you'll want to do this if your username does not match the one in VictorOps):

$ackUser = (Get-ChildItem ENV:\USERNAME).Value 

PRTG Setup

To use this and report info into PRTG, setup the script and ensure Quest AD PowerShell tools are installed on the PRTG machine. 

  1. Drop the script in your Custom Sensor folder (Example: D:\PRTG Network Monitor\Custom Sensors\EXEXML\)
  2. Setup an "EXE/Script Advanced" sensor on PRTG and name it something like "VictorOps Incidents". Select the script in the drop-down.
  3. In the settings specify the following parameters: -getInfo incidents -format PRTG


You can also setup a sensor for team on call reporting.
To do this, perform the above steps, but specify the parameters -getInfo OnCall -team unix -format prtg. 
 

That will return a sensor that returns a text message of who is on call with their phone number (pulled from AD).

You can then create a map in PRTG of who is on call that can be provided publicly. To get the on call info use the "Status Icons -> Sensor Message only" Properties in the PRTG map builder.

Scanning Interval

Be sure to change the scanning interval in PRTG to something that makes sense. There probably isn't a reason to keep it at every minute, so change it!


The code

<#   
.SYNOPSIS   
   This script utilizes the VictorOps API to return requested information.
.DESCRIPTION 
   This script can be used in various ways. This implementation returns data and interacts with the API to ack alerts. 
   It can also return values which can be used by PRTG sensors.
   
   Variable structure:
    $apiKey       = Your Victor OPs API Key   
    $apiID        = Your Victor OPs API ID
    $baseURL      = The base URL for the VictorOPs API. You shouldn't need to change this. 
    $acceptheader = "application/json" - this default should be fine
    
    The below information is gathered using the above variables.
    
    $headers = @{ 
    'Accept'       = $acceptheader
    'X-VO-Api-Id'  = $apiID
    'X-VO-Api-Key' = $apiKey    
    }
    
    For more info on the VictorOps API, visit https://portal.victorops.com/public/api-docs.html#/.
.PARAMETER getInfo
    Specify the information you'd like returned or action to take.
    
    ack       = List/ack any outstanding alerts
    OnCall    = List who is currently on call (must specify team with -team parameter) (compatible with -format parameter and PRTG sensors)
    UserSched = Get a user's oncall schedule. Best to return this into your own variable for now. (Must specify -user parameter)
    Upcoming  = See who is on call for a team in the future. (must speficy team with -team parameter)
    Incident  = List all incidents (compatible with -format parameter and PRTG sensors)
 
.PARAMETER team
    Specify the name of the team. If you have not setup the switch information later in this script, do so to ensure it lines up.
    
.PARAMETER user
    Specify the username you're getting info for.

.PARAMETER format
    Specify 'prtg' for certain -getInfo parameters and it will dump it as PRTG sensor information.
    Leave blank or specify 'user' to return a human readable response.
    Use 'raw' to return the raw API data. It would be best to call this script into a variable when doing this. $rawAPI = .\Script-Name.ps1 -getInfo 'oncall' -team 'teamname' -format 'raw' 
    
.NOTES   
    Name: Get-VictorOpsInfo.ps1
    Author: Ginger Ninja (Mike Roberts)
    DateCreated: 1/28/16
.LINK  
    http://www.gngrninja.com/script-ninja/2016/1/28/powershell-using-the-victorops-rest-api   
.EXAMPLE   
    .\Get-VictorOpsInfo.ps1 -getInfo OnCall -team unix
 .Example
    .\Get-VictorOpsInfo.ps1 -getInfo ack
#> 
[cmdletbinding()]
param(
    [string]
    $team,
    [string]
    $getInfo = 'notset',
    [string]
    $user,
    [string]
    $format = 'user'
)

if (!((Get-PSSnapin -name "Quest.ActiveRoles.ADManagement" -ea SilentlyContinue).name -eq "Quest.ActiveRoles.ADManagement")) {
  
        Write-Host `n"Loading Quest Active Directory Tools Snapin..."`n -ForegroundColor $foregroundColor
     
        Add-PSSnapin Quest.ActiveRoles.ADManagement | Out-Null
    }  if(!$?) {

        Write-Host `n"You need to install Quest Active Directory Tools Snapin from http://software.dell.com/products/activeroles-server/powershell.aspx"`n -ForegroundColor Red

        Start-Process "http://software.dell.com/products/activeroles-server/powershell.aspx"
        Break;
}

$scriptName   = $myInvocation.MyCommand
$path         = Split-Path -Path $MyInvocation.MyCommand.Path
$apiKey       = 'yourAPIKey'
$apiID        = 'Your API ID'
$baseURL      = 'https://api.victorops.com' 
$acceptheader = "application/json"

$headers = @{
    'Accept'       = $acceptheader
    'X-VO-Api-Id'  = $apiID
    'X-VO-Api-Key' = $apiKey
}

function Get-OnCallSchedule {
    [cmdletbinding()]
    param(
        [string]
        $baseURL,
        [string]
        $onCallURL
    )
    

    $fullURL = $baseURL + $onCallURL
    
    if ($fullURL) {
        
        $onCallSchedule = Invoke-RestMethod $fullURL -Headers $headers
        
    }
    
    return $onCallSchedule
    
}

function Get-Incident {
    [cmdletbinding()]
    param($baseURL)
    
    $incidentURL     = '/api-public/v1/incidents'
    $fullURL         = $baseURL + $incidentURL
    $onCallIncidents = (Invoke-RestMethod $fullURL -Headers $headers).Incidents

    Return $onCallIncidents
    
}

function Resolve-Incident {
    [cmdletbinding()]
    param ($baseURL)

    $incidents = Get-Incident $baseURL
    
    $i = 0
    #Switch for current phase?
    foreach ($in in $incidents) {
        
        if ($in.currentPhase -like 'UNACKED') {
            
            $i++
            
            $ackURL  = "/api-public/v1/incidents/ack"
            
            $fullURL = $baseURL + $ackURL
            
            Write-Host $in.EntityDisplayName
            Write-Host $in.incidentNumber
            
            $inName = $in.EntityDisplayName
            $inNum  = $in.incidentNumber
            
            Write-Host $fullURL
            
            if ((Read-Host "Ack this alert?") -like "*y*") {       
    
                $ackUser = (Get-ChildItem ENV:\USERNAME).Value  
                $ackMsg  = Read-Host "Ack message?"    
                $outputString = $null
                $outputString = "{
                `"userName`": `"$ackUser`",
                `"incidentNames`": [
                `"$inNum`"
                ],
                `"message`": `"$ackMsg`"
                }"

                Invoke-RestMethod -URi $fullURL -Method Patch -contentType "application/json" -Headers $headers -body $outputString
            
            }
           
            } elseif ($in.currentPhase -like 'ACKED') {
                
                $i++
                
                $ackURL  = "/api-public/v1/incidents/resolve"
                
                $fullURL = $baseURL + $ackURL
                
                Write-Host $in.EntityDisplayName
                Write-Host $in.incidentNumber
                
                $inName = $in.EntityDisplayName
                $inNum  = $in.incidentNumber
                
                if ((Read-Host "Resolve this alert?") -like "*y*") {       
        
                    $ackUser = (Get-ChildItem ENV:\USERNAME).Value  
                    $ackMsg  = Read-Host "Resolution message?"    
                    $outputString = $null
                    $outputString = "{
                    `"userName`": `"$ackUser`",
                    `"incidentNames`": [
                    `"$inNum`"
                    ],
                    `"message`": `"$ackMsg`"
                    }"

                    Invoke-RestMethod -URi $fullURL -Method Patch -contentType "application/json" -Headers $headers -body $outputString
                 
                } 
           }   
    }
    
    if ($i -eq 0) { Write-Host "No alerts to ack or resolve!" }
    
}


Switch ($team) {
  
    {$team -like "*team1*"}  {
        
        $teamName ='team1fullname'
    
    }

    {$team -like "*team2*"} {
        
        $teamName = 'team2fullname'
    
    }  
    
}

Switch ($getInfo) {
    
    {$_ -like "OnCall"} {
       
        if (!$team) {Write-Host `n"Team not specified!"`n -foregroundcolor Red;break}
        
        $onCallURL      = "/api-public/v1/team/$teamName/oncall/schedule"
        $onCallSchedule = Get-OnCallSchedule $baseurl $oncallurl  
        
        if (!$onCallSchedule.Schedule.overrideOnCall) {
    
            $onCallUser     = Get-QADuser $onCallSchedule.Schedule.onCall
           
        } else {
            
             $onCallUser     = Get-QADuser $onCallSchedule.Schedule.overrideOnCall
            
        }        
        
        if ($onCallUser) {
           
            $name   = $onCallUser.Name
            $mobile =  $onCalluser.MobilePhone
        
            Switch ($format) {
         
                {$_ -eq 'user'} {
                 
                    Write-Host `n"Currently on call for team: $team"
                    Write-Host $name "($mobile)"`n
                 
                }
             
                {$_ -eq 'prtg'} {
             
                    Write-Host "<prtg>"                     
                    Write-Host
                    "<result>"
                    "<channel>Team: $team</channel>"
                    "<value>1</value>"
                    "</result>" 
                    "<text>$name ($mobile)</text>"
                    Write-Host "</prtg>"
                    
                }
                
                {$_ -eq 'raw'} {
             
                    Return $onCallSchedule
                    
                }           
             }
         
         }
    }  
  
  {$_ -like "*Upcoming*"} {

        if (!$team) {Write-Host `n"Team not specified!"`n -foregroundcolor Red;break}
        
        $onCallURL      = "/api-public/v1/team/$teamName/oncall/schedule"
        $onCallSchedule = Get-OnCallSchedule $baseurl $oncallurl  
        $upcoming       = $onCallSchedule.schedule.rolls
        
        $upcoming | ForEach-Object{$WeekOf = $_.change.SubString(0,10);$Who = (Get-QADUser $_.OnCall).Name; Write-Host $WeekOf $Who}
          
  } 
  
  {$_ -like "*incidents*"} {
      
        $incidents = Get-Incident $baseURL
        #Maybe make this a switch...
        $unAcked   = $incidents | Where-Object{$_.currentPhase -eq 'UNACKED'}
        $unRes     = $incidents | Where-Object{$_.currentPhase -eq 'ACKED'}
        $resAlerts = $incidents | Where-Object{$_.currentPhase -eq 'RESOLVED'}
        
        if ($unAcked) {
            
            $counta = 1
            if ($unAcked.Count) {$counta = $unAcked.Count}
            $texta    = $unAcked.entityDisplayName 
          
        } else {$counta = 0;$texta = "No alarms in VictorOps!" }
        
        if ($unRes) {
            
            $countr = 1
            if ($unRes.Count) {$countr = $unRes.Count}
            $texta    = "Alert list: " + $unRes.entityDisplayName 
          
        } else {$countr = 0}  
              
        if ($resAlerts) {
       
            $countre = 1
            if ($resAlerts.Count) {$countre = $resAlerts.Count} 
          
        } else {$countre = 0}          
        
        Switch ($format) {
            
            {$_ -eq 'prtg'} {
                
                Write-Host "<prtg>"    
                                 
                Write-Host
                "<result>"
                "<channel>Unacknowledged Alerts</channel>"
                "<value>$counta</value>"
                "</result>" 
                "<text>$texta</text>"
            
                Write-Host
                "<result>"
                "<channel>Unresolved Alerts</channel>"
                "<value>$countr</value>"
                "</result>" 
                "<text>$textr</text>"
        
                Write-Host
                "<result>"
                "<channel>Resolved Alerts</channel>"
                "<value>$countre</value>"
                "</result>" 
                "<text>$textre</text>"
                
                Write-Host "</prtg>"        
                     
            }
            
            {$_ -eq 'user'} {
                
                Write-Host `n"Unacknowledged Alerts" 
                Write-Host `t$counta `n -foregroundcolor Red
                
                Write-Host "List:"`n
                
                foreach ($alert in $unAcked) {
                
                   Write-Host `t $alert.entityDisplayName `n
                
                }                
                
                Write-Host "Unresolved Alerts" 
                Write-Host `t$countr `n -foregroundcolor Red

                Write-Host "List:"`n
                
                foreach ($alert in $unRes) {
                
                   Write-Host `t $alert.entityDisplayName `n
                
                }

                
                Write-Host "Resolved Alerts" 
                Write-Host `t$countre`n -foregroundcolor Green
                
                Write-Host "List:"`n
                
                foreach ($alert in $resAlerts) {
                
                   Write-Host `t $alert.entityDisplayName `n
                
                }
            }
            
            {$_ -eq 'raw'} {
                
                Return $incidents 
             
            }            
            
        }

        
  }
  
  {$_ -like "*usersched*"} {
      
        if ($user) {
      
            $onCallURL      = "/api-public/v1/user/$user/oncall/schedule"
            $onCallSchedule = Get-OnCallSchedule $baseurl $oncallurl
            Return $onCallSchedule

        } else {Write-Host `n"User not specified!"`n -foregroundcolor Red}
  }
  
  {$_ -like "ack"} {
      
      Resolve-Incident $baseURL
      
  }
   
  {$_ -eq 'notset'} {
      
      Write-Host `n"Please specify the action you'd like to take via the -getInfo parameter" -foregroundColor Red
      Write-Host "For help type Get-Help $path\$scriptName"`n
      
  } 
                    
}

Have any ideas on how to use this, or general feedback? Leave a comment!