
Getting Started - Importing, Using, and Exporting Data
Welcome to my Getting Started with Windows PowerShell series!
In case you missed the earlier posts, you can check them out here:
We will be exploring:
Updated to reflect changes in what list type you should use.
Example:
Do use:
[Collections.Generic.List[PSCustomObject]]$resultsArray = @()Don’t use:
[System.Collections.ArrayList]$resultsArray = @()The reasoning behind this can be read, here: https://docs.microsoft.com/en-us/dotnet/api/system.collections.arraylist?view=netframework-4.8
Importing Data Into PowerShell
PowerShell offers a variety of ways to import data. I will be going over just a few of the ways in this article, but a lot of the concepts stay the same no matter which way you need to use. Remember that at the end of the day, the best way is the one that gets the job done for you!
The general guideline I follow is:
Import the data
Validate the data
Iterate through the data and take actions
Export data when needed
Text Files
While this method isn't as structured as others, it can really be handy in a pinch. You can copy and paste a list of users, computers, or anything else you want to iterate through, and then save it as a text file. Once you have a file, you can use PowerShell to import the contents.
For this example, I will import the contents of Cities.txt, seen here:

I'll use Get-Content to store the contents of the file in the variable $Cities.
$Cities = Get-Content .\Cities.txt
Let's take a look at the $Cities variable.

The contents have been successfully imported. We can see what type of object we're working with by piping $Cities to Get-Member.
$Cities | Get-Member

Looks like we're working with an array of strings. We can see this by using the Count property, as well as taking a look at the first value in the array, which would be reflected as $Cities[0].

CSV Files
PowerShell works nicely with CSV files. This method of importing data is a bit more structured, and overall is very clean. The headers of the CSV file will be imported as properties, and we'll take a look at that after we import the contents.
For this example I will import a CSV file that contains a list of users that HR wants us to create in our environment. I will use the command Import-CSV, and store the contents in the variable $Users.
Here is what the CSV file looks like:

Let's go ahead and import the CSV now.
$Users = Import-CSV .\ADUsers.csv
Now let's see what $Users contains.

Awesome! We even have some properties now. Let's see what we have when we pipe $Users to Get-Member.

Looks like CSVs are imported into a custom object, which we can then use as needed!
We can use the Count property to get the number of users imported, as well as take a look at the first value ($Users[0]) of the array.

CliXML Files
CliXML files in PowerShell are a special type of XML file that represent object(s) that have been exported. This is extremely handy when you need to export an object that you'll later want to import into PowerShell. You are also able to export information as CliXML that contains credentials, securely.
Using CliXML is the best way to export/import objects that you are going to use directly in PowerShell.
For this example, I will import a CliXML file I exported, which contains the results of Get-Process.
Here is the file:

Another benefit of CliXML is it maintains hierarchies. Let's import this content into the variable $Processes, via Import-Clixml.
$Processes = Import-Clixml .\Processes.xml
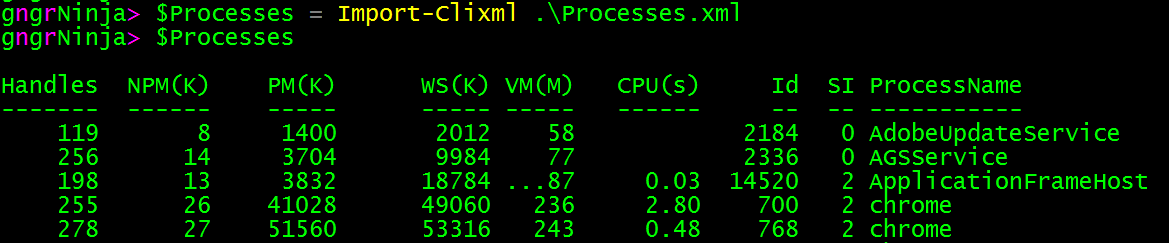
Success! We can see the objects stored in the $Processes variable.
Let's pipe $Processes to Get-Member and see what we have.
$Processes | Get-Member

Our object TypeName will have the saved object type appended to "Deserialized", and in our case that is "Deserialized.System.Diagnostics.Process".
We can use the Count property to get the number of objects in $Processes, as well as look at the first value by using $Processes[0].

Validation
After we import the information into PowerShell, validating it is the next important step. I went over some basic examples in my article on error handling. In this article we will be going further into how to validate data.
Text Files
There are a few different ways to validate information in text files. Using our example of importing cities from above, here is what our $Cities variable contains:

What problems can you spot with this? I see two!
$3477|3 is not a city
There seem to be some blank spaces at the end (Carriage returns)
Blank spaces can do some not-so-awesome things in scripts.
The easy fix for this script, since we're looking for city names, is to use the following regular expression, with the -match comparison operator: [a-z]. If you're not familiar with regular expressions, they can seem confusing at first. This basically says match any characters a-z.
Visit http://regexone.com/ to learn more about Regex, I've found it to be a great resource.
Let's re-declare our variable, using itself, Where-Object, and -match.
$Cities = $Cities | Where-Object {$_ -match '[a-z]'}
Now let's see the contents of $Cities.

That looks much better!
CSV/CliXML
Validating data from importing CSVs or CliXML files is a similar process. Since we'll have properties to work with, and values for each of those properties, the logic can become a bit more complex.
One way to handle it would be to not handle it up front, but to use some error handling, and catch any errors if they occur due to incomplete/invalid data.
While that will technically work... you can catch invalid or incomplete data another way.
In this example we'll be using the CSV file from earlier, and it's contents (with one addition, a test user with some missing information).
Here's our imported test data:

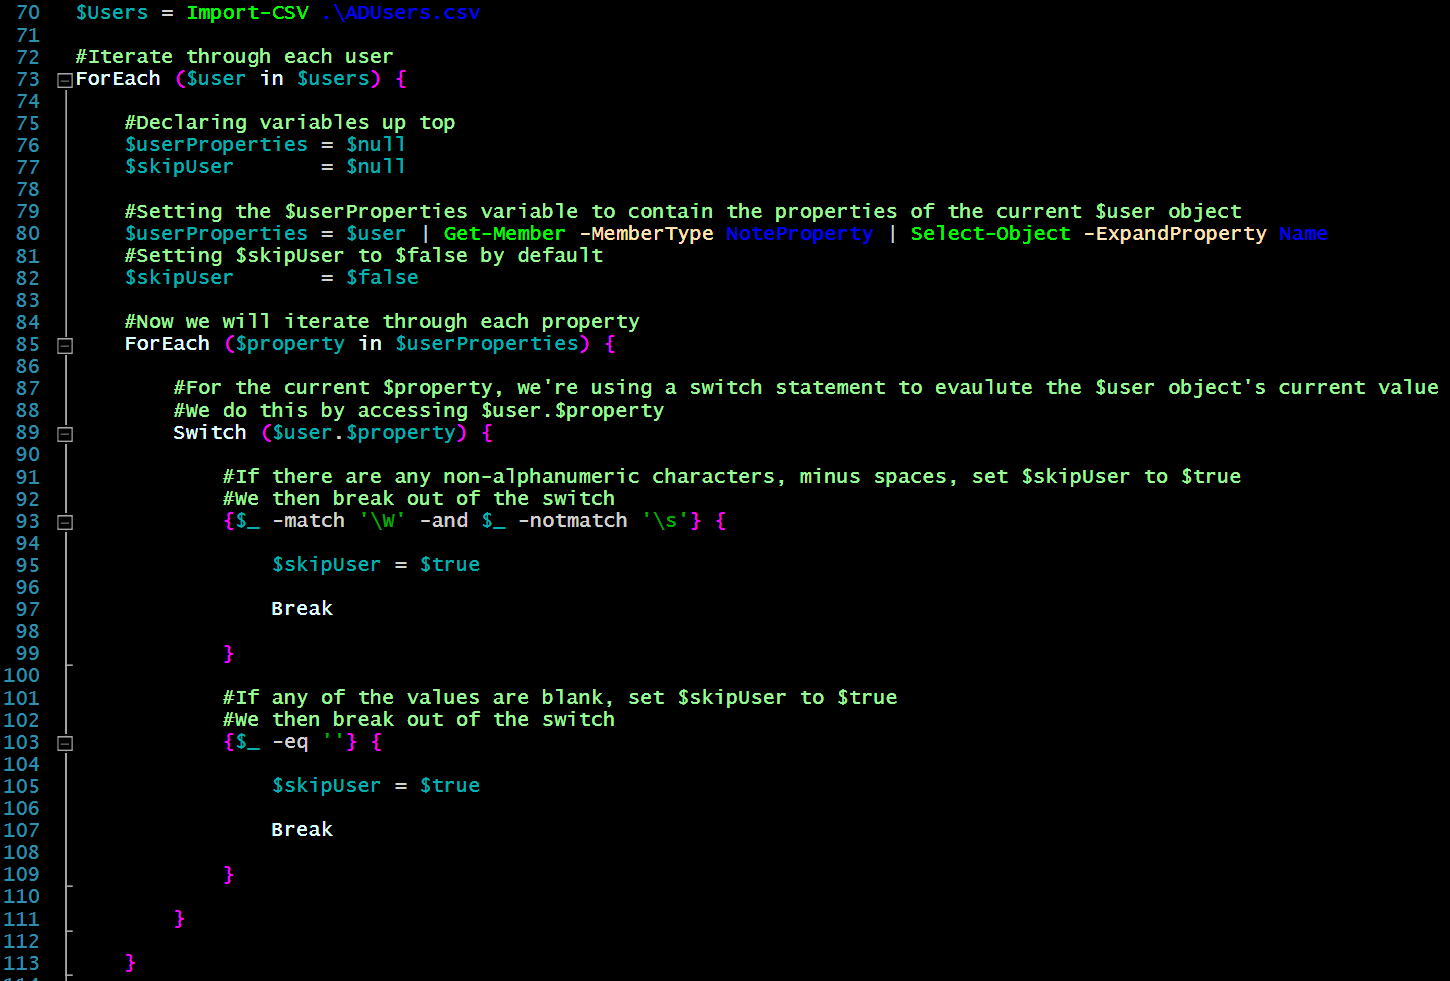
I'll now use the following code to validate the data:
#Iterate through each user
ForEach ($user in $users) {

    #Declaring variables up top
    $userProperties = $null
    $skipUser       = $null

    #Setting the $userProperties variable to contain the properties of the current $user object
    $userProperties = $user | Get-Member -MemberType NoteProperty | Select-Object -ExpandProperty Name
    #Setting $skipUser to $false by default
    $skipUser       = $false

    #Now we will iterate through each property
    ForEach ($property in $userProperties) {

        #For the current $property, we're using a switch statement to evaulute the $user object's current value
        #We do this by accessing $user.$property
        Switch ($user.$property) {

            #If there are any non-alphanumeric characters, minus spaces, set $skipUser to $true
            #We then break out of the switch
            {$_ -match '\W' -and $_ -notmatch '\s'} {

                $skipUser = $true

                Break

            }

            #If any of the values are blank, set $skipUser to $true
            #We then break out of the switch
            {$_ -eq ''} {

                $skipUser = $true

                Break

            }

        }

    }

    #If $skipUser is $false, perform this action
    if (!$skipUser) {

        Write-Host "Processing $($user | Out-String)"
        #Processing code here

    #Else (basically if $skipUser is $true), perform this action
    } else {

        Write-Host "Skipping $($user | Out-String)"
        #Skipping code here

    }

}
I use a couple different loops, a switch statement, regex, and an if statement to validate the data. I've added comments to the above code so you can better understand what is happening.
Let's take a look at the results:
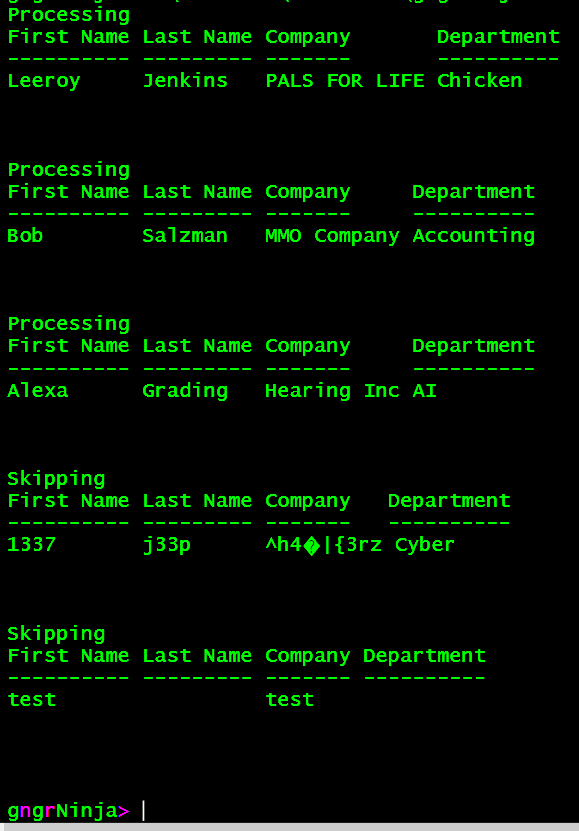
Perfect! The two that we'd expect to be skipped, are indeed skipped.
Iterating Through Data
Iterating through data in PowerShell typically involves using loops. While I have gone over loops in a previous article, I will cover how they apply to our examples above.
Text Files
Let's expand upon our example from validating Text Files above. We have the following cities in $Cities:

Let's iterate through them, and just for fun, return some information from Weather Underground's free autocomplete API for each one.
[Collections.Generic.List[PSCustomObject]]$apiDataArray = @()

ForEach ($city in $Cities) {

    $apiURL         = $null
    $cityName       = $null
    $apiData        = $null
    $cityDataObject = $null

    $cityName       = $city
    $apiURL         = "http://autocomplete.wunderground.com/aq?query=$cityName"
    $apiData        = Invoke-RestMethod -Uri $apiURL

    $cityDataObject = [PSCustomObject]@{

        CityName = $cityName
        APIData  = $apiData

    }

    $apiDataArray.Add($cityDataObject) | Out-Null

}
In the above example I use a ForEach loop, Invoke-RestMethod, and a PS Custom Object.
Let's take a look at the results in $apiDataArray!

We now have an array of cities, and their associated API data. Let's dig into the data for Chicago.

Hmm, looks like we'll need to access the RESULTS property.

The API returned the results in an array for what it found when we gave it the value of Chicago for the city name. The first object in the array is the closest match. Let's access that!

There we go, data we can use.
CSV/CliXML Files
We'll be using the CSV information we validated earlier in this example. We pretty much demonstrated iterating through it when we validated it. However, I'd like to take that example further to demonstrate a few things, and put a lot of the concepts I've been going over together!
For this example I will iterate through the contents of the CSV file, and perform the following actions:
Create an array to store objects in
Validate information
Attempt to create the user in my Active Directory lab environment
Capture all results in an object
Add the object to the array
Return the object array
Here is the code (I've added comments so you can understand what is happening, every step of the way):
#Import users and create an array to store the results in
$Users                                                  = Import-CSV .\ADUsers.csv
[Collections.Generic.List[PSCustomObject]]$resultsArray = @()

#if $Users exists
if ($Users) {

    #Iterate through each user
    ForEach ($user in $users) {

        #Declaring variables up top
        $userProperties = $null
        $skipUser       = $null
        $samAccountName = $null
        $createUser     = $null
        $userName       = $null
        $resultsObject  = $null
        $csvValidation  = $null

        #Setting the $userProperties variable to contain the properties of the current $user object
        $userProperties = $user | Get-Member -MemberType NoteProperty | Select-Object -ExpandProperty Name

        #Setting $skipUser to $false by default
        $skipUser       = $false

        #Now we will iterate through each property
        ForEach ($property in $userProperties) {

            #For the current $property, we're using a switch statement to evaulute the $user object's current value
            #We do this by accessing $user.$property
            Switch ($user.$property) {

                #If there are any non-alphanumeric characters, minus spaces, set $skipUser to $true
                #Set $csvValidation to the property we found an issue with
                #We then break out of the switch
                {$_ -match '\W' -and $_ -notmatch '\s'} {

                    $skipUser      = $true
                    $csvValidation = "Invalid characters in [$property]"

                    Break

                }

                #If any of the values are blank, set $skipUser to $true
                #Set $csvValidation to the property we found an issue with
                #We then break out of the switch
                {$_ -eq ''} {

                    $skipUser      = $true
                    $csvValidation = "Empty value for [$property]"

                    Break

                }

            }

        }

        #If $skipUser is $false, perform this action
        if (!$skipUser) {

            #Set the name of the user in $userName using first and last name from CSV
            $userName = "$($user.'First Name') $($user.'Last Name')"

            #Set $adServer with the hostname of a domain controller
            $adServer = (Get-ADDomainController).HostName

            Write-Host "Creating AD account for $userName..."`n

            #Set $samAccountName variable with first initial+lastName.
            $samAccountName = ($user.'First Name'.Substring(0,1) + $user.'Last Name').ToLower()

            Try {

                #Store created AD User object results in $createUser via New-ADUser with -PassThru, then use that with the other AD commands
                $createUser = New-ADUser -Company:$user.Company -Department:$user.Department -DisplayName:$userName -GivenName:$user.'First Name' -Name:$userName -Path:"OU=Users,OU=Accounts,DC=gngrninja,DC=com" -SamAccountName:$samAccountName -Server:$adServer -Surname:"$($user.'Last Name')" -Type:"user" -UserPrincipalName:"$samAccountName@gngrninja.com" -PassThru

                #Set the password for the account. You would want to use a more secure method than this for the password, however :). Flag for reset on new logon
                Set-ADAccountPassword -Identity:$createUser -NewPassword:('p@$$w0rd' | ConvertTo-SecureString -AsplainText -Force) -Reset:$true -Server:$adServer

                #Set more password options
                Set-ADAccountControl  -Identity:$createUser -AccountNotDelegated:$false -AllowReversiblePasswordEncryption:$false -CannotChangePassword:$false -DoesNotRequirePreAuth:$false -PasswordNeverExpires:$false -Server:$adServer -UseDESKeyOnly:$false

                #Enable the account
                Enable-ADAccount      -Identity:$createUser -Server:$adServer

                #Perform action if account exists in AD
                if (Get-ADUser $createUser -Server $adServer) {

                    Write-Host "User [$($createUser.Name)] verified to exist in AD!"`n -ForegroundColor Green -BackgroundColor Black

                    $resultsObject = [PSCustomObject]@{

                        UserName         = $createUser.Name
                        AccountCreated   = $true
                        ErrorMessage     = 'N/A'

                    }

                #Perform action if account is not found in AD
                } else {

                    Write-Host "User [$userName] not found in AD... something went wrong!"`n -ForegroundColor Red -BackgroundColor DarkBlue

                    $resultsObject = [PSCustomObject]@{

                        UserName         = $userName
                        AccountCreated   = $false
                        ErrorMessage     = 'Account not found in AD!'

                    }

                }

                #Add results object to $resultsArray
                $resultsArray.Add($resultsObject) | Out-Null

            }

            #Catch account already exists exception
            Catch [Microsoft.ActiveDirectory.Management.ADIdentityAlreadyExistsException] {

                Write-Host "User [$userName] already exists in AD!"`n -ForegroundColor Red -BackgroundColor DarkBlue

                $resultsObject = [PSCustomObject]@{

                        UserName         = $userName
                        AccountCreated   = $false
                        ErrorMessage     = 'Account already exists in AD!'

                }

                #Add results object to $resultsArray
                $resultsArray.Add($resultsObject) | Out-Null

            }

            Catch {

                Write-Host "Error [$($_.Exception.Message)] occured when attempting to create [$userName]!"`n -ForegroundColor Red -BackgroundColor DarkBlue

                $resultsObject = [PSCustomObject]@{

                        UserName         = $userName
                        AccountCreated   = $false
                        ErrorMessage     = $_.Exception.Message

                }

                #Add results object to $resultsArray
                $resultsArray.Add($resultsObject) | Out-Null

            }

        #Else (basically if $skipUser is $true), perform this action
        } else {

            $userName = "$($user.'First Name') $($user.'Last Name')"
            Write-Host "Skipping $userName..."

            $resultsObject = [PSCustomObject]@{

                    UserName         = $userName
                    AccountCreated   = $false
                    ErrorMessage     = "Error validating data: [$csvValidation]!"

             }

             #Add results object to $resultsArray
             $resultsArray.Add($resultsObject) | Out-Null

        }

    }

}

#Return the $resultsArray array of objects
Return $resultsArray
Let's run this on a remote session to my lab's Domain Controller, and see what happens! I've saved the script as Invoke-NewUserCreation.ps1, in a directory that also contains a CSV of the users.

Since I return the object array of results, I will use the following command to run the script and store the results:
$createUsers = .\Invoke-NewUserCreation.ps1

There you can see some of what is happening, because I used the evil Write-Host command to display information usefully :)
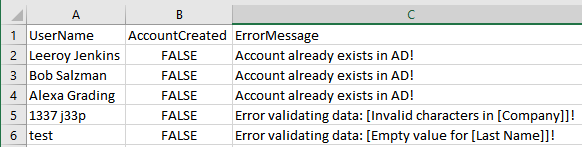
However, the real power comes with the object we have now (which has detailed results). Let's take a look at $createUsers.
$createUsers | Format-Table -AutoSize

Here you can see all the information regarding what happened. We can even see where the first validation errors occurred for the users that were skipped.
Here is a screenshot of Active Directory Users and Computers on that Domain, showing the results:

Let's run the script again, to see what happens!
$createUsers = .\Invoke-NewUserCreation.ps1

Those errors were to be expected! Now let's see the object...
$createUsers | Format-Table -AutoSize

Now the object contains the error message stating the user account already exists.
Exporting Data
We've gone over importing, validating, and iterating through data. Now let's see what we need to do to export it!
Text Files
This is the simplest of the bunch. In this example I will use Get-Process to get a list of process names, and then export that to Processes.txt.
Get-Process | Select-Object -ExpandProperty Name | Out-File .\Processes.txt

Let's make sure the file exists, and that it has content!


Sure enough, it does!
CSV Files
Exporting to CSV allows for better readability, and also works to import the data into other systems. The readability can also be used for reporting purposes.

Let's export that to a CSV via the Export-Csv command. We will want to be sure to use the parameter -NoTypeInformation, as that will prevent PowerShell from also outputting the object's top information on top of the CSV (which we don't want!).
$createUsers | Export-Csv -NoTypeInformation (".\ADresults{0:MMddyy_HHmm}.csv" -f (Get-Date))
Let's see if the file exists...

There it is! Let's take a look at the contents.
We have data, and it is ours to pretty up.
CliXML Files
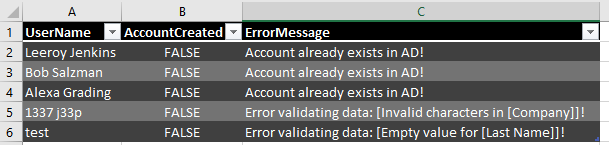
I love CliXML files. I use them a lot, and they can really save you some time. We'll use the $createUsers object we used earlier, which contains the following information:

Now I will export that to an XML file via Export-Clixml.
$createUsers | Export-Clixml (".\ADresults{0:MMddyy_HHmm}.xml" -f (Get-Date))

Let's ensure the file exists:

For good measure, let's import the Clixml file and then compare the original object and imported object side-by-side:
$createUsersCopy = Import-Clixml .\ADresults062716_2041.xml

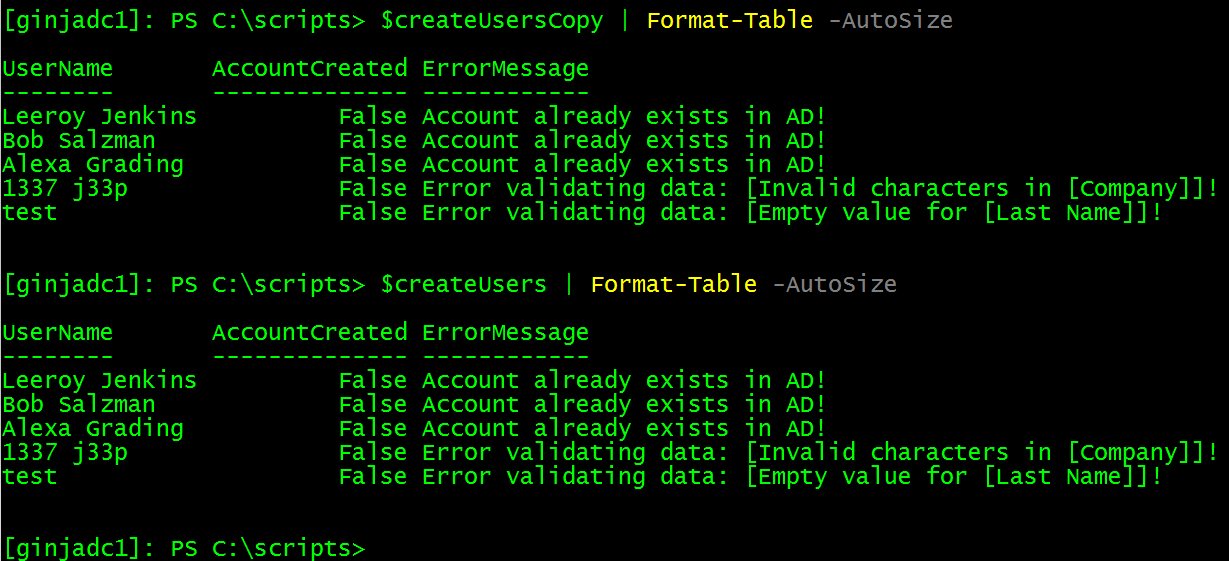
There you have it, they are identical! The CliXML commands provide an excellent method for storing PowerShell objects.
Homework
How could we have automatically made the CSV iteration example export the results to a CSV?
How about to CliXML?
What ways can you benefit from validation in your code?
I hope you've enjoyed the series so far! As always, leave a comment if you have any feedback or questions!
-Ginger Ninja