

Getting Started - Basics and Environment Customization
Welcome to my Getting Started with Windows PowerShell series!
We will be exploring:
Customizing your PowerShell experience, and making it feel like home.
A new home at least, and an extremely powerful one at that!
Update 4/24/19: Look for some of these series pages to get revamped. PowerShell Core is making waves! If you haven’t checked it out, you should.
Looking to get started with Visual Studio Code + PowerShell? Check out this post:

Just What is PowerShell?
PowerShell is a framework provided by Microsoft that provides a platform for automation, general scripting, and well just about anything you can imagine doing with it. It's based on .NET, and has hooks into pretty much anything Windows can do. There are a lot of new things introduced with PowerShell, and it is ever evolving. You can also still use old commands you're familiar with like ping, but you have much more powerful options at your finger tips (like Test-Connection). If you'd like a deeper dive into what PowerShell is, check out Microsoft's Scripting Guy's post, here.
PowerShell is an object-oriented programming language with a ton of features. Everything we work with PowerShell is an object one way or another. What this means is we can get information from it via properties, and take actions with it via methods.
You can use PowerShell in two distinct ways.
Interactively, via the shell
This is handy when trying to figure something out, and to troubleshoot issues
As a scripting language
You can use editors such as the PowerShell ISE to create powerful scripts
Visual Studio Code is another great choice, and seems to be where most people are moving to. Setting it up is a bit more involved, but once things are working it has a ton of great features.
PowerShell also makes it easy to create your own custom objects, more on that in another post!
PowerShell Versions
Here's the breakdown:
Windows 7 comes with Windows PowerShell version 2.0 installed by default. If you're still running Windows 7, and want to try out the latest version of PowerShell (currently 5.0), you'll need to install the Windows Management Framework update
Windows 8 versioning is a bit strange
You can run PowerShell 2.0-3.0
You cannot run PowerShell 4.0+
Windows 8.1 let's you run version 5.0
Windows 10 comes with PowerShell version 5.0 installed by default, and if you're all updated (which it is hard not to be with how Windows 10 updates work...) version 5.1+ will be available
If for some reason you're using a machine running Windows XP, PowerShell 2.0 will work with this download.
PowerShell Core
PowerShell core heralds the open sourcing of PowerShell, check it out on Github! You can even run it on your Raspberry Pi.
How can I check what version I have?
Well, first you'll have to open PowerShell.
Hit the Windows key or click the Start icon/button.
Type in 'PowerShell', and select 'Windows PowerShell'
I recommend pinning PowerShell to your taskbar as well. This makes it really easy to launch.


PowerShell stores the version in a special variable dedicated to host information. This variable is aptly named $host. To see the value of this variable, type $host into your console and press enter. You should see a similar result to this:

If you simply wanted to return the latest version, try typing $host.Version to display the Version property only.

Finally, if you want to just return the Major Version, use $host.Version.Major.

For a more detailed write up on versions and supported OSs, see this post at 4sysops.
How PowerShell Works
PowerShell works by executing commands, and then provides you a way to interpreting the results. Everything in PowerShell either is or becomes an object in one way or another. Think of an object in this instance as something you can take action on via methods, and get information from via properties.
Let's learn some more basics before we go about customizing our environment. Don't worry too much about grasping terminology! With PowerShell especially, learning by doing is where it's at.
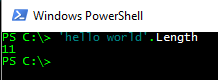
'Hello World'
Even the simplest thing in PowerShell, such as 'Hello World', becomes an object you can take action on. Go ahead and type the following command in PowerShell:
'hello world'.Length
The above example should return 11, as seen below.
Since 'Hello World' is an object, we can pipe it via "|" to Get-Member to see what we can do with it. Piping in PowerShell is the act of adding the "|" character to take the results of the input before it, and pass that over to the next command. Let's go ahead and run this:
'Hello World' | Get-MemberYou should see the following:

You can see that the object Type is of System.String, and below that the various methods and properties. To use them, simply add a dot after 'Hello World' and specify the one you'd like to use. For instance, I wonder what ToUpper does. Let's see!
'Hello World'.ToUpper
Hmm... that looks a little weird. That's because to execute the method, you need to put a pair of parentheses after it. Sometimes you can include different values in the parentheses to include overload options. What we're seeing here is the definition of those options for .ToUpper(). For this example we can just use:
'Hello World'.ToUpper()
Get-Member will likely be one of the handiest cmdlets you will use. It lets you know what properties and methods the object contains.
Now that we've covered some basics, let's get back to checking out...
Ping vs Test-Connection
Let's ping google.com via PowerShell.
Ping Google.com
Alright, pretty standard! Let's see what Test-Connection Google.com does.
Test-Connection Google.com
Now that looks a little bit different. So what's so special about Test-Connection? To see what else Test-Connection can do and the options it provides, use:
Get-Help Test-Connection
Notice under REMARKS it states that I don't have the help files stored on my computer. To remedy this, right click your PowerShell icon on the taskbar, and go to Run as Administrator. Then use this command:
Update-HelpNow let's see the help for Test-Connection again!
Get-Help Test-Connection

Under the SYNTAX portion you can see that Test-Connection accepts the -ComputerName parameter. This is the one that Google.com was placed into by default. It then specifies what the input is expected to be. This parameter accepts a string, and string array. That is what the [] next to string means. Think of an array as a collection of values.
To see examples of how to run Test-Connection, type:
Get-Help Test-Connection -Examples
Variables
Let's take advantage of the fact that Test-Connection's -ComputerName parameter can accept a string array. To do this, we'll need to create a variable and add some values to it. The best way to create a string array is to use this command:
[System.Collections.ArrayList]$testArray = @()This above code will create an empty array in the variable $testArray. Think of a variable as a container of objects.

Let's add some hosts to this array that we'll want to use with Test-Connection
$testArray.Add('192.168.1.1')
$testArray.Add('google.com')
$testArray.Add('qwertyuiop.asdf') 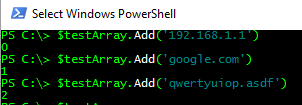
Arrays in PowerShell always start with 0, and when we use the .Add method on this array you can see it outputs the index of the element(value) we are adding. To add an element without seeing that, simply pipe $testArray.Add('yahoo.com') to Out-Null.
$testArray.Add('yahoo.com') | Out-Null
You can see it did not return the index number this time. To display the values in the array, type:
$testArray

OK! Now that we have our array setup, let's use:
Test-Connection -ComputerName $testArray
You can even use Test-Connection with conditional logic.
if (Test-Connection Google.com) {Write-Host "Success!"} 
Since Test-Connection Google.com returned $true, it proceeds to perform the command in the script block {}.
I wonder what happens if you replace Google.com with 'qwertyuiop.asdf'...
Alright! Now that we've gone through some more of the basic concepts, it's time to...
Customize Your Environment
Open up your PowerShell console and Right Click the title bar.
Select Properties.
Select the Font tab to adjust the font.
Select the Colors tab to set the colors you want.


Customizing your profile
PowerShell uses profile files to automatically load a script when you start the PowerShell console.
Let's take a look at the file PowerShell uses for your current user profile on all hosts (meaning the ISE and console). We'll get into the different host types in a different post. The special variable we'll want to look at is $profile, and we'll want to see the CurrentUserAllHosts property.
$profile.CurrentUserAllHosts
It looks like the generic Dell account (my way to have a fresh instance of PowerShell) I'm using would have the profile stored in:
C:\Users\Dell\Documents\WindowsPowerShell\profile.ps1Since the folder and file do not exist, let's use the New-Item cmdlet to create each. Be sure to change the values to match what your result was from the $profile.CurrentUserAllHosts value. Note: the file will still be profile.ps1, and only the user name should change.
New-Item -Path C:\Users\Dell\Documents\ -ItemType Directory -Name WindowsPowerShell
New-Item -Path C:\Users\Dell\Documents\WindowsPowerShell\ -ItemType File -Name profile.ps1
To auto-magically do this, you can use the following commands:
New-Item -Path "$((Get-ChildItem ENV:\UserProfile).Value)\Documents\" -ItemType Directory -Name WindowsPowerShell
New-Item -Path "$((Get-ChildItem ENV:\UserProfile).Value)\Documents\WindowsPowerShell" -ItemType File -Name profile.ps1
Now you should be able to use the Start-Process cmdlet(which opens a file with the associated handler in Windows automatically) to open and edit the profile file.
Start-Process $profile.CurrentUserAllHostsYou should now have a blank text file open with profile.ps1 as the name in the upper left.

Let's add the following code to the profile.ps1 file:
I will detail what this code does in the next post!
$foregroundColor = 'white'
$time = Get-Date
$psVersion= $host.Version.Major
$curUser= (Get-ChildItem Env:\USERNAME).Value
$curComp= (Get-ChildItem Env:\COMPUTERNAME).Value

Write-Host "Greetings, $curUser!" -foregroundColor $foregroundColor
Write-Host "It is: $($time.ToLongDateString())"
Write-Host "You're running PowerShell version: $psVersion" -foregroundColor Green
Write-Host "Your computer name is: $curComp" -foregroundColor Green
Write-Host "Happy scripting!" `n

function Prompt {

$curtime = Get-Date

Write-Host -NoNewLine "p" -foregroundColor $foregroundColor
Write-Host -NoNewLine "$" -foregroundColor Green
Write-Host -NoNewLine "[" -foregroundColor Yellow
Write-Host -NoNewLine ("{0}" -f (Get-Date)) -foregroundColor $foregroundColor
Write-Host -NoNewLine "]" -foregroundColor Yellow
Write-Host -NoNewLine ">" -foregroundColor Red

$host.UI.RawUI.WindowTitle = "PS >> User: $curUser >> Current DIR: $((Get-Location).Path)"

Return " "

}
Once you've added the content, save profile.ps1.
Now close and re-open your PowerShell console.
It should now look similar to this:

Each time you type a command the function named prompt executes and changes both the prompt (to include the current time), and the Window Title (to include the current user and directory).
In the next post I will be going over command discovery and formatting results.
Homework
Try to figure out exactly how the string format operator works in the prompt function to format the time.
Use Get-Command to discover more PowerShell commands.
Find some commands to run (maybe Get-Date)? and Pipe them to Get-Member to see what properties and methods they contain.
Declare a variable and use that variable to use the methods and display the properties available. Hint: $time = Get-Date.
Further customize your profile to change up your prompt and title!
Let me know if you have any questions! Feedback is always appreciated.
-Ginger Ninja